Festive Peppermint Oreo Balls – Easy, Delicious Holiday Treat

If there’s one thing I love about holiday desserts, it’s finding little treats that look beautiful, taste amazing, and don’t require hours in the kitchen. These festive peppermint Oreo balls are exactly that kind of recipe.
They’re made with crushed Oreo cookies, creamy softened cream cheese, a little peppermint flavor, and a smooth chocolate coating. Once dipped and topped with crushed candy canes, they become the prettiest little Christmas treats.
The combination of rich chocolate, sweet cookies, and refreshing peppermint tastes just like the holidays.
The best part? You don’t need an oven, complicated ingredients, or any special baking skills. Everything comes together with a food processor or rolling pin, a mixing bowl, and a little time in the refrigerator.

I especially love making these for Christmas dessert tables, holiday cookie exchanges, family gatherings, and homemade edible gifts. You can prepare them ahead of time, decorate them in different ways, and keep a batch ready whenever you need something sweet to share.
If you’re looking for an easy no-bake Christmas dessert that everyone will want to try, these peppermint Oreo balls deserve a place on your holiday treat list.
Why You’ll Love These Peppermint Oreo Balls

There are plenty of reasons to make these little treats during the holiday season.
- No baking required: You don’t need to turn on your oven. The refrigerator does most of the work.
- Simple ingredients: Oreo cookies, cream cheese, peppermint, chocolate, and candy canes are all you need.
- Perfect holiday flavor: Chocolate and peppermint are such a classic Christmas combination.
- Easy to make ahead: You can prepare the Oreo balls in advance and keep them refrigerated until you’re ready to serve.
- Beautiful for gifting: Package them in small holiday boxes or arrange them on a festive dessert platter.
- Easy to customize: Use white chocolate, milk chocolate, or dark chocolate depending on the look and flavor you prefer.
I also love how easy they are to make in batches. You can prepare one batch for your family and another to share with friends or take to a Christmas party.
Ingredients You’ll Need

You only need a handful of ingredients to make these festive peppermint Oreo balls. Each one has a specific job, so here’s what to know before getting started.
For the Oreo Balls
- 36 Oreo cookies: One standard 14.3-ounce package. Use the regular Oreo cookies, including the cream filling. There’s no need to remove it.
- 8 ounces cream cheese: Use full-fat block cream cheese, softened to room temperature. This helps bind the cookie crumbs into a smooth, rich filling.
- ½ teaspoon peppermint extract: This gives the filling a refreshing holiday flavor. Start with this amount because peppermint extract can become overpowering quickly.
For the Chocolate Coating
- 16 ounces white chocolate or white candy melts: For a snowy white coating that looks beautiful with crushed candy canes.
- Optional milk or dark chocolate: You can use these instead or create a mixture of different chocolate coatings.
- ½ cup crushed candy canes: For decorating the tops of the Oreo balls.
- Extra melted chocolate: Optional, for drizzling over the finished treats.
A Few Ingredient Notes
Oreo cookies: Regular Oreos work best for this recipe because the cookie and cream filling create the right consistency. You don’t need to scrape out the filling before crushing them.
Cream cheese: I recommend using block cream cheese rather than whipped or spreadable cream cheese. Spreadable varieties contain more moisture and can make the mixture too soft to roll.
Peppermint extract: Be careful not to add too much. Peppermint has a strong flavor, and a little goes a long way. You want a refreshing minty taste rather than something that tastes like toothpaste.
Chocolate: White chocolate gives these treats a beautiful Christmas look, especially with red peppermint pieces on top. Candy melts or confectionery coating are also convenient because they’re designed for dipping and tend to be easier to work with.
Candy canes: Crush them into small pieces rather than leaving large chunks. Smaller pieces are easier to sprinkle over the chocolate coating and look prettier on the finished Oreo balls.
How to Make Festive Peppermint Oreo Balls
These peppermint Oreo balls are surprisingly easy to put together. The main trick is allowing enough chilling time so the filling becomes firm before dipping it into the melted chocolate.
Step 1: Crush the Oreo Cookies
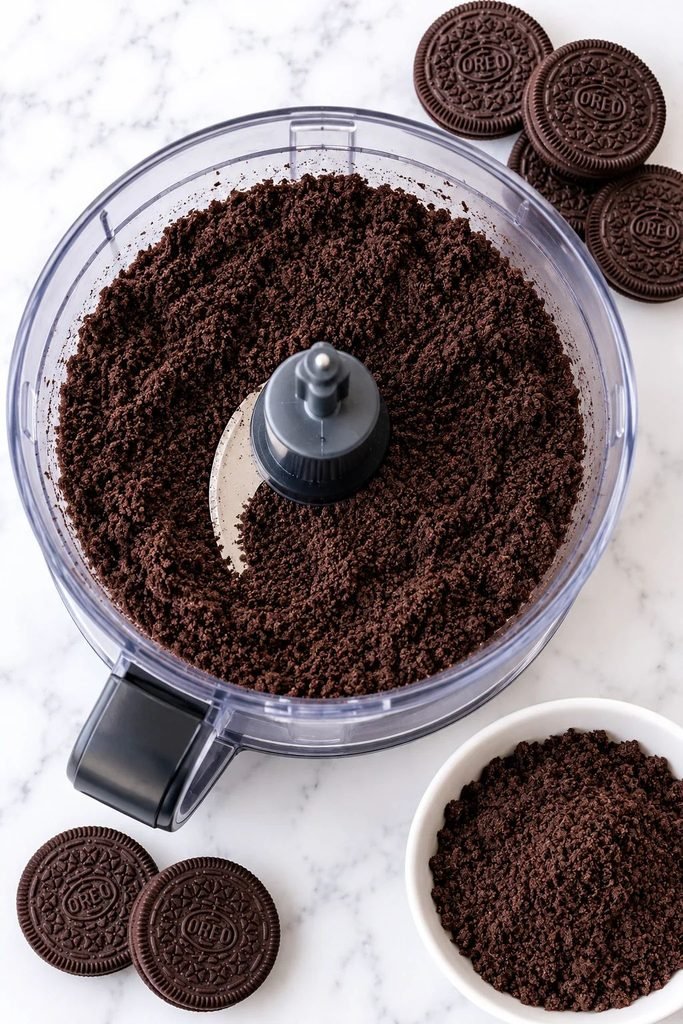
Start by placing all 36 Oreo cookies into a food processor.
Pulse until the cookies become very fine crumbs. You want the mixture to look like dark, even cookie sand, without large pieces remaining.
If you don’t have a food processor, place the cookies inside a large zip-top bag and crush them with a rolling pin. Work in batches if necessary, making sure you break down the cookies as evenly as possible.
Transfer the crushed Oreos to a large mixing bowl.
I recommend crushing the cookies quite finely because this helps the cream cheese bind everything together and gives the finished Oreo balls a smooth, truffle-like texture.
Step 2: Mix the Cream Cheese and Peppermint
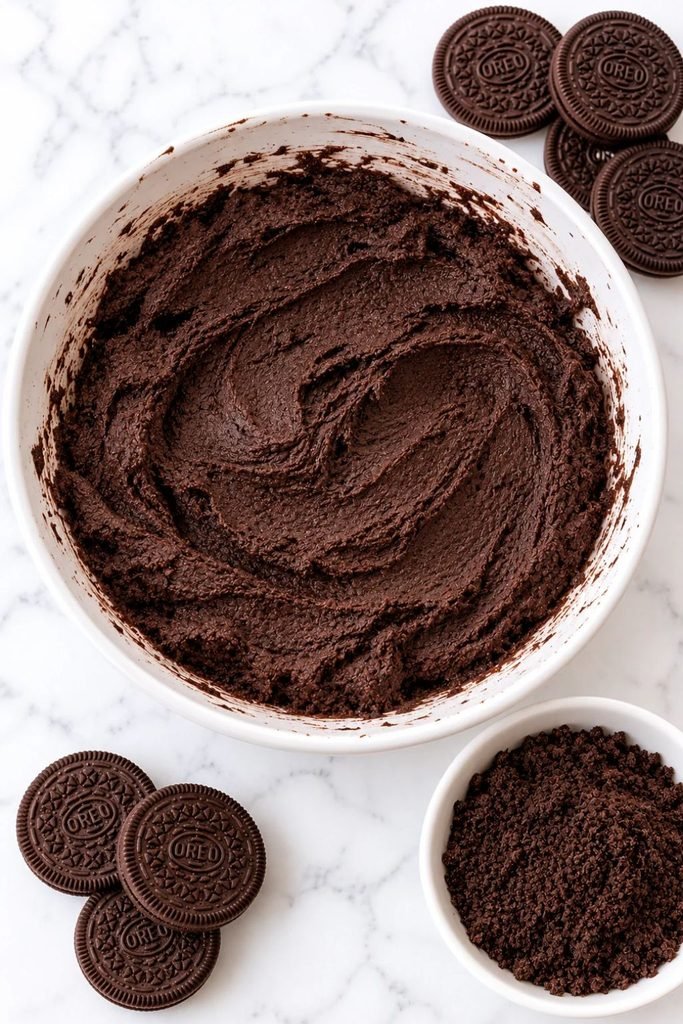
Add the softened cream cheese to the Oreo crumbs.
Pour in the peppermint extract and mix everything together using a sturdy spatula or hand mixer on low speed.
Continue mixing until the cream cheese is evenly distributed and no dry cookie crumbs remain.
The mixture should look dark, thick, and slightly sticky, almost like a soft chocolate dough.
If you notice pockets of plain cream cheese or dry crumbs, keep mixing until everything is combined.
Avoid adding extra cream cheese unless absolutely necessary. Too much moisture can make the mixture difficult to roll and dip.
Step 3: Roll the Mixture Into Balls
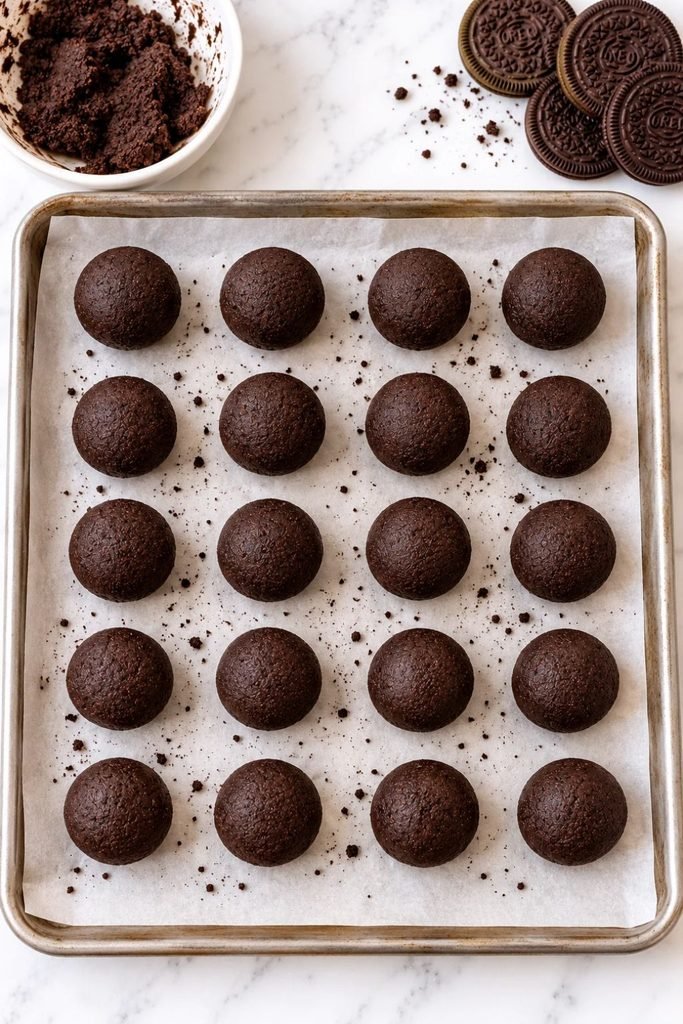
Line a baking sheet or large tray with parchment paper.
Scoop small portions of the Oreo mixture and roll them between your palms to form smooth balls.
For evenly sized treats, use a small cookie scoop. Aim for approximately 1 tablespoon of mixture per ball.
Place each ball on the prepared baking sheet, leaving a little space between them.
Continue until you’ve used all the mixture. Depending on the exact size, you should get approximately 30 to 36 Oreo balls.
If the mixture becomes sticky while rolling, refrigerate it for 10 to 15 minutes before continuing.
Step 4: Chill the Oreo Balls
Once all the balls are shaped, place the baking sheet in the refrigerator for at least 1 hour.
This step is important because the filling needs to become firm before you dip it into the melted chocolate.
If you try dipping soft Oreo balls, they can lose their shape, crumble, or fall apart in the chocolate.
For a quicker option, you can place them in the freezer for approximately 20 to 30 minutes, checking that they’re firm but not frozen solid.
Step 5: Crush the Candy Canes
While the Oreo balls are chilling, prepare the peppermint topping.
Place a few candy canes inside a zip-top bag and gently crush them using a rolling pin or the flat side of a kitchen utensil.
You want a mixture of small peppermint pieces and a little fine candy dust.
Avoid crushing everything into powder because the small red-and-white pieces create a prettier finish.
Transfer the crushed candy canes to a small bowl and set aside.
Step 6: Melt the Chocolate
Add the white chocolate or candy melts to a microwave-safe bowl.
Heat in short intervals of approximately 20 to 30 seconds, stirring well between each interval.
Continue until the chocolate is smooth and completely melted.
Be careful not to overheat it. White chocolate can burn or become thick and grainy if exposed to too much heat.
If your melted chocolate feels too thick for dipping, stir in a small amount of suitable neutral oil or cocoa butter, a little at a time, until it reaches a smoother consistency. Avoid adding water because even a small amount can cause chocolate to seize.
You can also melt the chocolate using a double boiler over gently simmering water. Make sure the bowl doesn’t touch the water and that no steam or water gets into the chocolate.
Step 7: Dip the Oreo Balls in Chocolate

Remove the chilled Oreo balls from the refrigerator.
Using a dipping fork, chocolate dipping tool, or regular fork, lower one ball into the melted chocolate.
Turn it gently until the entire surface is coated.
Lift it out and allow the excess chocolate to drip back into the bowl. You can lightly tap the fork against the edge of the bowl to help remove extra coating.
Carefully transfer the coated Oreo ball back onto the parchment-lined baking sheet.
Repeat with the remaining balls.
If the chocolate starts becoming too thick while you’re working, warm it briefly and stir until smooth again.
Step 8: Add the Crushed Peppermint Topping

This is where the Oreo balls start looking especially festive.
While the chocolate coating is still wet, sprinkle crushed candy cane pieces over the top of each ball.
You can cover just the top or scatter a little around the sides for extra decoration.
Work fairly quickly because the chocolate coating begins to set as it cools. Once it hardens, the peppermint pieces won’t stick as easily.
For an extra decorative finish, you can drizzle a little melted dark chocolate over some of the white chocolate Oreo balls.
Step 9: Let the Chocolate Set
Once all the Oreo balls are coated and decorated, return the baking sheet to the refrigerator.
Chill for approximately 20 to 30 minutes, or until the chocolate coating is completely firm.
Once set, gently remove the Oreo balls from the parchment paper.
They should have a firm chocolate shell with a creamy, chocolate-cookie center and little peppermint pieces on top.
Transfer them to an airtight container or arrange them on your favorite holiday serving platter.
Tips for Making Perfect Peppermint Oreo Balls

Although this is a simple no-bake recipe, a few small details can make the process much easier.
- Use softened cream cheese: Cold cream cheese is harder to mix evenly and can leave little lumps throughout the Oreo mixture.
- Crush the cookies finely: Large cookie pieces can make the filling uneven and harder to roll.
- Chill before dipping: This is one of the most important steps. Firm Oreo balls are much easier to coat without falling apart.
- Use a dipping fork: It allows excess chocolate to drip away and helps create a smoother coating.
- Keep the melted chocolate smooth: Work in short heating intervals and stir frequently to avoid overheating.
- Add the candy canes immediately: Sprinkle the peppermint pieces on while the chocolate is still wet.
- Don’t make the balls too large: Smaller portions are easier to coat and more convenient to serve at parties.
- Keep the peppermint flavor balanced: Start with ½ teaspoon of extract and adjust carefully if you make another batch.
Common Mistakes to Avoid
Adding Too Much Cream Cheese
It can be tempting to add extra cream cheese if the cookie crumbs initially look dry, but too much can make the filling overly soft.
Mix thoroughly before deciding whether anything needs adjusting. The mixture should hold together when pressed between your fingers.
Skipping the Chilling Step
If you dip the Oreo balls while they’re still soft, they may break apart or leave crumbs in your melted chocolate.
Give them enough time in the refrigerator to firm up properly.
Overheating the Chocolate
Chocolate, especially white chocolate, can become thick and difficult to work with if overheated.
Always melt it gradually and stir between heating intervals.
Adding Peppermint Topping Too Late
If you wait until the chocolate coating has already hardened, the crushed candy canes won’t stick.
Decorate each Oreo ball immediately after dipping while the coating is still wet.
Using Large Candy Cane Pieces
Large chunks can fall off the coating and make the treats difficult to bite into.
Crush the candy canes into small pieces for the best appearance and texture.
Easy Variations to Try
One of the best things about Oreo balls is how easily you can change the flavors and decorations.
Once you’ve made the peppermint version, you can use the same basic method to create several different holiday treats.
1. White Chocolate Peppermint Oreo Balls
This is the classic festive version.
Use white chocolate for the coating and sprinkle crushed candy canes over the top. The white coating looks like freshly fallen snow, while the red peppermint pieces give each treat a beautiful Christmas finish.
2. Dark Chocolate Peppermint Oreo Balls
If you prefer a richer chocolate flavor, use dark chocolate instead of white.
The slightly bitter chocolate balances the sweetness of the Oreo filling and peppermint topping. You can finish with a little white chocolate drizzle for contrast.
3. Milk Chocolate Oreo Balls
Milk chocolate gives the treats a sweeter, creamier finish.
It’s a lovely option if you’re making these for children or anyone who prefers a milder chocolate flavor.
4. Chocolate Drizzle Peppermint Oreo Balls
Start with a white chocolate coating, then drizzle melted milk or dark chocolate over the top.
Finish with a small amount of crushed candy cane for a bakery-style appearance.
5. Extra Minty Oreo Balls
If you really enjoy peppermint, you can make the filling slightly more minty by carefully adjusting the peppermint extract.
Add it gradually and taste the mixture before rolling. Peppermint extract is concentrated, so avoid adding too much at once.
6. Christmas Sprinkle Oreo Balls
Not everyone loves peppermint, so you can make a few without candy canes.
Instead, decorate the white chocolate coating with red, green, and white Christmas sprinkles. This gives you a colorful alternative while keeping the same creamy Oreo center.
How to Serve Peppermint Oreo Balls
These little treats are perfect for almost any holiday gathering.
I love the idea of arranging them on a white platter with a few extra crushed candy canes scattered around the edges. You can also mix them with other Christmas sweets to create a beautiful dessert table.
Here are a few ways to serve them:
- Christmas dessert platters: Arrange them alongside brownies, cookies, chocolate bark, and other small treats.
- Holiday cookie exchanges: Package several Oreo balls in individual paper candy cups and arrange them in a gift box.
- Christmas parties: Place them on a serving tray so guests can easily pick one up.
- Homemade gift boxes: Combine them with other homemade sweets for a thoughtful edible gift.
- Hot chocolate evenings: Serve them with mugs of warm cocoa for a cozy winter treat.
If you’re planning a full holiday dessert spread, you could also serve these alongside my Easy Christmas Funfetti Bread for a colorful combination of festive sweets.
For an extra cozy holiday drink pairing, my peppermint mocha recipe is another lovely option.
How to Store Peppermint Oreo Balls
Because these Oreo balls contain cream cheese, they need to be refrigerated.
Refrigerator: Store the finished Oreo balls in an airtight container in the refrigerator for up to 5 days. Place parchment paper between layers if you’re stacking them to help prevent the chocolate decorations from getting damaged.
Freezer: You can freeze the Oreo balls for up to 2 months in a freezer-safe airtight container. For the best results, freeze them in a single layer until firm before transferring them to a container.
Thawing: Transfer frozen Oreo balls to the refrigerator and allow them to thaw overnight or until soft enough to enjoy. Keep them refrigerated rather than leaving them out for an extended period.
Make-ahead tip: You can prepare the filling, roll the balls, and refrigerate them before dipping. You can also freeze the undipped balls and coat them with chocolate after thawing in the refrigerator.
For food safety, don’t leave cream-cheese-filled Oreo balls at room temperature for more than 2 hours. If you’re serving them at a party, keep extra portions refrigerated and replenish the serving platter as needed.

Festive Peppermint Oreo Balls Recipe Card
Ingredients
Method
- Place the Oreo cookies in a food processor and pulse until they form fine crumbs. Alternatively, crush them in a sealed zip-top bag using a rolling pin.
- Transfer the Oreo crumbs to a large mixing bowl. Add the softened cream cheese and peppermint extract.
- Mix until the ingredients are completely combined and a thick, uniform mixture forms.
- Line a baking sheet with parchment paper. Scoop approximately 1 tablespoon of mixture at a time and roll into smooth balls.
- Arrange the balls on the prepared baking sheet and refrigerate for at least 1 hour, until firm.
- Meanwhile, crush the candy canes into small pieces and set aside.
- Melt the white chocolate or candy melts in a microwave-safe bowl in 20–30-second intervals, stirring between each interval until smooth.
- Remove the chilled Oreo balls from the refrigerator. Dip each one into the melted chocolate, turning to coat completely.
- Lift each ball with a dipping fork and allow excess chocolate to drip off. Place back on the parchment-lined baking sheet.
- Immediately sprinkle crushed candy canes over the wet chocolate coating.
- If desired, drizzle melted dark or milk chocolate over the tops for decoration.
- Refrigerate for 20–30 minutes, or until the chocolate coating is completely set.
- Store in an airtight container in the refrigerator until ready to serve.
Notes
- Use regular Oreo cookies, including the filling.
- Full-fat block cream cheese gives the best consistency.
- Start with ½ teaspoon peppermint extract and adjust carefully if desired.
- Chill the balls before dipping so they hold their shape.
- Decorate with crushed candy canes before the chocolate sets.
- Keep refrigerated because the recipe contains cream cheese.
- Store in the refrigerator for up to 5 days or freeze for up to 2 months.
Frequently Asked Questions
Do peppermint Oreo balls need to be baked?
No! This is a completely no-bake recipe. You simply crush the Oreo cookies, combine them with cream cheese and peppermint extract, roll the mixture into balls, chill, and coat with melted chocolate.
Can I make Oreo balls without a food processor?
Absolutely. Place the Oreo cookies in a sealed zip-top bag and crush them with a rolling pin until they become fine crumbs.
It may take a little longer, but it works just as well. Make sure there aren’t large cookie pieces left behind.
Can I use regular chocolate instead of white chocolate?
Yes. Milk chocolate and dark chocolate both work beautifully.
White chocolate gives the Oreo balls a more traditional snowy Christmas appearance, while dark chocolate creates a richer flavor.
Can I leave out the peppermint extract?
Yes! If you prefer a classic Oreo truffle flavor, simply leave out the peppermint extract.
You can still decorate the tops with crushed candy canes, or use festive sprinkles instead.
Why are my Oreo balls too soft to roll?
The mixture may have too much cream cheese, or the cream cheese may have been too soft.
Try refrigerating the mixture for 15 to 20 minutes before rolling. If it remains very soft, you can mix in a little additional finely crushed Oreo cookie to help firm it up.
Why is my chocolate coating too thick?
The chocolate may not be fully melted, or it may have been overheated and become difficult to work with.
Warm it gently in short intervals and stir well. If necessary, add a small amount of suitable neutral oil or cocoa butter to improve the consistency.
Can I make peppermint Oreo balls ahead of time?
Yes! They’re actually a great make-ahead Christmas treat.
You can prepare them a few days before your gathering and keep them in an airtight container in the refrigerator. You can also freeze them for longer storage.
How many Oreo balls does this recipe make?
This recipe makes approximately 30 to 36 Oreo balls, depending on how much mixture you use for each one.
Using a small cookie scoop helps keep them evenly sized.
Final Thoughts
These festive peppermint Oreo balls are such a lovely addition to the holiday season. They’re rich, creamy, chocolatey, and finished with just enough peppermint to make every bite feel like Christmas.
I especially love that they don’t require baking. You can prepare a batch ahead of time, decorate them with crushed candy canes, and have a beautiful homemade treat ready for your holiday gatherings.
Whether you’re making them for a Christmas party, a cookie exchange, or simply because you’re craving something sweet, they’re easy to customize and fun to share.
Make a batch with white chocolate, try a few with dark chocolate, and don’t forget the crushed peppermint on top. I think you’ll love how simple and festive these little treats turn out!