Crafting with kids has always been one of my favorite ways to spend a weekend. I love seeing their faces light up when they create something with their own hands.
One of the easiest ways to make that happen is with air dry clay.
It doesn’t need baking or firing, so your kids can shape, sculpt, and decorate their projects with minimal supervision.
I remember my first weekend trying it with my niece, and we ended up laughing for hours while making little dishes and ornaments that actually turned out beautifully.
Whether you are a parent looking for weekend activities, a teacher planning a classroom project, or someone who just wants to introduce children to the joys of handmade art, air dry clay is perfect.

It’s inexpensive, non-toxic, and endlessly versatile.
From name plaques and jewelry dishes to ornaments and figurines, air dry clay lets kids make creations they can truly be proud of.
It’s inexpensive, non-toxic, and endlessly versatile. From name plaques and jewelry dishes to ornaments and figurines, this guide features 15 fun and easy air dry clay projects that kids can actually make and be proud of.
Each project below includes a short description and a detailed step-by-step guide designed to make the process simple and enjoyable, even for beginners.
Hey there! Just so you know, I’m an Amazon affiliate. If you make a purchase through some of the links on this site, I may earn a small commission at no extra cost to you. Thanks for supporting the blog!
What You’ll Need
Here’s a simple list of supplies you’ll want to have ready before you begin. (You can link each item to your Amazon affiliate products.)
- Air dry clay
- Fine-grit sandpaper (400–600 grit)
- Acrylic paint or spray paint
- Paintbrush
- Waterproof sealant (choose one of the following):
- Mod Podge Outdoor
- Polycrylic water-based sealant
- Clear acrylic spray sealant
- Epoxy resin (for full waterproofing)
- Disposable gloves
- craft mat
- Soft bristle brush for dusting
Once your workspace is set up with these essentials, you’re ready to start crafting.
1. Personalized Name Plaques
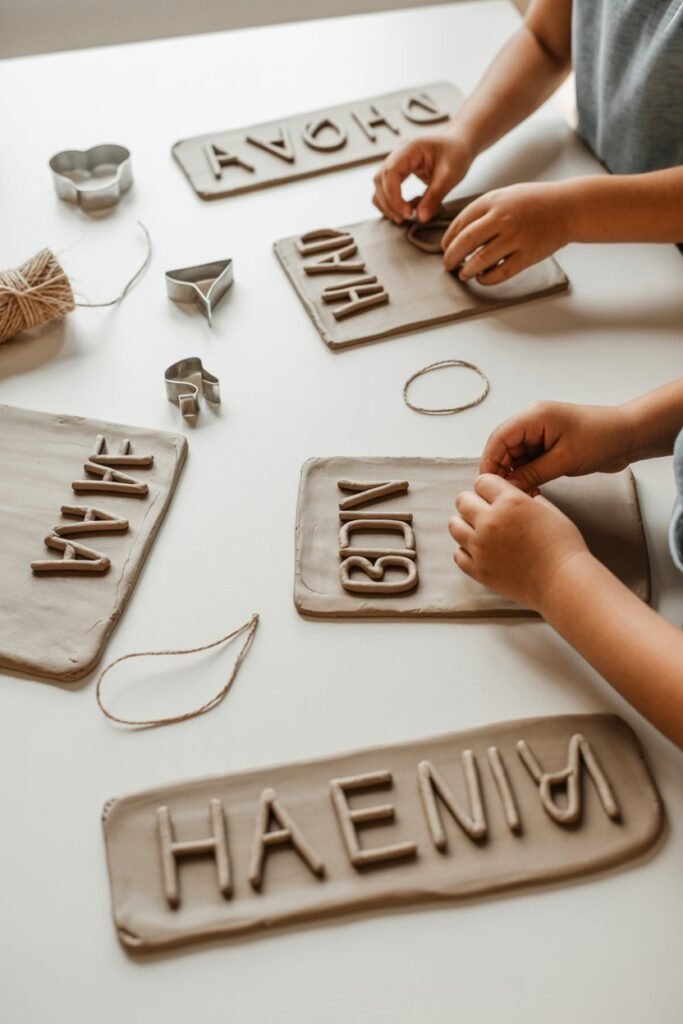
A name plaque is such a fun and personal project for kids of any age.
I love how it lets them spell out their name and decorate it with colors, patterns, or even natural textures.
Once finished, it can be hung on a bedroom door or displayed proudly on a shelf.
How to Make:
- Roll out a piece of air dry clay until it’s about ¼ inch thick.
- Cut out a rectangular or oval base for the plaque using a knife or cookie cutter.
- Roll small pieces of clay into thin ropes and form the letters of your child’s name.
- Press the letters gently onto the plaque’s surface, smoothing the edges where they connect.
- Use a straw or toothpick to create two small holes at the top if you plan to hang it.
- Let the plaque dry flat for 24 to 48 hours, turning it halfway through for even drying.
- Once completely dry, paint the base and letters using acrylic paint.
- Apply a thin coat of sealant to protect the surface and add a soft sheen.
- Thread twine or ribbon through the holes to hang.
Tip: Encourage your child to add small decorations like pressed flowers, leaves, or simple clay shapes around their name.
I’ve found these little personal touches really make the plaque feel special.
2. Handprint Keepsakes

This is one of the most meaningful air dry clay projects you can make with kids. I love how it captures a moment in time and turns it into a lasting memory.
These are perfect for gifts to parents, grandparents, or teachers. They always bring a smile.
How to Make:
- Roll out a portion of clay to about ½ inch thickness on wax paper.
- Help your child press their hand gently into the clay to create a clear handprint. I always make sure their fingers are spread naturally for the best impression.
- Use a round bowl or cookie cutter to trim the edges into a neat circle or oval shape.
- If you plan to hang it, make a small hole near the top using a straw or toothpick.
- Let the clay dry naturally for 48 hours, flipping after the first day to ensure even drying.
- Once dry, paint the handprint and background in contrasting colors.
- Apply a coat of Mod Podge or sealant to protect the paint.
- Optional: Use a toothpick to carve your child’s name and the date for a personal touch.
Tip: I love adding little details like a tiny heart or star around the handprint. It makes the keepsake even more special.
Optional: Use a toothpick to carve your child’s name and the date below the handprint before drying.
Also check out – How to Seal Air Dry Clay (Step-by-Step Guide for Beginners)
3. Mini Flower Pots

Mini clay pots are a wonderful way to introduce kids to shaping and forming three-dimensional pieces.
I love how they can be used for small succulents, faux plants, or even craft supplies like beads and buttons.
Watching a simple ball of clay turn into a tiny pot is always so rewarding.
How to Make:
- Roll a ball of clay roughly the size of a lemon.
- Press your thumb into the center of the ball to start forming a hollow.
- Use your fingers to pinch the walls evenly, rotating the pot as you go.
- Smooth the inside and outside with a little water on your fingertips. I find that this step really helps give the pot a polished look.
- Let the pot dry completely for 48 hours, turning occasionally to prevent warping.
- Once dry, sand the edges lightly if needed.
- Paint with acrylic colors. Kids can create stripes, polka dots, or abstract patterns.
- Finish with a clear sealant.
Note: These pots are decorative unless fully sealed with waterproof varnish. Avoid planting directly unless you add a waterproof liner.
4. Jewelry Dishes
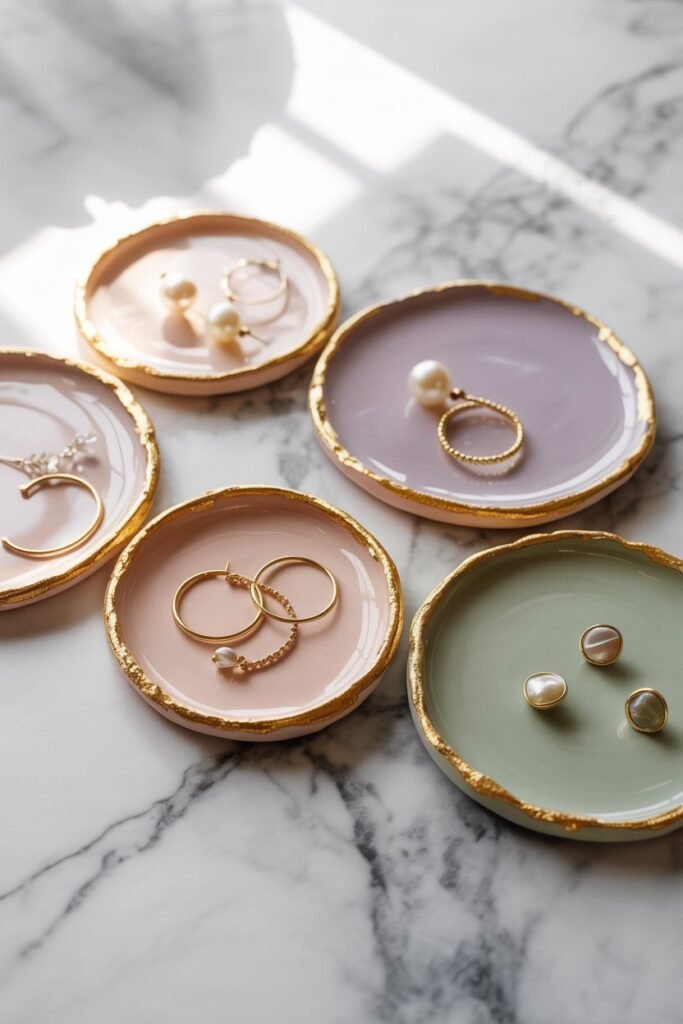
Jewelry dishes are one of my favorite quick clay projects, and they make wonderful handmade gifts.
I love how each dish can be completely personalized with colors, initials, or simple textures.
It’s amazing to see kids get creative and end up with something functional that also looks beautiful.
How to Make
- Roll the clay flat to about ¼ inch thick. Make sure the surface is smooth so the dish looks polished.
- Use a round cookie cutter or trace around a small bowl to cut a perfect circle.
- Gently press the circle inside a small bowl so the sides curve upward. This gives the dish a neat, finished shape.
- Let it dry inside the bowl for about 24 to 36 hours. I usually check it after a day to make sure it’s holding its shape.
- Once dry, remove it carefully and smooth any rough edges with your fingers or a tiny bit of sandpaper.
- Paint the dish with your chosen design. I love marble effects, soft ombre patterns, or even metallic edges for a special touch.
- Apply a thin coat of sealant to give it a glossy, durable finish that lasts.
Tip
Encourage kids to mix and match colors or add tiny designs like dots, initials, or small shapes. It’s a simple way to make each dish unique and gives them a sense of pride in their creation.
Design Idea: Press lace, textured fabric, or leaves into the clay before drying to leave a delicate imprint.
5. Animal Figurines
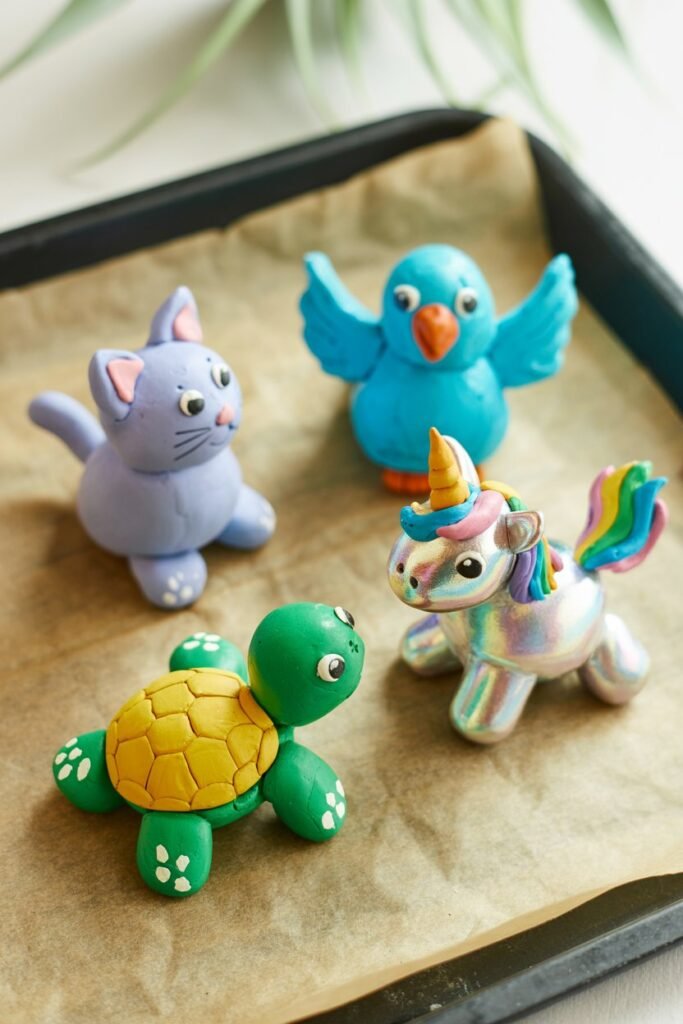
Clay animals are always a hit with kids. I love seeing them bring their favorite pets, imaginary creatures, or simple farm animals to life.
This project is a fun way for kids to learn about shapes, balance, and creativity all at once.
How to Make
- Start by deciding which animal to create. Simple shapes like a turtle, bird, or cat are perfect for beginners.
- Roll balls of clay for each body part. For a turtle, make a large ball for the shell and smaller ones for the head and legs.
- Attach the pieces using a little water where they meet, pressing gently to secure. I always remind kids to be gentle but firm so nothing falls apart.
- Smooth the joints with your fingers or a small sculpting tool for a polished look.
- Use a toothpick to add details such as eyes, scales, or fur textures. I like letting kids make small patterns that reflect their imagination.
- Let the figurine dry completely for 48 hours.
- Once hardened, paint it in bright, cheerful colors.
- Seal with a thin coat of Mod Podge to protect the paint and add a subtle shine.
Tip
Place larger pieces on foil or a non-stick surface while drying. This helps prevent the base from bending or sticking, and it makes clean-up much easier.
6. Moon and Star Mobiles
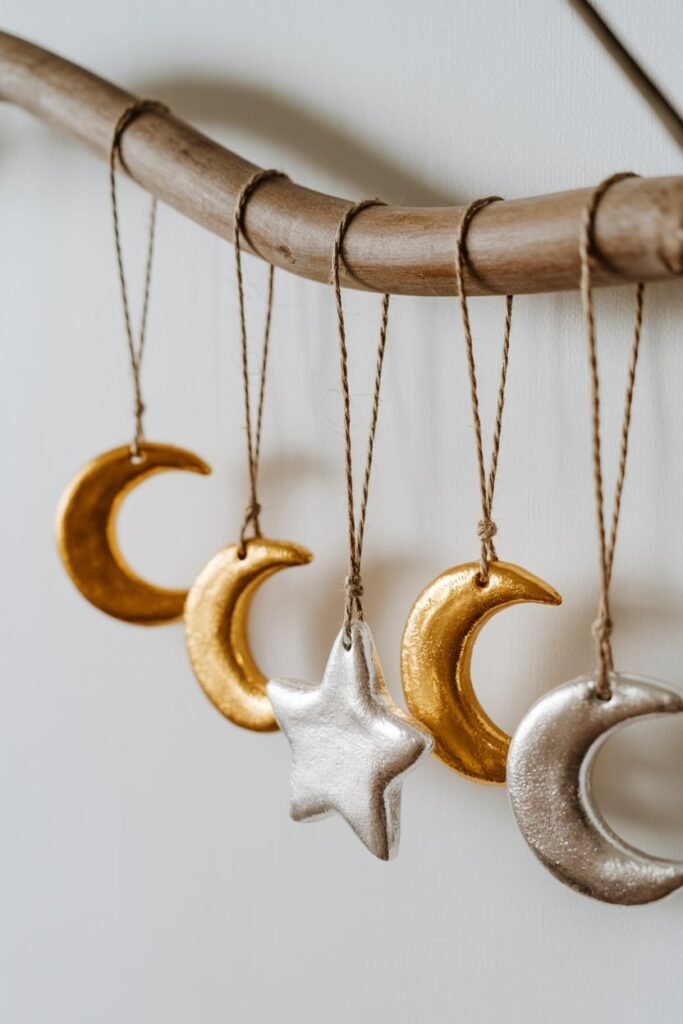
This project is one of my favorites because it combines creativity with home décor.
I love seeing how kids’ handmade mobiles can instantly brighten a bedroom, reading nook, or even a sunny window.
There’s something magical about watching their little shapes sway gently in the air.
How to Make
- Roll out a sheet of clay to about ¼ inch thick. I like using a smooth rolling pin to keep the surface even.
- Use cookie cutters to make fun shapes like moons, stars, and planets. Encourage kids to mix and match shapes for a playful effect.
- With a straw, punch a small hole near the top of each shape for hanging. Make sure the hole is big enough for string or twine to pass through.
- Let the shapes dry flat for 24 to 48 hours. Turning them halfway through can help prevent warping.
- Paint each shape in soft pastel or metallic colors such as gold, silver, or light blue. I love letting kids experiment with gradients or tiny patterns to make each piece unique.
- Once the paint is fully dry, seal the surface with a clear coat to protect the colors and give a subtle shine.
- Thread each piece with string or twine. Adjust the lengths so the shapes hang at different heights for a balanced look.
- Tie the shapes to a wooden stick, embroidery hoop, or driftwood branch. I often use driftwood because it adds a natural, whimsical touch.
- Hang the mobile securely using fishing wire or ribbon, making sure it’s stable and evenly balanced.
Variation
For a fun twist, use glow-in-the-dark paint on a few pieces. At night, the shapes create a magical night-sky effect that kids absolutely love.
7. Nature Imprint Tiles

This project is one of my favorites because it brings the outdoors inside.
I love how it helps kids notice and appreciate natural textures while creating something beautiful.
It’s a calm, sensory craft that works in any season and gives children a hands-on way to explore nature.
How to Make
- Go on a short walk and collect leaves, ferns, flowers, or small shells. I like letting kids choose their favorites so each tile feels unique.
- Roll out the clay to ¼ inch thick on a flat surface, keeping it smooth for clear imprints.
- Place each leaf or flower face down on the clay and press gently so the veins and textures leave an imprint. I always encourage kids to experiment with different pressure to see what textures show up best.
- Carefully lift the item off to reveal the pattern. This is always the moment kids get excited.
- Cut the clay into squares, circles, or rectangles using a knife or cookie cutter.
- Smooth the edges with your fingers or a damp sponge for a neat finish.
- Allow the tiles to dry for at least 48 hours. I recommend turning them occasionally if they’re thick to prevent uneven drying.
- Paint the tiles using light colors and gently dry-brush darker tones over the raised details to highlight textures. It really makes the patterns pop.
- Finish with a protective sealant to preserve the designs.
Uses
These tiles are versatile. Once sealed properly, they can be used as wall décor, coasters, or even small garden markers. I love seeing kids proudly display their natural art around the house.
8. Mini Food Playsets

Creating pretend food from clay is always a hit with kids.
I love how it sparks their imagination and gives them a chance to play chef, baker, or fruit seller.
Making mini cookies, cupcakes, or fruits is not only fun but also helps children practice fine motor skills while being creative.
How to Make
- Roll small portions of clay into basic shapes. Use flat circles for cookies, cones for ice cream, or round balls for fruits. I like letting kids mix and match to make little food sets.
- Use a toothpick or clay tool to add details such as sprinkles, frosting lines, or tiny fruit stems. This is where the project really becomes playful.
- Smooth edges with a damp brush if needed for a neat finish.
- Let the items dry completely for 24 to 48 hours. I recommend leaving them on a non-stick surface so nothing sticks or warps.
- Paint each item with realistic shades—tan for cookies, red for strawberries, pink for frosting, and so on. Encourage kids to get creative with fun colors too.
- Once painted, allow the pieces to dry completely, then seal with a clear coat to prevent chipping and give a polished look.
Important
These are decorative toys only. Remind children not to put clay “food” in their mouths. I always make this a fun safety lesson while crafting.
9. Refrigerator Magnets
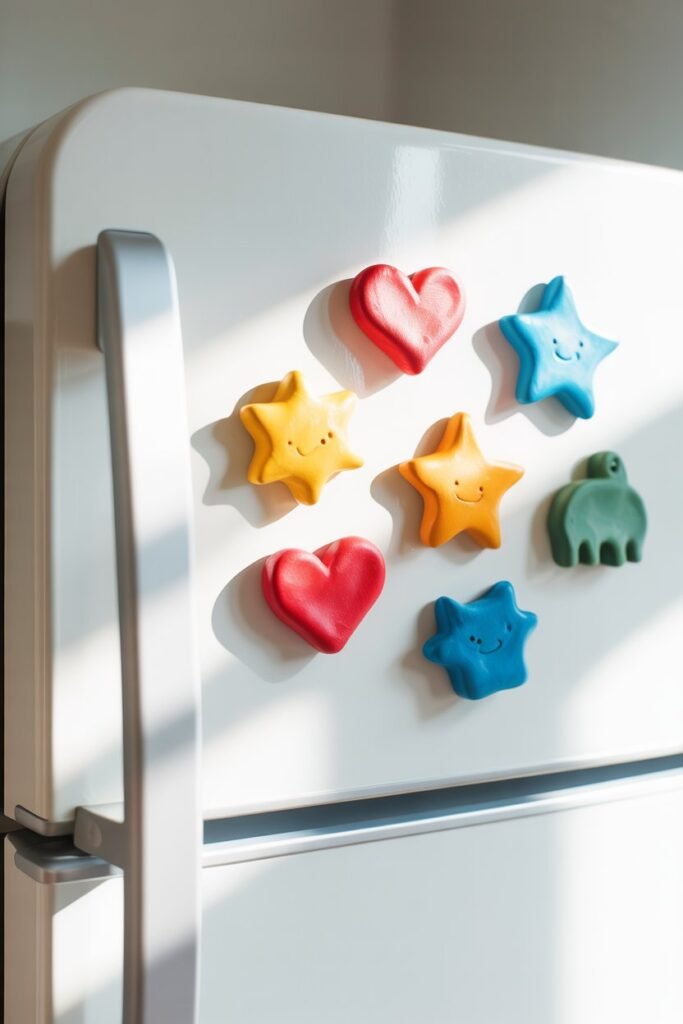
Air dry clay magnets are one of my favorite simple projects for kids.
I love that they get to create something functional that can be displayed proudly on the fridge.
From hearts and stars to animal shapes, these magnets are perfect for gifts or just to add a pop of color to your kitchen.
How to Make
- Roll out a sheet of clay to about ¼ inch thick. I like to use a smooth surface so the shapes come out even.
- Use cookie cutters or freehand simple shapes like stars, hearts, or initials. Let kids choose their favorite shapes for a personal touch.
- Smooth edges with a little water if needed for a polished look.
- Let the shapes dry flat for 24 to 48 hours. Make sure they are fully dry before moving to painting.
- Paint each piece with bright acrylic colors or patterns. I encourage kids to experiment with dots, stripes, or tiny details to make each magnet unique.
- Once dry, seal with Mod Podge or a clear spray sealant to protect the paint and give a subtle shine.
- Attach small adhesive magnets to the back using strong craft glue. Press gently and hold in place for a few seconds.
- Let the glue cure for at least a few hours before placing the magnets on any magnetic surface.
Variation
Try making seasonal designs like pumpkins, snowflakes, or flowers. This way you can switch out your magnets throughout the year and keep the fridge fun and festive.
10. Clay Beads and Bracelets
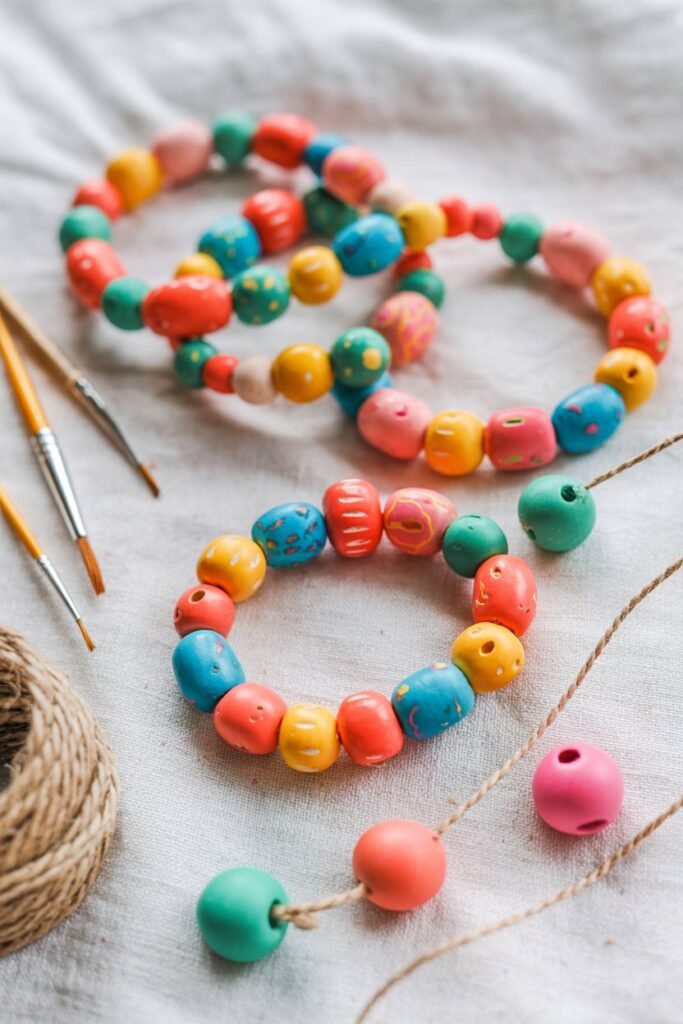
Making beads from clay is a fun way for kids to practice rolling, shaping, and creating patterns.
I love how this project lets them design their own jewelry while experimenting with colors and textures.
Once dry, the beads can become colorful bracelets, necklaces, or even keychains.
How to Make
- Take small pieces of clay and roll them into round or oval beads about the size of a marble. Encourage kids to make beads of slightly different sizes for a playful, handmade look.
- Use a skewer or toothpick to carefully poke a hole through the center of each bead. Make sure the hole goes all the way through for easy stringing later.
- Smooth edges and remove any excess clay around the holes for a polished finish.
- Allow the beads to dry completely for 48 hours. I usually leave them on a non-stick surface to avoid sticking or warping.
- Paint each bead with different colors and patterns—dots, stripes, or even letters for a personal touch.
- Seal with a thin coat of gloss to protect the paint and add a subtle shine.
- String the beads onto elastic thread or twine to make bracelets, necklaces, or even charms for bags.
Tip
Mix different clay colors before shaping to create a marbled or swirled effect. Kids love seeing how the colors blend and change as they roll the beads.
11. Seashell Bowls
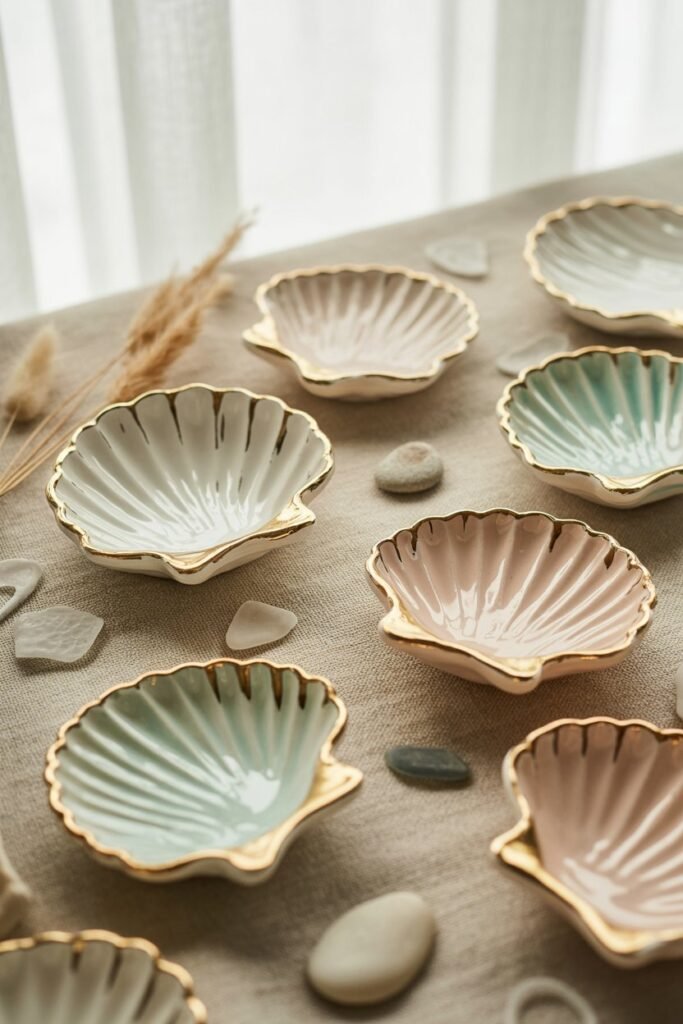
Seashell bowls are such a fun way to bring a coastal, beachy vibe into your home.
I love how kids enjoy collecting shells and then turning them into little clay dishes. It’s a project that combines creativity with a touch of nature, and the end result is always so charming.
How to Make
- Choose a few clean seashells with smooth interiors. I like letting kids pick their favorite shapes for variety.
- Press air dry clay evenly into the inside of each shell, following its natural curve. This step is fun because the clay naturally takes the shell’s shape.
- Smooth the surface with a little water to get rid of bumps and fingerprints.
- Allow the clay to dry inside the shell for 24 to 36 hours. Make sure it’s completely hardened before removing.
- Gently remove the clay from the shell mold. Take your time to keep the edges intact.
- Sand any rough spots lightly if needed for a polished finish.
- Paint the bowls in natural tones like cream, gold, or soft pastels. I love letting kids experiment with subtle gradients or patterns.
- Finish with a layer of gloss sealant to protect the paint and add a soft shine.
Variation
For a whimsical touch, use metallic paint inside the bowl to create a shimmering pearl effect. Kids love seeing how the finish catches the light.
12. Fairy Garden Accessories

Fairy garden accessories are one of my favorite projects to do with kids.
I love how it sparks their imagination, letting them create tiny worlds full of magic.
From miniature mushrooms to fairy doors, these little creations make indoor or outdoor fairy gardens come alive.
How to Make
- Decide what items to create—tiny mushrooms, benches, stones, or doors. I like letting kids plan their own little fairy scene before starting.
- Shape each item from small portions of clay using fingers or simple tools. Encourage them to experiment with size and form to make each piece unique.
- Add fine details with toothpicks or sculpting tools, such as wood grain, polka dots, or tiny windows. This is where the magic really happens.
- Let the pieces dry completely for 48 hours. Make sure they are on a flat, non-stick surface to avoid warping.
- Paint each piece with bright or earthy tones depending on your fairy garden’s theme. I love seeing the variety of colors kids choose.
- Seal with a waterproof sealant if the pieces will be used outdoors to protect them from the elements.
- Arrange the finished items in soil, flowerpots, or miniature garden containers to create a whimsical scene.
Tip
Add small artificial moss, pebbles, or twigs around the pieces to enhance the fairy garden look. Kids enjoy adding their personal touches and seeing the garden come to life.
13. Hanging Ornaments
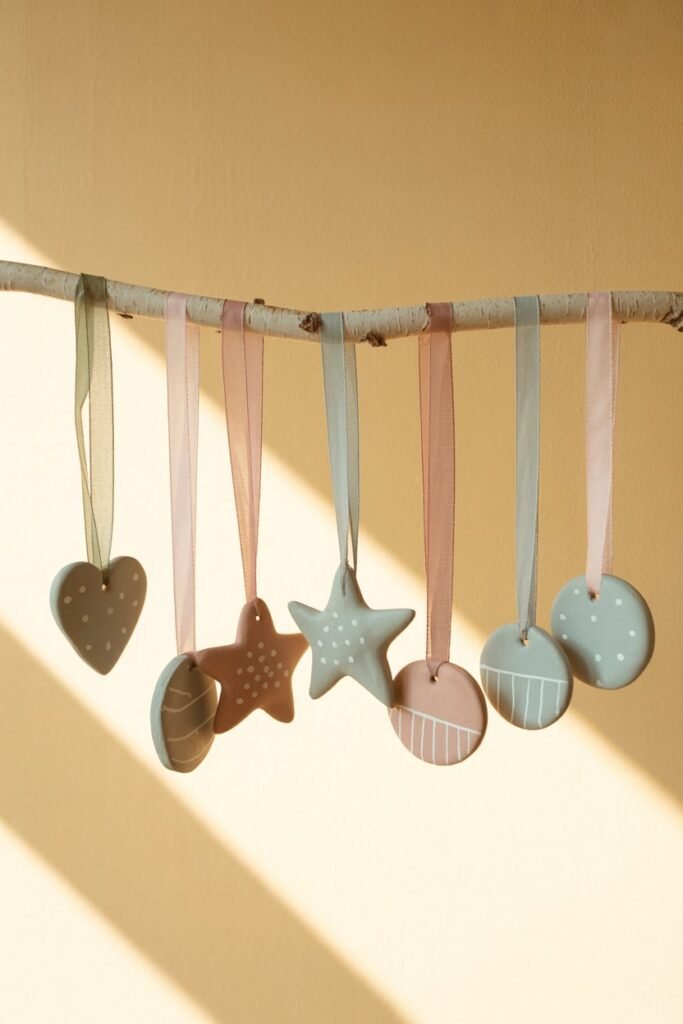
Clay ornaments are so much fun because they aren’t just for the holidays.
I love seeing how kids personalize each piece with names, stamps, or textures.
They can be used year-round for room décor, birthday favors, or special occasions, making each creation meaningful and unique.
How to Make
- Roll out clay to about ¼ inch thick on a smooth surface. This gives a sturdy base for decorating.
- Cut out desired shapes using cookie cutters—hearts, stars, circles, or seasonal icons. Let kids mix shapes for a fun, playful set.
- Make a small hole at the top of each shape with a straw for hanging. Make sure the hole is large enough for ribbon or string to pass through.
- Allow the ornaments to dry flat for 24 to 48 hours. Turning them halfway through can help prevent warping.
- Paint them with acrylic colors, add glitter, or stamp patterns before sealing. I love letting kids combine techniques for extra flair.
- Apply Mod Podge or varnish to protect the paint and give a soft shine.
- Thread ribbon or string through the hole once fully dry so they’re ready to hang.
Idea
Create a themed set—spring flowers, fall leaves, or winter snowflakes. Kids enjoy switching them out each season to brighten their rooms or gifts.
14. Unicorn Horn Pens
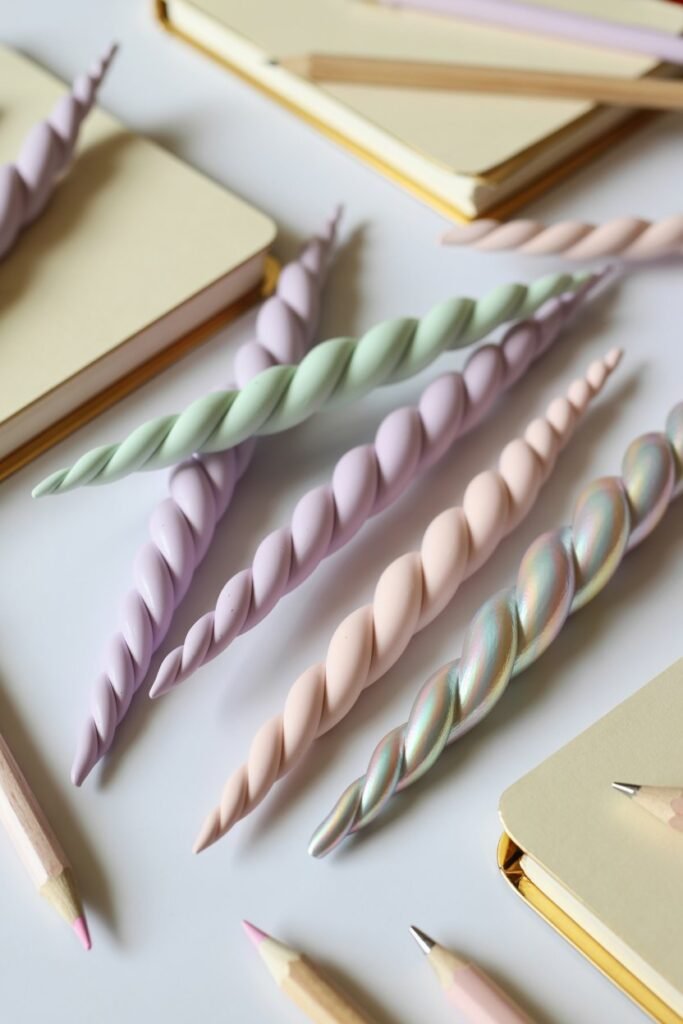
Unicorn pens are one of my favorite fun projects for kids. I love how something as simple as a pen can become a magical accessory.
It’s creative, functional, and makes writing or drawing a little more exciting for children.
How to Make
- Take a regular pen or pencil and remove any caps or attachments that may get in the way. This gives a smooth surface for the clay to stick.
- Roll a small piece of clay into a long, thin rope. Kids enjoy twisting and shaping it evenly.
- Wrap the clay around the pen in a spiral shape from top to bottom, leaving the writing tip exposed. Make sure it’s secure but doesn’t block the ink.
- Gently press and smooth the clay with damp fingers for a polished look.
- Let the pen dry for 24 hours. Placing it on a non-stick surface helps keep the spiral intact.
- Once dry, paint the spiral with pastel or metallic colors such as gold, silver, or lavender. I love seeing kids mix shades for a magical effect.
- Seal with clear varnish to protect the paint and ensure durability.
- Optional: Add a small clay unicorn horn topper to the pen’s end for an extra whimsical touch.
Tip
Encourage kids to experiment with colors and textures. A little glitter or metallic paint really brings the unicorn pen to life and makes it feel magical.
15. Personalized Gift Tags

Clay gift tags are one of my favorite ways to add a personal touch to presents.
I love how kids can make something that’s both creative and functional. Each tag becomes a little keepsake that makes any gift feel extra special.
How to Make
- Roll out the clay to about ¼ inch thick on a clean surface. I like using a non-stick mat so kids don’t have to worry about sticking.
- Cut into rectangles, circles, or tag shapes using a knife or cutter. Let kids get creative with the shapes—they can even make tiny hearts or stars.
- Use a straw to make a small hole at the top for ribbon or string. Make sure the hole is big enough for threading easily.
- Before drying, stamp names, initials, or short words into the clay using alphabet stamps or a toothpick. I encourage kids to personalize each one for the recipient.
- Allow the tags to dry completely for 48 hours. Place them flat to prevent warping.
- Paint lightly or leave natural for a rustic look. Soft pastels, metallics, or even white paint can look beautiful.
- Seal with Mod Podge to protect the surface and add a subtle shine.
- Thread ribbon or twine through the hole and attach to a wrapped gift.
Tip
These tags are reusable. You can wipe them clean and re-label with a marker for different occasions. Kids love seeing how one tag can be used in many ways.
Tips for Working with Air Dry Clay
To ensure the best results, keep these simple but important guidelines in mind:
- Always store unused clay in an airtight container to prevent it from hardening.
- Avoid drying projects in direct sunlight, which can cause cracks.
- Flip larger pieces halfway through drying to ensure even hardening.
- Use fine-grit sandpaper to smooth rough edges once the clay is completely dry.
- Allow projects to dry naturally—don’t try to speed up the process in an oven.
- Use water sparingly when smoothing surfaces; too much can weaken the clay.
Conclusion: The Joy of Creating with Air Dry Clay
Air dry clay is one of the most versatile and beginner-friendly crafting materials available. With just a few simple supplies and a bit of imagination, kids can create art that feels meaningful and lasting. Each of these fifteen air dry clay projects encourages creativity, focus, and fine motor skill development while providing an enjoyable, screen-free activity for families.
From keepsakes like handprints and name plaques to functional pieces like jewelry dishes and magnets, air dry clay offers endless possibilities. The best part is that every creation is unique. No two projects will ever look the same, which makes every piece special and personal.
If you want to make craft time even easier, consider keeping a dedicated “clay craft box” at home stocked with clay, paint, tools, and sealant. That way, you and your kids are always ready for a new project whenever inspiration strikes.
So gather your supplies, clear the kitchen table, and start shaping something memorable today. These air dry clay projects are simple, affordable, and guaranteed to spark creativity for the whole family.