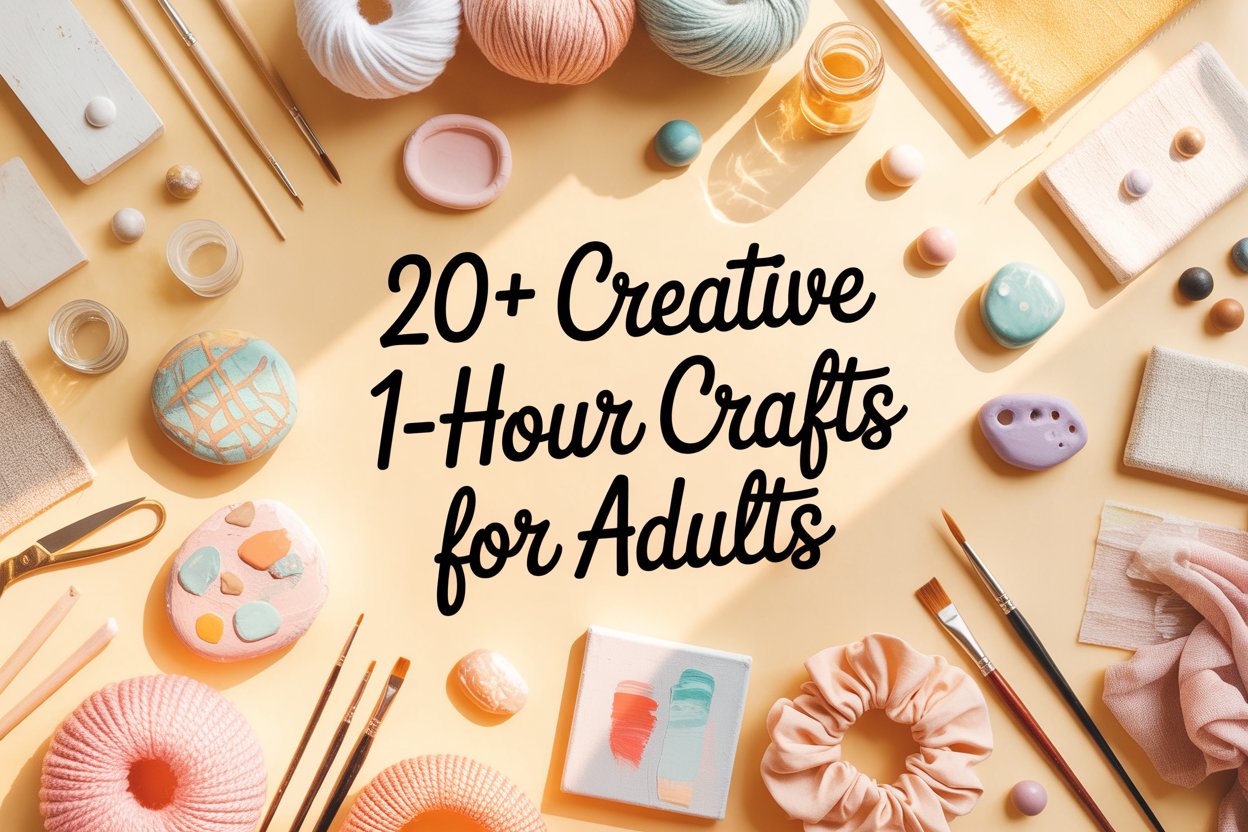
I don’t know about you, but sometimes I just want to make something cute, relaxing, or useful without spending all afternoon on it. You know, a project that’s satisfying but not overwhelming.
That’s why I love one-hour crafts — they’re quick enough to actually finish, but still let you feel creative, proud, and maybe even a little fancy.
Whether you’re curling up on a Sunday afternoon, needing a mindful break after work, or looking for a last-minute gift idea, I’ve got you covered.
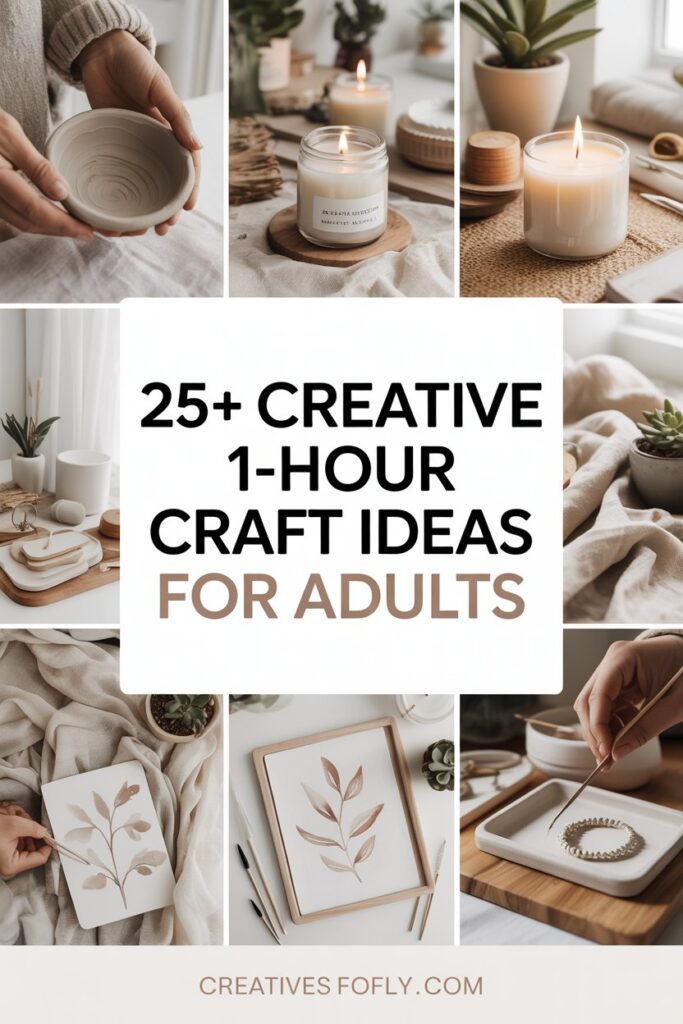
These 25+ creative 1-hour craft ideas are designed for busy adults like us who want beautiful, practical, and fun projects without the stress.
So grab a cup of coffee (or tea!) and let’s dive in. I’ve broken down the first 10 ideas with detailed supplies and step-by-step instructions so you can literally pick one and get started right now.
Trust me, you’ll feel that instant little “I made this!” glow.
Key Takeaways
- Quick, manageable crafts are perfect for busy adults who want a creative break without committing to a long project.
- Most projects use simple materials you likely already have at home, making them affordable and accessible.
- Crafting can reduce stress, boost mood, and spark creativity in just one hour.
- From DIY home decor to personalized gifts, these ideas let you create something functional or decorative in a short time.
- Even small projects feel rewarding and provide a sense of accomplishment, making them ideal for self-care or fun with friends.
Also see – 10 Beautiful & Easy Air-Dry Clay Coaster Ideas
1. Air-Dry Clay Trinket Dish

Sometimes the simplest projects are the most satisfying. This one-hour craft lets you create a small, handmade clay dish that’s both functional and decorative.
Perfect for beginners or anyone looking for a quick, relaxing creative project, it’s versatile enough to serve as a jewelry holder, a tiny catch-all for keys, or a cute accent on your desk.
Plus, the little imperfections give it charm and character — no two dishes will look the same!
Supplies:
- Air-dry clay
- Rolling pin or a smooth bottle
- Small bowl, cookie cutter, or your fingers for shaping
- Water and paper towel
- Acrylic paint, metallic markers, or glaze (optional)
- Clear sealant spray
Instructions:
- Start by rolling out a chunk of clay to about 1/4 inch thick. A rolling pin or even a smooth bottle works perfectly.
- Shape the clay into a shallow dish using a small bowl, cookie cutter, or simply your fingers. Don’t worry about perfection — the handmade look is what makes it special.
- Smooth out the edges by dipping your fingertip in a little water and gently running it along the rim.
- Let the dish dry flat for 24 hours until fully hardened.
- Once dry, get creative with paints, metallic markers, or glaze to add patterns, colors, or little accents that match your style.
- Finish by spraying a clear sealant to make it water-resistant and durable.
Pro Tip:
Think about where you’ll use your dish before decorating — a soft pastel for a bedroom jewelry tray, metallic accents for a chic desk accessory, or fun patterns for a playful addition to your space.
These little touches make your creation uniquely yours, and the slight imperfections only add character.
2. Painted Flower Pot
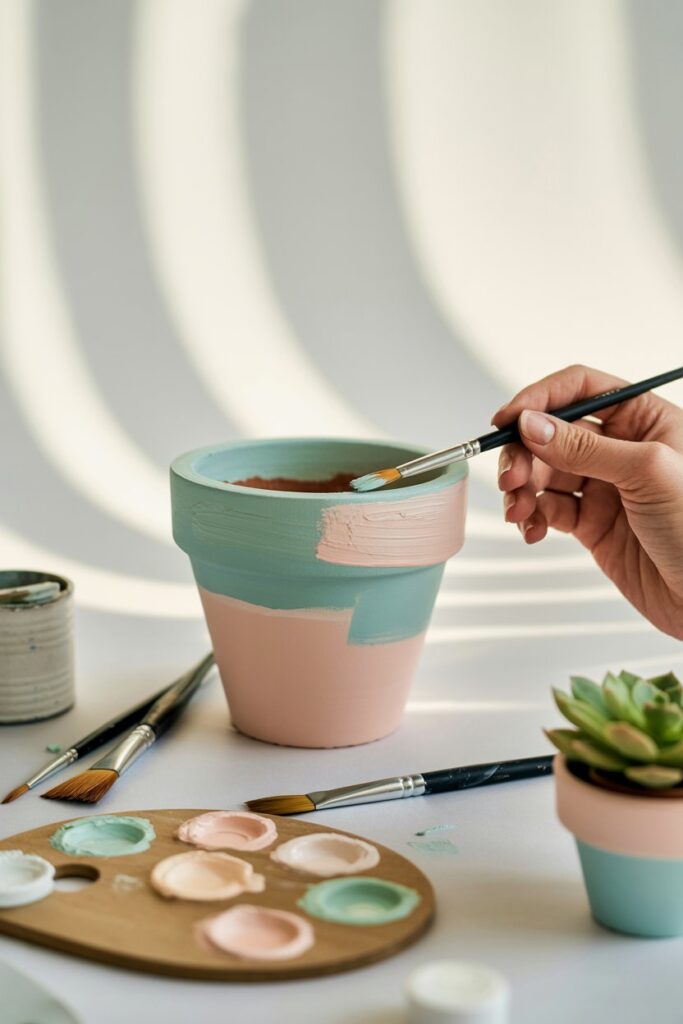
Give a plain terracotta pot a fresh, creative makeover in just an hour. This easy craft is perfect for adding a splash of color to your home, creating a small personalized gift, or enjoying a relaxing creative break.
Whether you go for geometric shapes, abstract patterns, or soft floral designs, the charm comes from the handmade touch.
Supplies
- Small terracotta pot
- Acrylic paint and brushes
- Painter’s tape (optional for geometric designs)
- Clear sealant spray
Instructions
- Wipe the pot clean to remove dust and let it dry completely. A clean surface ensures your paint sticks well.
- Use painter’s tape if you want crisp stripes, triangles, or other geometric shapes. Freehand patterns work just as beautifully.
- Paint your base color and allow it to dry fully before adding any details.
- Add patterns, dots, stripes, or floral accents. Layering colors or using abstract designs gives your pot extra character. Let each layer dry.
- Spray a thin layer of clear sealant to protect your design and make it last longer.
Pro Tip
Keep it simple and embrace imperfections. Abstract patterns, bold color blocks, or playful designs make even a basic pot look sophisticated and stylish.
3. DIY Beaded Phone Charm
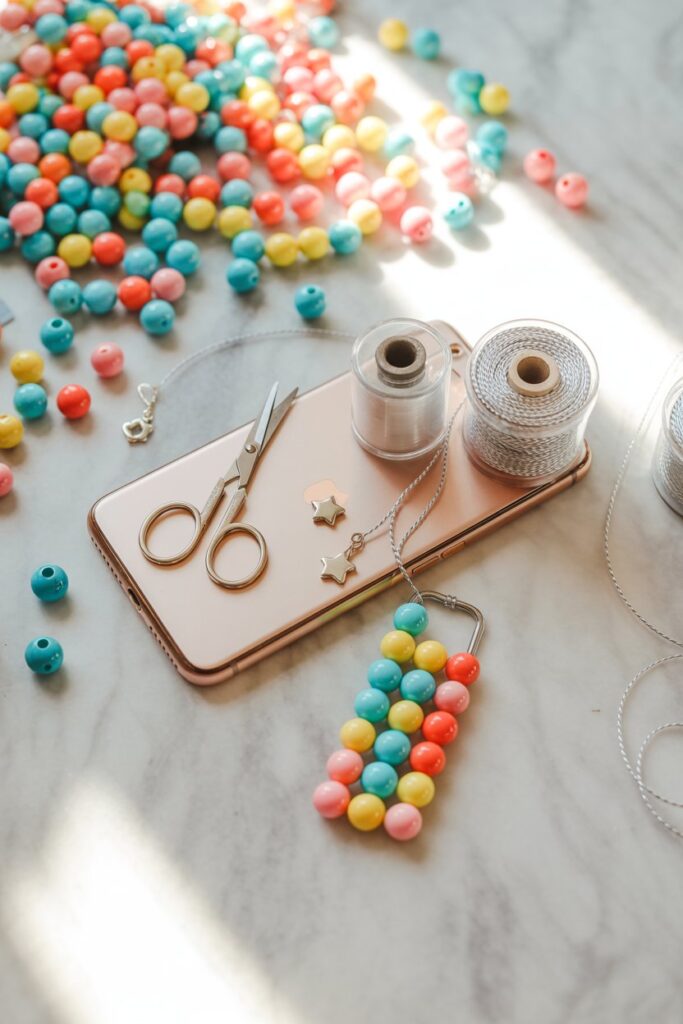
Create a personalized phone charm in under an hour using colorful beads and simple materials.
This quick craft is perfect for adding personality to your phone, making a cute gift, or exploring your creativity.
You can mix and match colors, textures, and even add letter beads or charms to make it uniquely yours.
Supplies
- Beads of your choice (mix sizes, colors, textures)
- Elastic cord or string
- Key ring or small clasp
- Scissors
Instructions
- Cut a piece of string long enough to hang from your phone or bag. A little extra length makes tying easier.
- Thread beads onto the string in a fun pattern. You can alternate colors, mix textures, or add special letter beads or charms.
- Tie secure knots at both ends to keep the beads in place. Make sure the knots are tight so nothing slips off.
- Attach a key ring or clasp to make it easy to hang from your phone, keys, or bag.
- Trim any extra cord for a clean, finished look.
Pro Tip
Get creative with charms and letters to make it personal. Adding initials, words, or tiny symbols turns a simple beaded charm into a meaningful, custom accessory.
4. Personalized Bookmark With Tassels
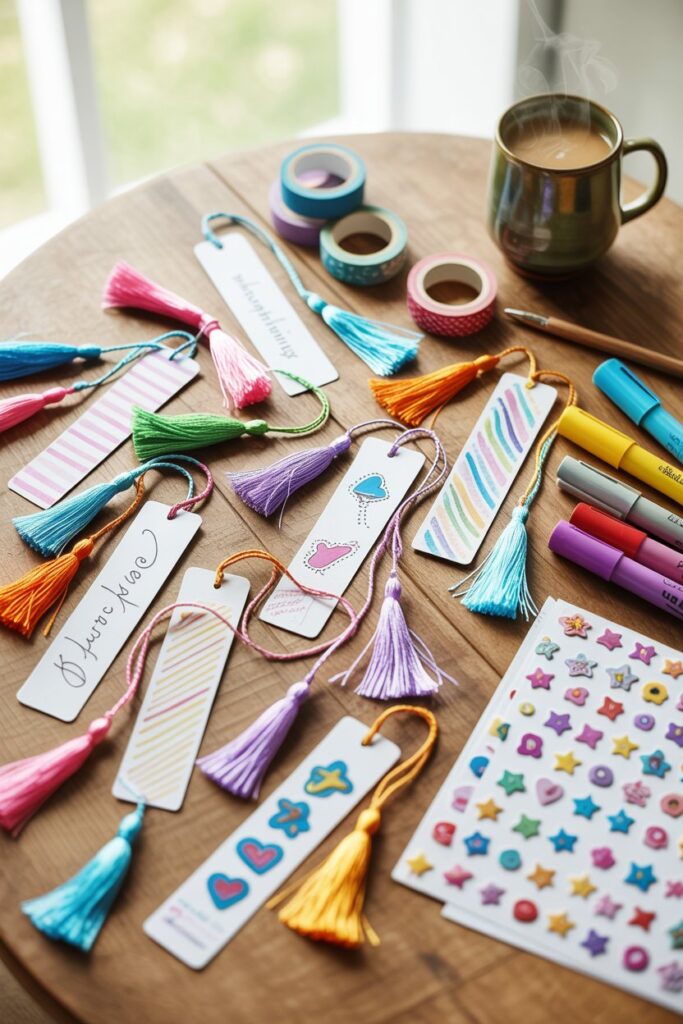
Create a set of charming, custom bookmarks in under an hour.
These easy crafts are perfect for adding a personal touch to your reading routine or giving as thoughtful, handmade gifts.
You can experiment with colors, patterns, quotes, or initials to make each one unique.
Supplies
- Cardstock or thick paper
- Washi tape, stickers, or stamps
- Acrylic paint or pens
- Scissors
- Yarn for tassels
Instructions
- Cut a rectangle from cardstock, roughly 2×6 inches. Adjust the size based on your preference.
- Decorate your bookmark with paint, stamps, washi tape, or stickers. Make it colorful, patterned, or minimalist — whatever fits your style.
- Punch a hole at the top of the bookmark.
- Tie a yarn tassel through the hole to add texture and charm.
- Personalize it with words, quotes, initials, or small designs for a meaningful touch.
Pro Tip
Make a batch at once so you have a set of bookmarks to gift or share. They make small, thoughtful presents for friends, family, or coworkers and can brighten anyone’s reading experience.
You will also love – Simple and Easy 15 Air Dry Clay Projects Your Kids Will Love
5. Pressed Flower Glass Frame
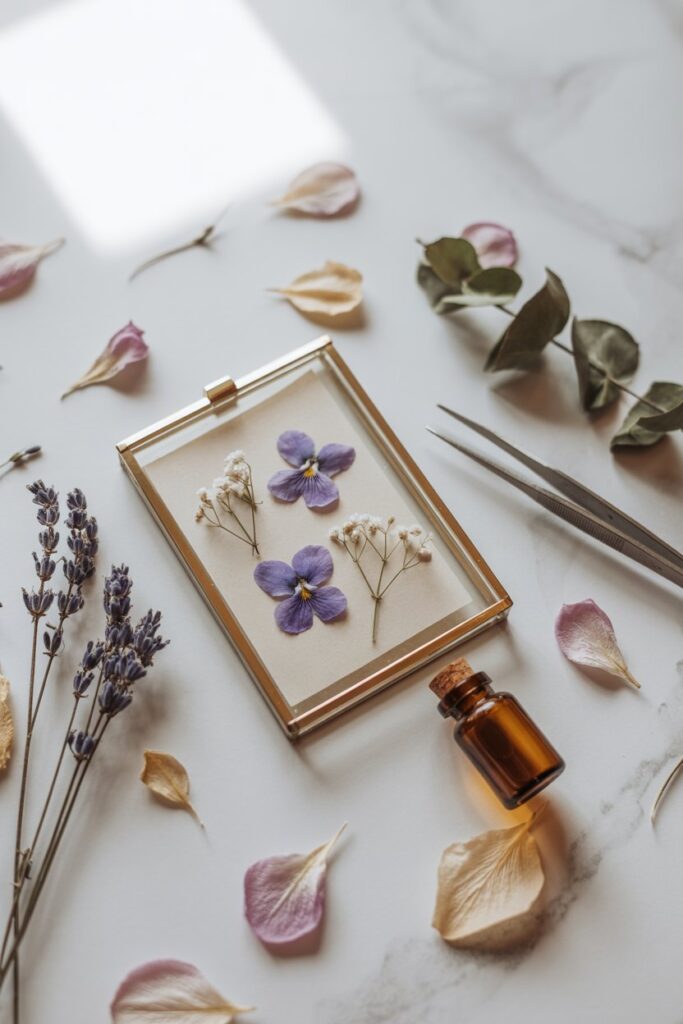
Bring a touch of nature indoors with a delicate dried flower frame.
This craft is simple, beautiful, and creates a lasting decorative piece that can brighten any windowsill, shelf, or desk.
Layering flowers adds depth, while the transparency of the glass keeps the look light and airy.
Supplies
- Small glass frame
- Dried flowers
- Clear adhesive or mod podge
- Tweezers (optional)
Instructions
- Remove the backing of the frame to access the glass panes.
- Arrange your dried flowers on one pane of glass. Layer petals or stems to create depth and visual interest.
- Use tweezers to gently adjust delicate flowers and petals for precise placement.
- Apply a thin layer of clear adhesive or mod podge to secure the flowers in place.
- Carefully place the second pane of glass on top and close the frame. Ensure flowers stay in place and edges are aligned.
Pro Tip
For a minimalist, dreamy look, choose a few tiny flowers instead of a full bouquet.
This simple arrangement allows light to shine through and creates an elegant, ethereal display that works beautifully in any space.
6. Air-Dry Clay Coasters
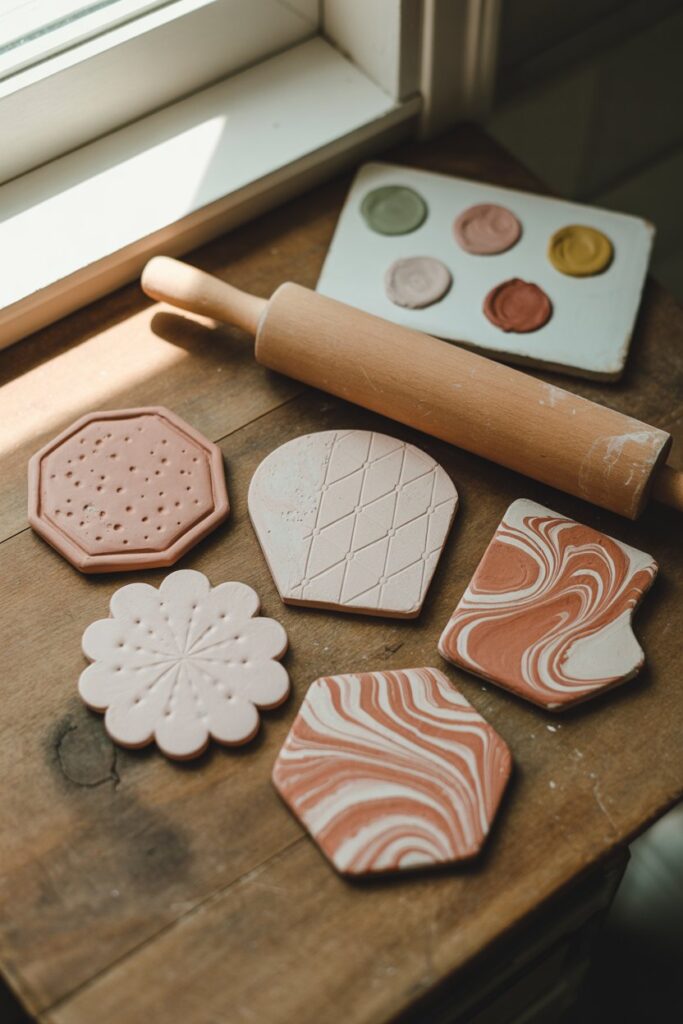
Create a tiny handmade dish that is both functional and decorative.
These little clay dishes are perfect for holding jewelry, keys, or small trinkets, and the best part is that each one is unique.
Playing with shapes, textures, or colors adds personality and makes every piece feel special.
Supplies
- Air-dry clay
- Rolling pin
- Round cutter or cup
- Acrylic paint (optional)
- Sandpaper
- Clear sealant
Instructions
- Roll out the clay to about 1/4 inch thick on a clean surface.
- Use a round cutter, cup, or cookie cutter to cut out circles or any fun shapes you like.
- Smooth the edges using a tiny bit of water on your fingertip.
- Let the clay dry completely, usually about 24 hours.
- Lightly sand the dish to create a smooth finish.
- Paint patterns, designs, or leave the clay natural for a minimalist look.
- Seal the dish with clear spray or varnish to protect it.
Pro Tip
For a fancy but simple twist, try marbling two different clay colors together before cutting. The swirls create a beautiful, high-end look without extra effort.
7. Hand-Painted Canvas Tote
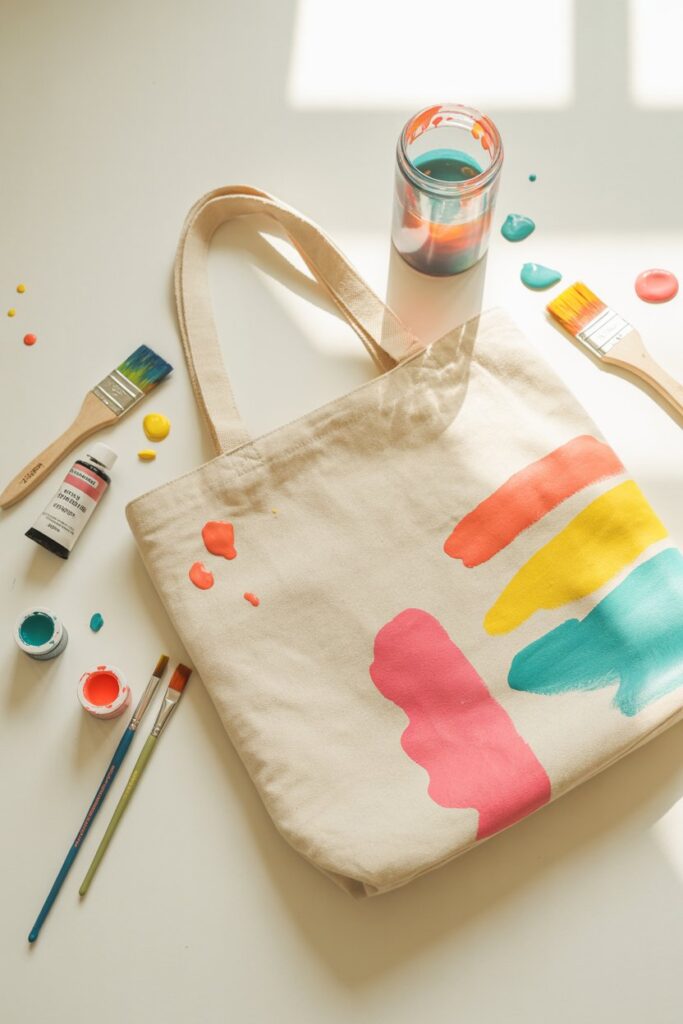
Turn a plain tote bag into a wearable work of art.
Decorating your own canvas tote is a fun way to express your style, practice creativity, and make a practical item feel personal.
From abstract shapes to playful doodles, each tote becomes a unique statement piece you’ll love to carry everywhere.
Supplies
- Plain canvas tote
- Fabric paint or acrylic paint mixed with fabric medium
- Paintbrushes or sponge
- Painter’s tape (optional for geometric designs)
Instructions
- Lay your tote flat on a protected surface, like cardboard or newspaper.
- Use painter’s tape to mark off geometric shapes if you want clean lines.
- Paint your design — go abstract, floral, lettering, or doodles.
- Let the paint dry completely according to the instructions on your paint.
- Optional: Iron the tote to heat-set the paint if the product requires it.
Pro Tip
Don’t overthink your design. Imperfections give it charm, and once you see your finished tote, you’ll love carrying something you made yourself — it’s addictive!
8. Decorative Candle Jar Labeling
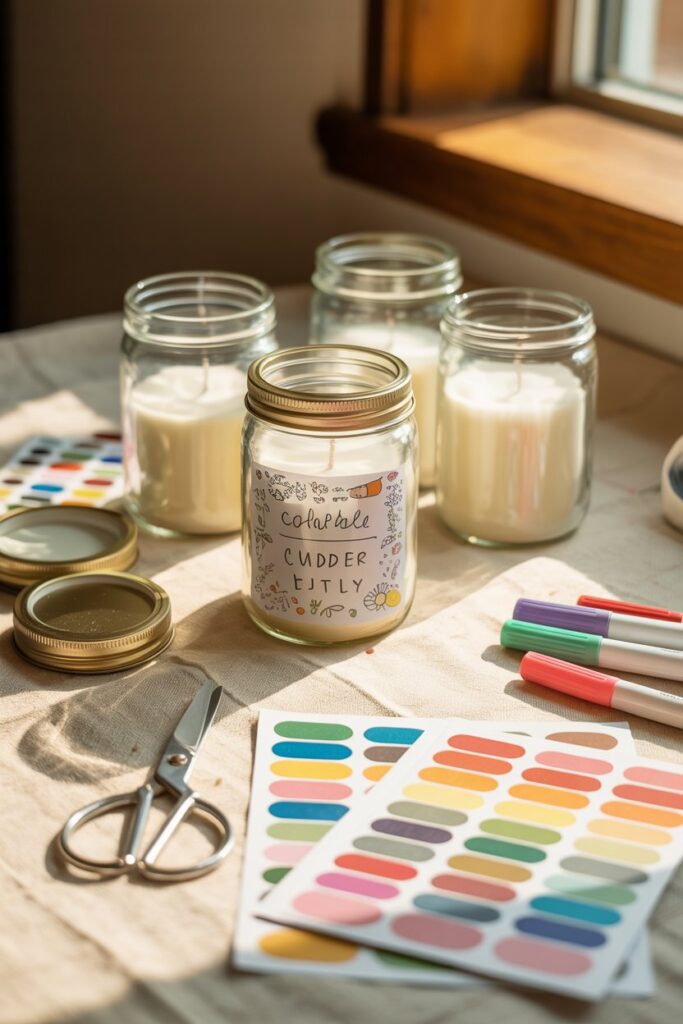
Transform plain candle jars into charming, customized gifts or home accents. Adding a handmade label is an easy way to make a simple candle feel personal and stylish.
Whether you go for minimal elegance or playful quotes, this craft lets you express creativity while giving something practical and beautiful.
Supplies
- Plain candle jars
- Sticker paper or printable labels
- Scissors or cutting tool
- Markers or pens (optional)
Instructions
- Measure your jar and cut the sticker paper to fit the surface.
- Write or draw your design — keep it minimal, add fun quotes, or get creative with patterns.
- Carefully stick the label onto the jar.
- Smooth out any air bubbles for a polished finish.
Pro Tip
Metallic or gel pens make your design pop and instantly give the jar a chic, high-end look. Watching your handiwork glow adds a satisfying, professional touch to a simple craft.
9. DIY Polymer Clay Earrings
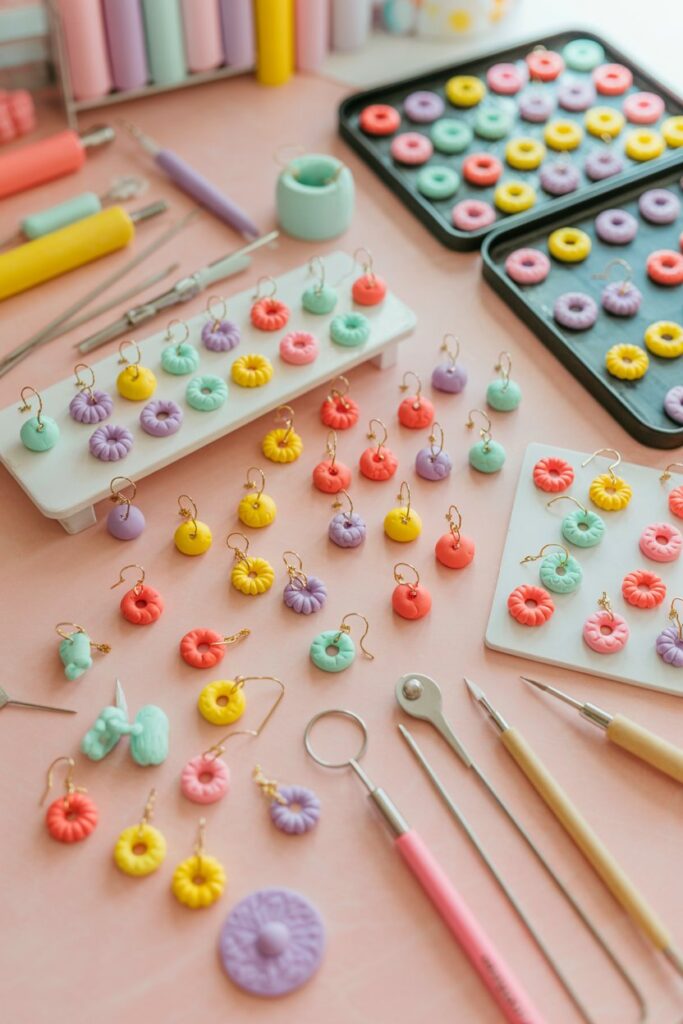
Create unique, boutique-style earrings in the comfort of your home. Polymer clay is perfect for experimenting with shapes, colors, and textures.
Whether you make hearts, abstract shapes, or playful designs, these earrings are a fun way to personalize your accessories or craft thoughtful handmade gifts.
Supplies
- Polymer clay
- Sculpting tools or toothpicks
- Earring hooks
- Oven for baking
- Jump rings (optional)
Instructions
- Shape the clay into tiny hearts, circles, abstract shapes, or any design you love.
- Poke a small hole for the earring hook before baking.
- Bake according to the polymer clay package instructions.
- Once cooled, attach hooks using jump rings if needed.
Pro Tip
Stack colors or add tiny textures for a boutique-inspired look. Small details like marbling or dots make your earrings look professional and extra special.
10. Painted Wooden Spoons

Transform simple wooden spoons into charming, decorative kitchen accessories.
This craft is perfect for adding personality to your cooking utensils or creating thoughtful, handmade gifts for friends and family.
With a little paint and creativity, these spoons become functional art that brightens any kitchen.
Supplies
- Wooden spoons
- Acrylic paint
- Paintbrushes
- Painter’s tape (optional)
- Clear sealant
Instructions
- Wipe spoons clean to remove dust or oils.
- Use painter’s tape to create stripes or geometric patterns if desired.
- Paint your designs — stripes, dots, letters, or cute doodles.
- Let the paint dry completely.
- Seal with a clear coat for durability and to protect the artwork.
Pro Tip
Pair your painted spoons with a homemade jar of jam, honey, or tea for an adorable, ready-to-gift package. Small touches like this make the gift feel personal and thoughtful.
11. DIY Macramé Keychain
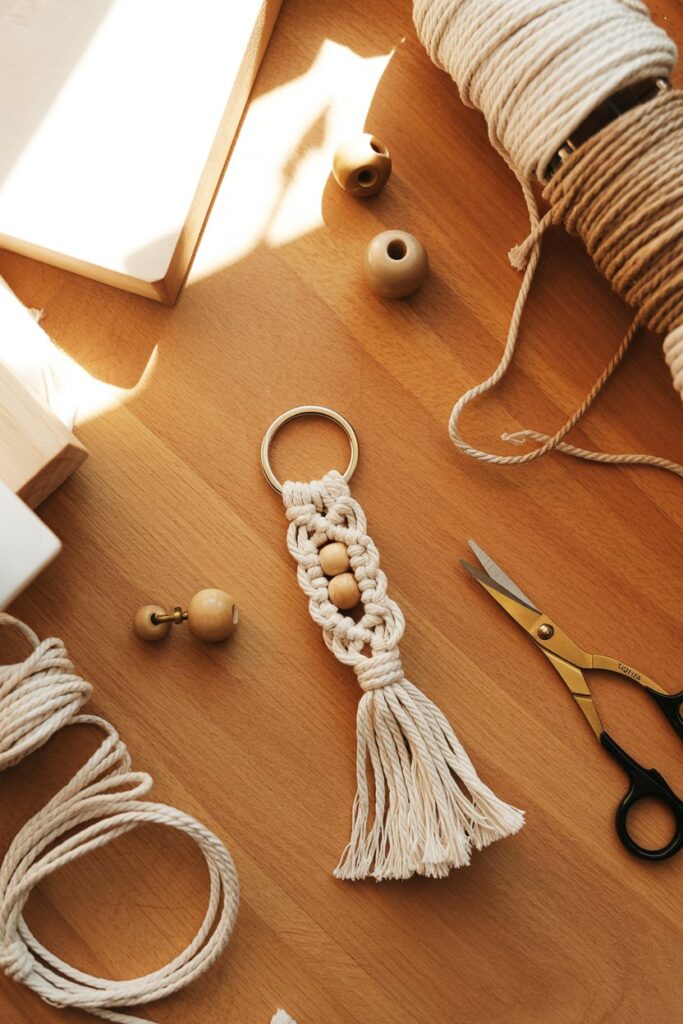
Macramé is soothing, creative, and surprisingly easy to start. A tiny keychain project is perfect if you don’t want to commit to a large wall hanging.
It’s also a cute, handmade accessory for your keys or bag, making it a functional craft that shows off your creativity.
Supplies
- Cotton cord or embroidery floss
- Key ring
- Scissors
- Beads (optional)
Instructions
- Cut 3–4 pieces of cord, each about 12 inches long.
- Fold the cords in half and loop them through the key ring.
- Use simple knots, such as a square knot or spiral knot, to create a small design.
- Add beads for extra flair if desired.
- Trim ends neatly or leave a bit of fringe for a casual look.
Pro Tip
Even if you’re new to macramé, small projects like this are beginner-friendly. Start simple, and you’ll feel a sense of calm and satisfaction as you watch your keychain take shape.
12. Painted Rocks for Decor or Paperweights
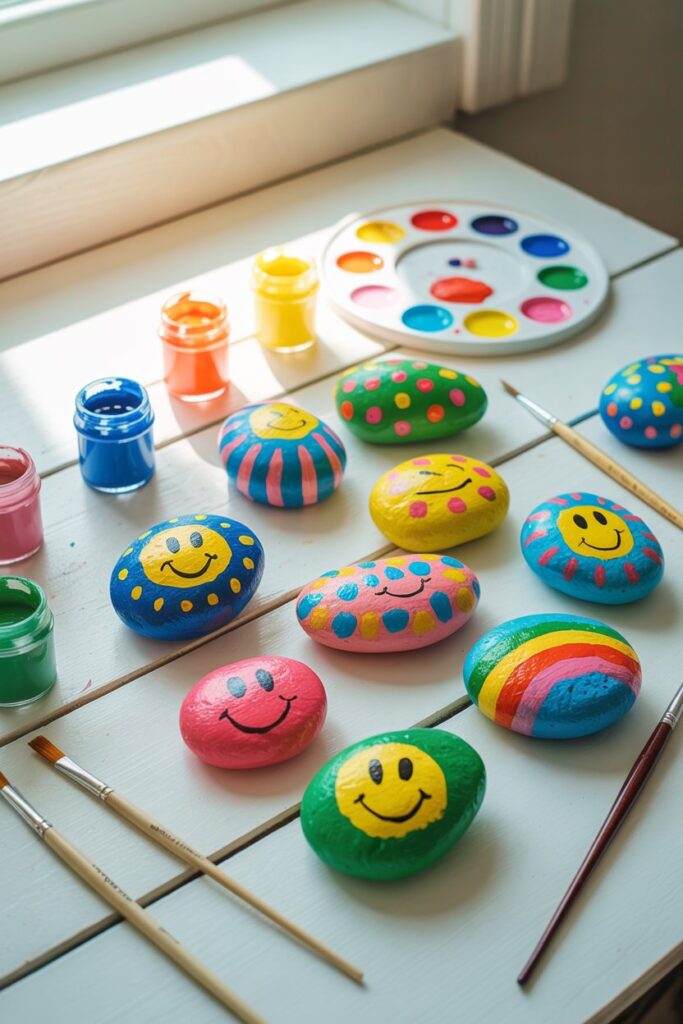
Painting rocks is a relaxing, stress-relieving activity that also sparks creativity.
Smooth rocks can be transformed into little works of art, and they’re incredibly versatile.
Use them as paperweights, decorative accents around your home, or thoughtful gifts for friends and family.
Supplies
- Smooth rocks or pebbles
- Acrylic paint
- Paintbrushes
- Sealant spray
Instructions
- Clean the rocks thoroughly and let them dry completely.
- Paint your design — this could be patterns, inspiring quotes, or fun shapes.
- Allow the paint to dry fully before handling.
- Seal your artwork with a clear spray to protect it and make it last longer.
Pro Tip
Adding glitter, metallic paint, or tiny details instantly elevates your rocks, making them look more polished and special. Don’t be afraid to experiment with colors and textures — each rock can be a unique piece of art.
13. DIY Decorative Jars
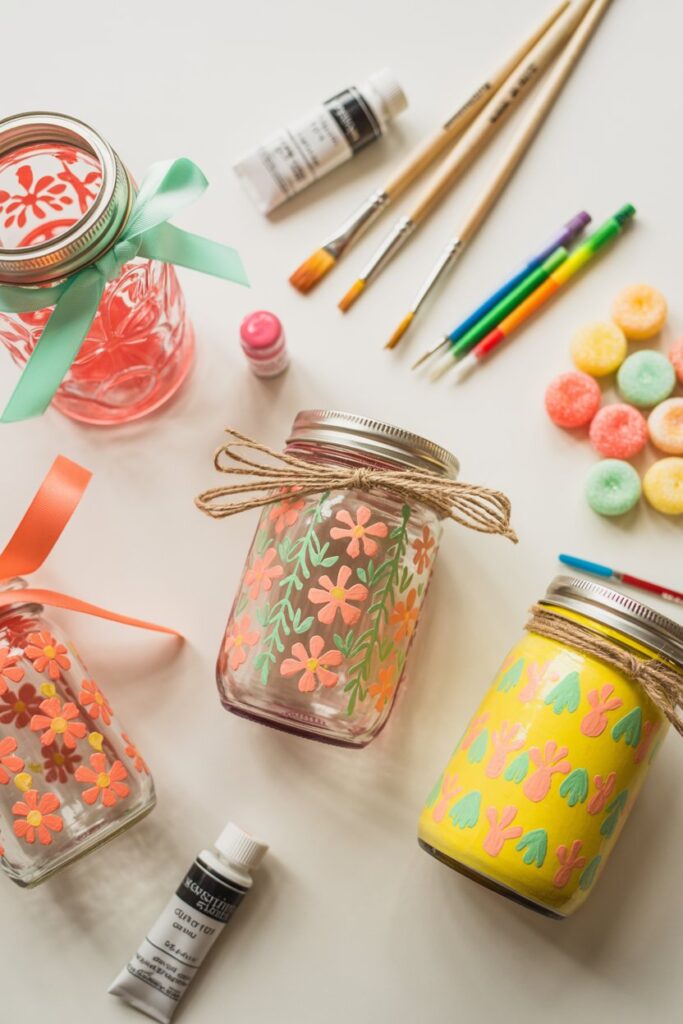
Decorative jars are a simple craft that can instantly elevate any space.
They are versatile, allowing you to store pens, candles, snacks, or small trinkets while adding a personal, handmade touch to your home.
Decorating jars is quick, creative, and incredibly satisfying, making it a perfect 1-hour project.
Supplies
- Empty jars (mason jars or recycled jars)
- Acrylic paint or glass paint
- Paintbrushes
- Ribbon, twine, or stickers
Instructions
- Clean the jars thoroughly and remove any labels.
- Paint designs directly onto the jar — stripes, ombré effects, polka dots, or abstract patterns work beautifully.
- Let the paint dry completely before handling.
- Wrap twine or ribbon around the jar’s neck to add extra charm and detail.
Pro Tip
These jars make thoughtful DIY gifts. Fill them with candies, bath salts, or even small craft supplies for a personalized touch.
Experimenting with colors, textures, and embellishments allows each jar to become a unique statement piece.
14. Fabric Scrunchies
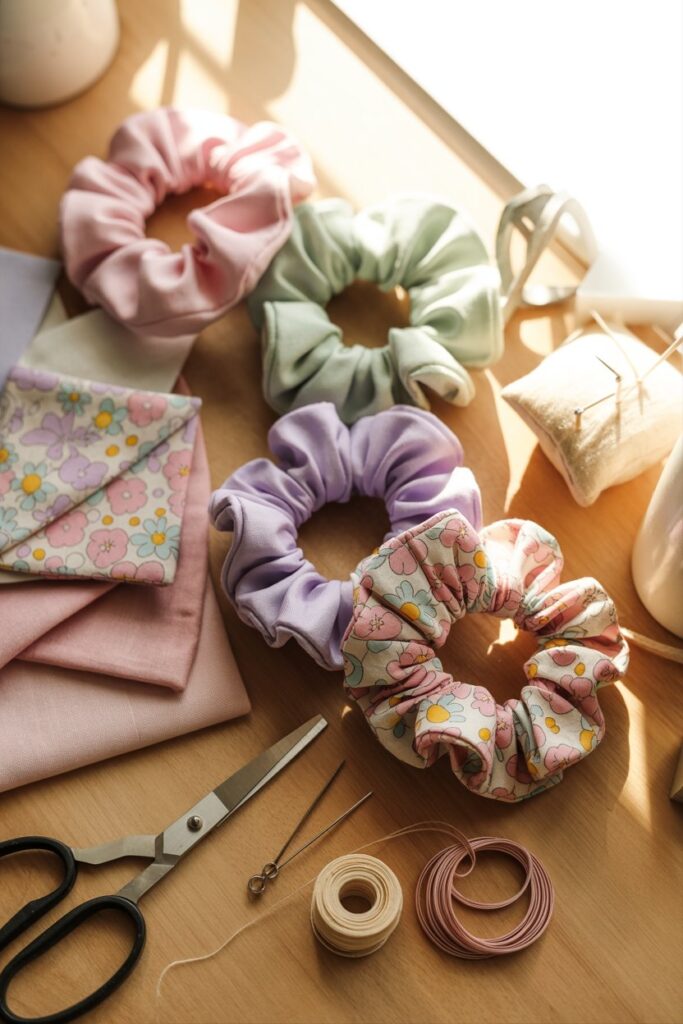
Scrunchies are quick, fun, and incredibly satisfying to make.
They are not only practical for keeping hair stylish and secure, but they also double as cute accessories that add a pop of personality to any outfit.
Once you make one, you might find yourself creating a whole collection — perfect for gifting or keeping for yourself.
Supplies
- Fabric (cotton, satin, or silk)
- Elastic
- Needle and thread or sewing machine
- Scissors
Instructions
- Cut a strip of fabric roughly 18×4 inches.
- Fold the fabric lengthwise with the right sides together and sew along the edge, leaving a small gap for turning.
- Turn the fabric right side out.
- Insert the elastic and tie the ends securely.
- Sew the gap closed to finish your scrunchie.
Pro Tip
Mix and match fabrics to create a playful set — polka dots, florals, metallics, or even velvet make for trendy, stylish scrunchies that you’ll love wearing or gifting.
15. Mini Canvas Paintings
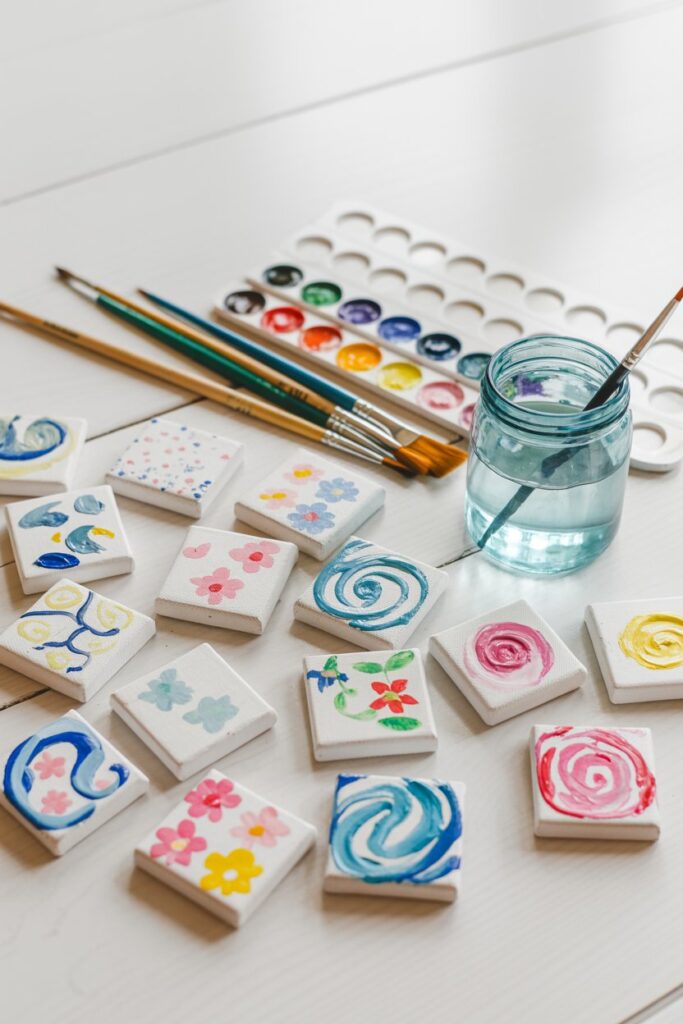
Painting on mini canvases is a fun, satisfying craft that allows you to express creativity in a small space.
These tiny artworks are perfect for displaying on shelves, desks, or windowsills, and you can even create a miniature gallery wall by grouping a few together.
It’s a low-pressure way to experiment with colors, patterns, and techniques while producing something beautiful.
Supplies
- Small canvases
- Acrylic paint
- Paintbrushes
- Palette or paper plate for mixing colors
Instructions
- Plan your design or dive straight in — abstracts, florals, or simple patterns are beginner-friendly.
- Paint your base colors and allow them to dry completely.
- Layer patterns, highlights, or small details for depth and interest.
- Let the finished piece dry fully before displaying or framing.
Pro Tip
Consider making a set of 3–5 mini canvases with coordinating colors or themes. Grouped together, they create a charming, eye-catching display that feels intentional and artistic.
16. DIY Tassel Garland
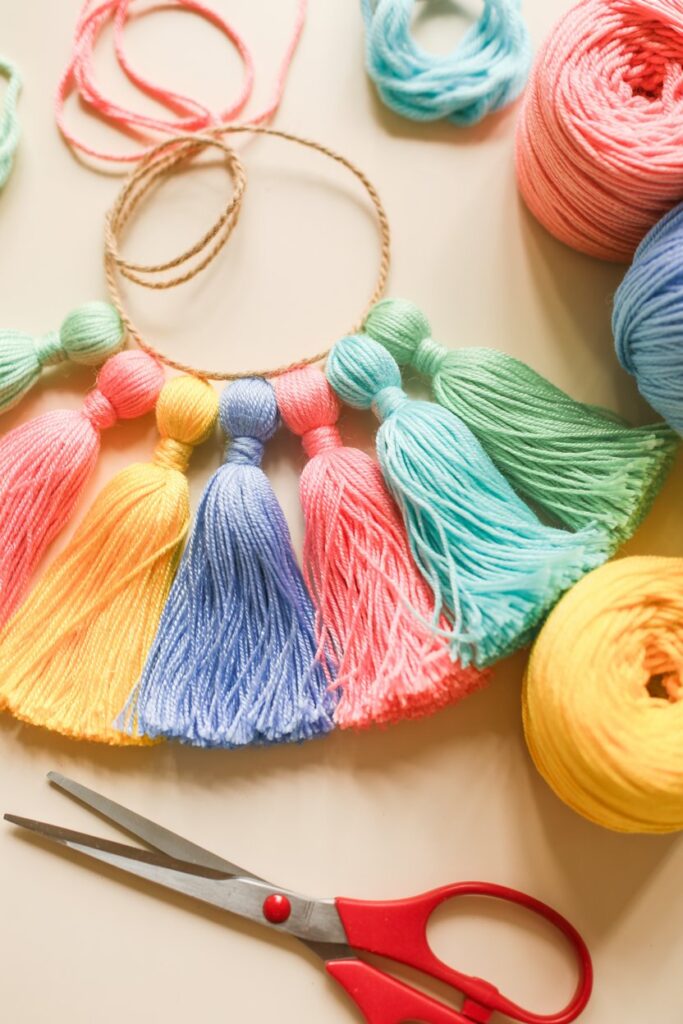
I adore garlands because they instantly brighten a room and add a touch of charm to any space.
Making them yourself is surprisingly satisfying, and they’re versatile enough for bedrooms, workspaces, or party decor.
This simple project is perfect for adding color, texture, and personality to your home.
Supplies
- Yarn or embroidery floss
- Scissors
- String or twine for the garland
- Tape (optional for securing ends)
Instructions
- Cut yarn into pieces about 8–10 inches long.
- Fold each piece in half and loop it over the string, pulling the ends through the loop to secure.
- Continue adding tassels until your garland is filled to your liking.
- Trim ends evenly if needed for a polished look.
Pro Tip
Mix and match colors for a playful or cozy vibe. Soft pastels create a warm, inviting feel, while bright tones are perfect for festive or party-ready decor.
17. Decorative Washi Tape Notebooks
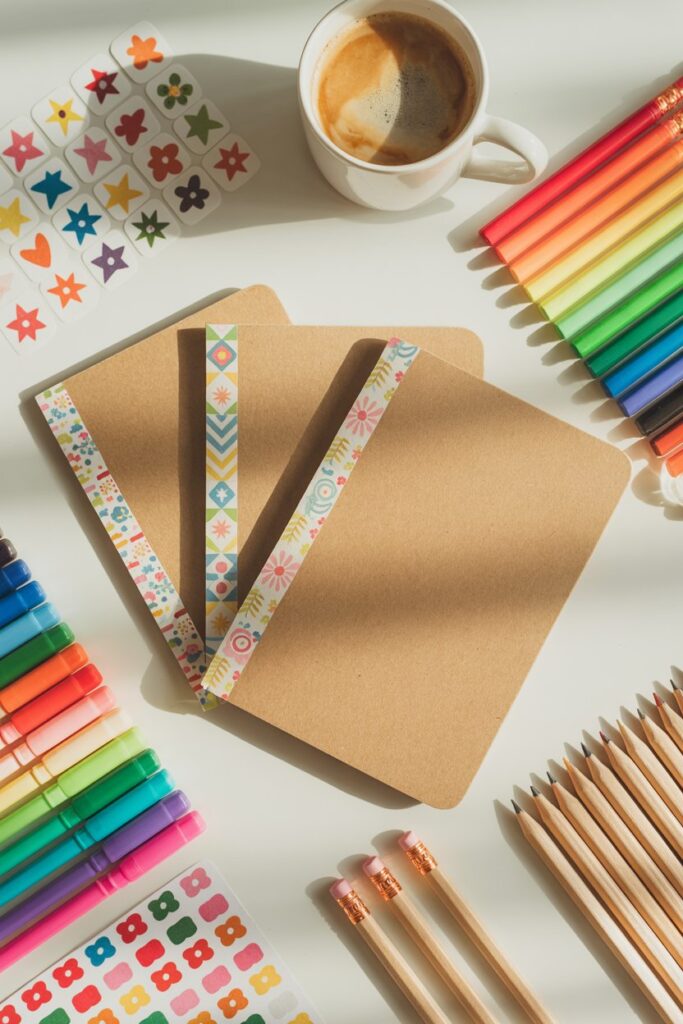
I love using washi tape because it instantly transforms something plain into something fun and personalized.
Decorating notebooks is quick, enjoyable, and perfect for journaling, planning, or gifting to friends and family. It’s a small craft that makes a big impact.
Supplies
- Plain notebook
- Washi tape in various patterns
- Stickers, markers, or pens (optional)
Instructions
- Decide on your design — stripes, blocks, or abstract shapes.
- Apply washi tape carefully, smoothing out any bubbles.
- Add doodles, stickers, or lettering for a personal touch.
Pro Tip
Decorate the edges of pages for a subtle “wow” factor when flipping through the notebook. It’s a small detail that makes your creation feel extra special.
18. DIY Scented Sachets
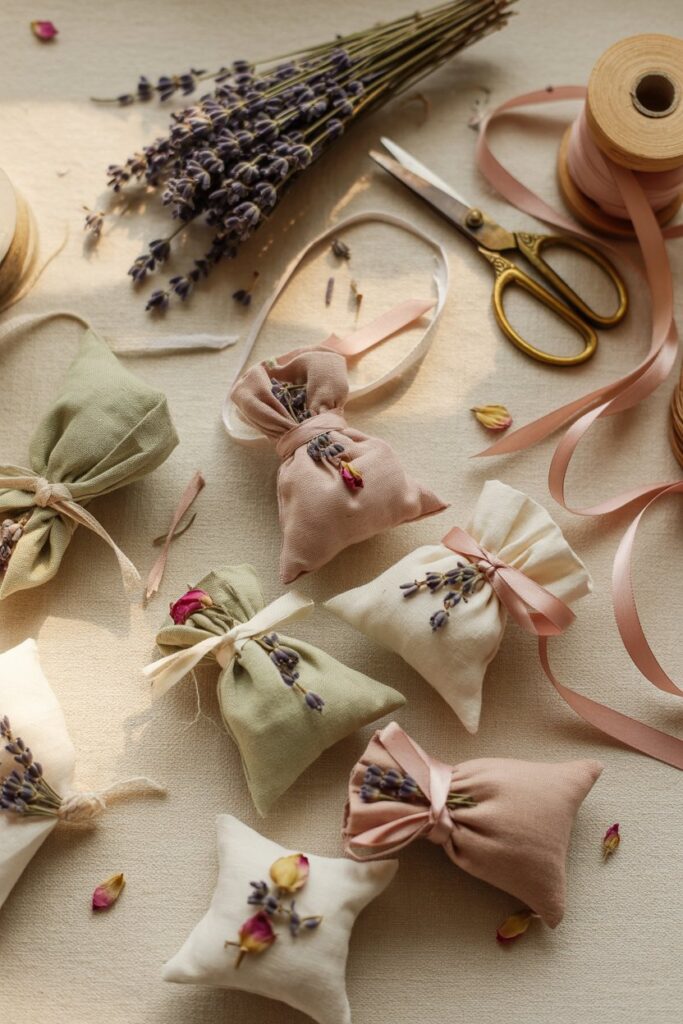
Scented sachets are small, charming, and wonderfully practical.
They make drawers, closets, or even cars smell delightful, and the handmade touch turns them into thoughtful gifts for friends and family.
Plus, creating your own allows you to mix scents and experiment with different fabrics, textures, and colors to match your personal style or the season.
Supplies
- Small fabric squares
- Needle and thread or hot glue
- Dried lavender, rose petals, or potpourri
- Ribbon
Instructions
- Fold the fabric into a small pouch and sew or glue the edges, leaving the top open.
- Fill with dried flowers or potpourri, layering scents if desired.
- Sew or tie the top closed securely.
- Add a ribbon for a decorative finish.
Pro Tip
Mix scents to create a signature aroma — lavender and rose together make a classic, soothing combination. These little sachets feel extra special when you customize the fabric or ribbon to match the recipient’s taste.
19. Hand-Painted Plant Markers
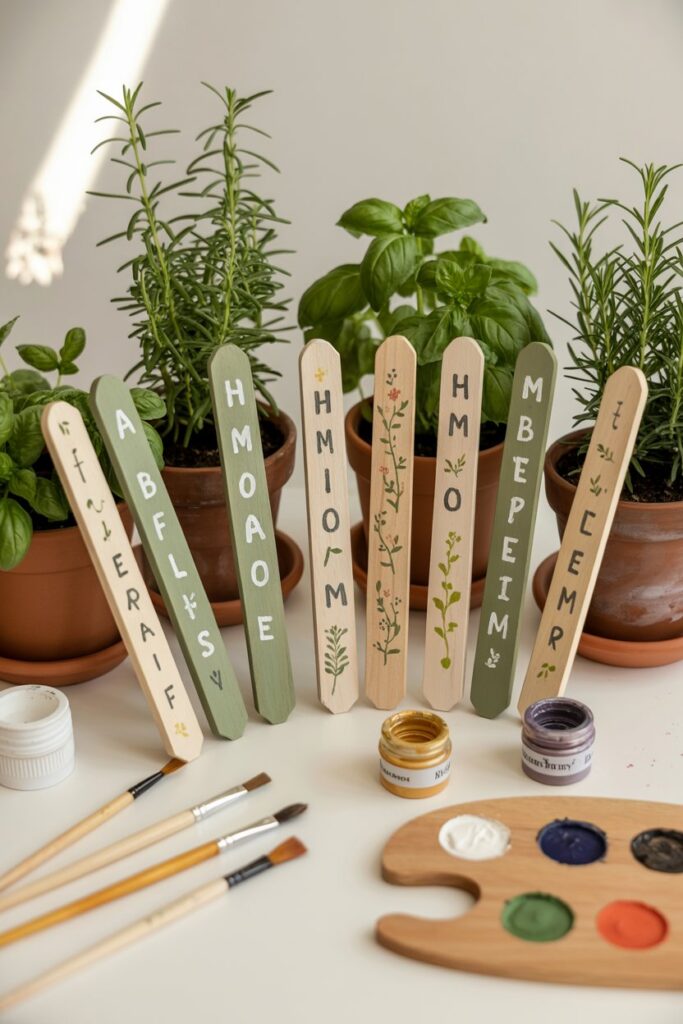
Plant markers are a fun, satisfying craft that add both organization and charm to your garden, balcony, or kitchen herb pots.
They’re a simple way to keep track of your plants while giving your green space a personal, decorative touch.
Plus, painting and customizing them is a relaxing, creative activity that makes your garden feel extra cared for.
Supplies
- Wooden sticks or spoons
- Acrylic paint or paint pens
- Clear sealant spray
Instructions
- Clean your wooden sticks and allow them to dry completely.
- Paint a base color if desired, or leave the wood natural for a rustic look.
- Write plant names or draw small icons to identify your herbs or flowers.
- Seal with clear spray for durability and to protect your artwork from moisture.
Pro Tip
Add tiny details like dots, hearts, or leaves to give each marker personality.
These little touches make your garden feel loved and thoughtfully curated, even if it’s just a few pots on your windowsill.
20. DIY Jewelry Dish with Gold Accents
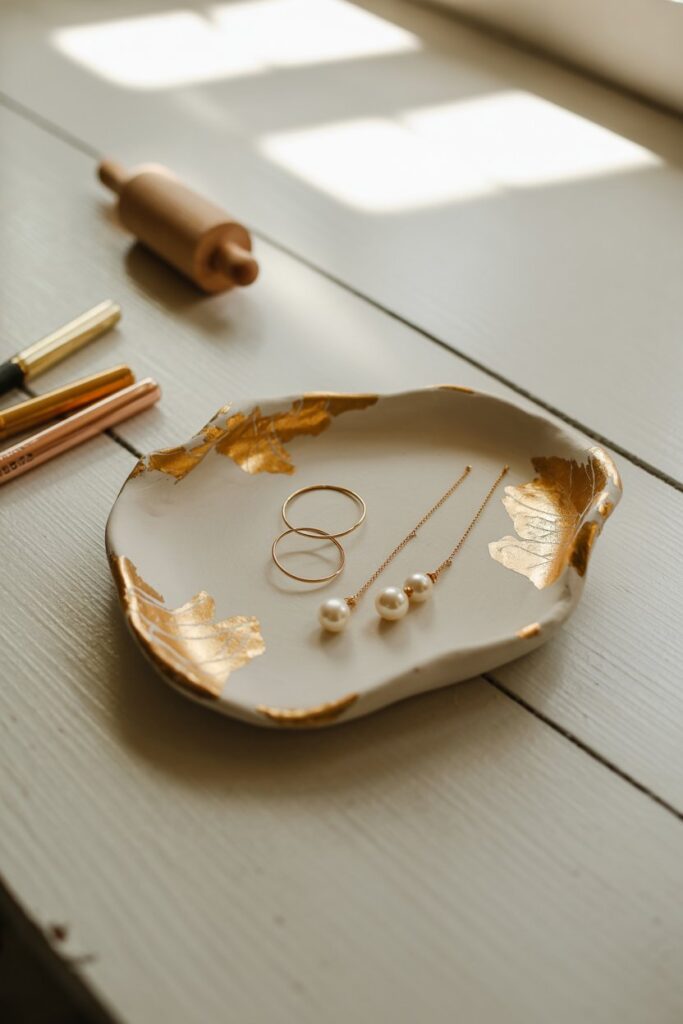
A jewelry dish is a simple, satisfying craft that instantly adds a touch of elegance to any nightstand, dresser, or vanity.
Creating your own lets you personalize it with shapes, colors, or metallic accents, making it both a decorative piece and a practical organizer for rings, earrings, and small trinkets.
The best part? Imperfections only add charm, giving it a handmade, boutique feel.
Supplies
- Air-dry clay
- Rolling pin
- Small bowl or mold
- Gold leaf pen or metallic paint
- Clear sealant
Instructions
- Roll out the clay to about 1/4 inch thickness and shape it into a shallow dish using a small bowl or your hands.
- Smooth the edges gently with a bit of water.
- Allow the dish to dry completely, usually 24 hours.
- Add gold accents or metallic details with a pen or paint to elevate the design.
- Seal with clear spray to protect the surface and ensure longevity.
Pro Tip
Use this dish to store jewelry, tiny trinkets, or keys. Its combination of practicality and elegance makes it a chic addition to any space, and customizing it with metallic accents makes it feel extra luxurious.
See the full post here – Anthropologie-Inspired DIY Air-Dry Clay Trinket Dish Tutorial
Final Thought
I hope this list of creative 1-hour crafts inspires you to grab your supplies and just start making. The beauty of these projects is that they’re quick, fun, and leave you with something you can actually use, gift, or display.
I love how even a tiny bit of crafting can turn a regular afternoon into a little moment of joy and self-expression.
Remember, it’s not about perfection — it’s about enjoying the process, adding your personal touch, and feeling proud of what you create.
So go ahead, pick a project that speaks to you, and let yourself get a little messy. You might just discover a new favorite hobby along the way!