If you have ever wanted to make something cute for your room, desk, or coffee table, air dry clay is one of the easiest ways to get creative without needing special tools or experience.
I love these kinds of projects for slow afternoons when you want to unwind, put on some music, and make something with your hands.
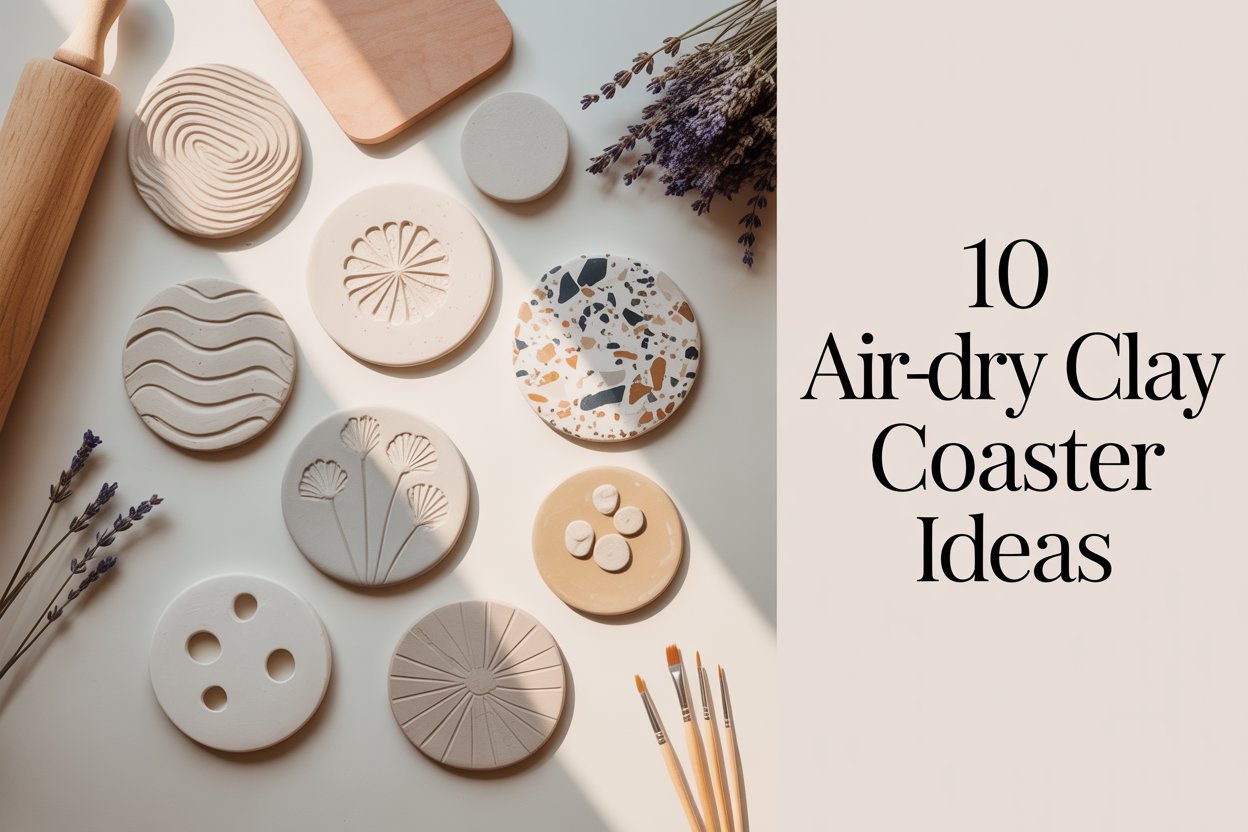
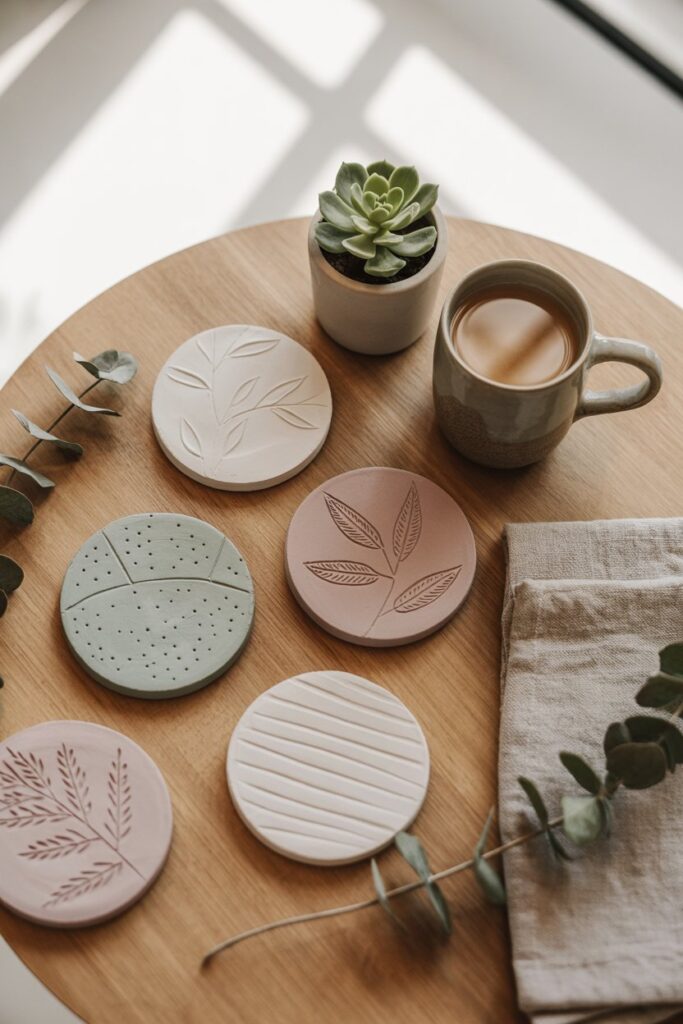
Clay coasters are honestly one of my favorite DIYs. They are small, simple, and so easy to customize.
You can keep them minimal, play with soft pastels, add botanical details, or go bold with patterns and texture.
No matter your style, there is something about shaping clay that makes the process feel calming and fun.
Take your time with this one. Grab your clay, clear a little space, and enjoy the process.
Below are 10 air dry clay coaster ideas, each with supplies, easy steps, and a few helpful tips I have picked up along the way to make your coasters look polished and finished.
Tips for Making Air Dry Clay Coasters Look Polished
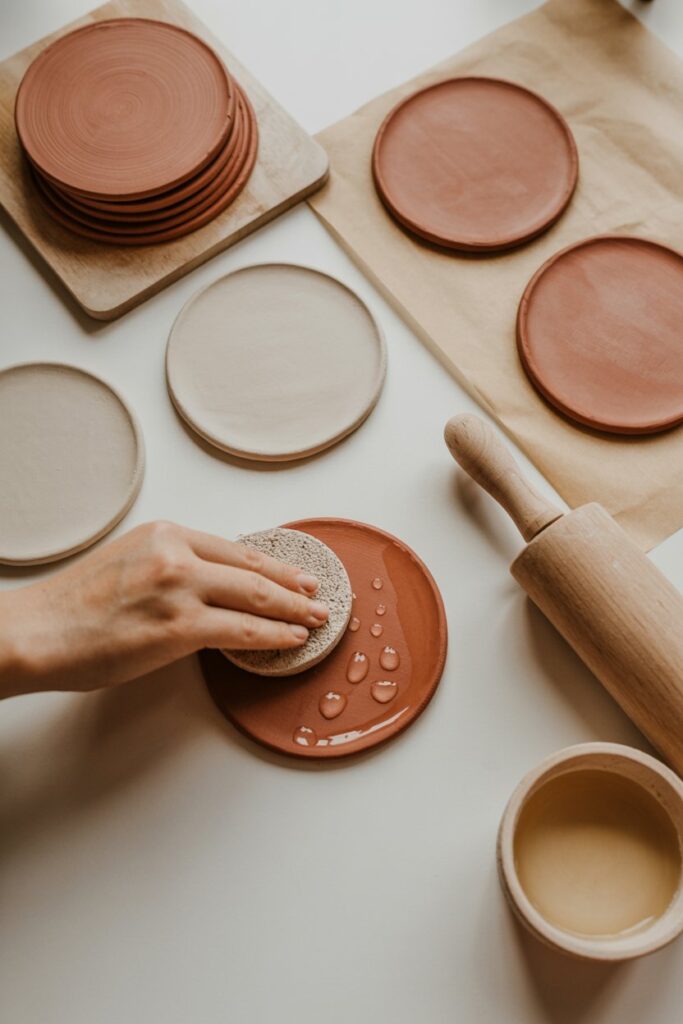
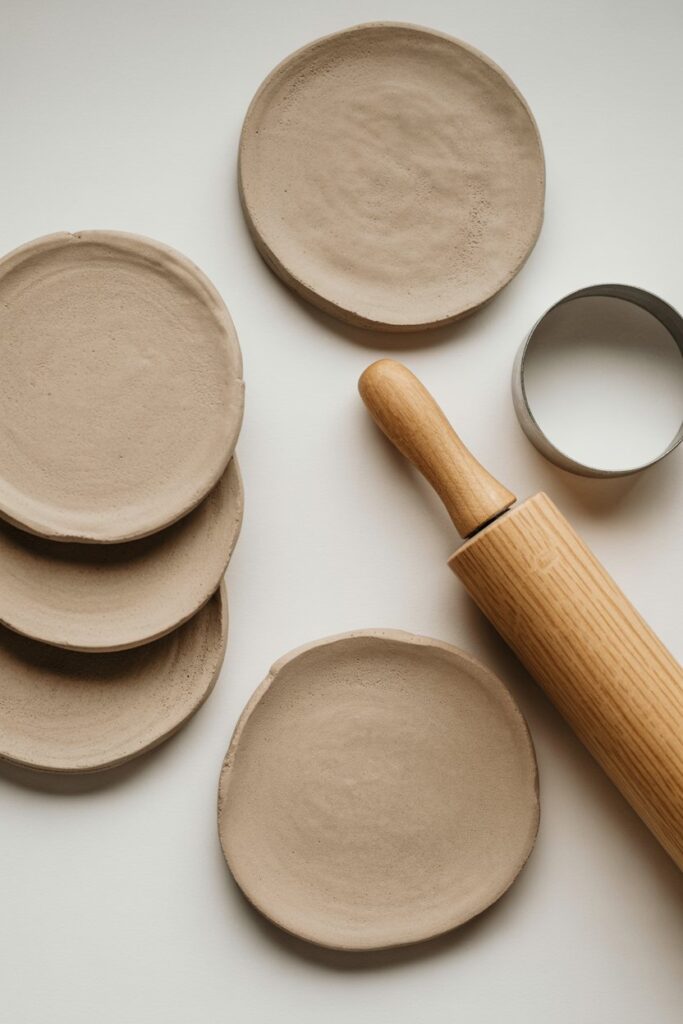
Air dry clay is easy to work with, but a few small steps can make your coasters look much more finished. I always roll my clay evenly, about a quarter inch thick, so the coasters dry flat and sturdy.
Smoothing the edges with a damp finger or sponge makes a big difference. It takes just a minute and instantly gives the coasters a cleaner look.
To avoid warping, I flip them occasionally while they dry so both sides dry evenly.
Once the coasters are completely dry, sealing them is important. A clear sealant protects the surface and helps your design last longer.
These simple tips help turn a basic DIY into something that looks polished and gift ready.
Also Check Out These – Start Your Air Dry Clay Journey with These 10 Essential Tips and How to Seal Air Dry Clay
1. Minimalist Circle Coasters
These are the coasters I always suggest if you are brand new to working with clay. The designs are simple, clean, and modern, which makes them surprisingly forgiving for beginners.
Even better, they have that effortless, high end look that feels expensive without being complicated to make.
Supplies
- Air-dry clay
- Rolling pin
- Round cutter or cup
- Water + paper towel
- Sandpaper
- Acrylic paint (optional)
- Sealant
Steps
- Roll out your clay until it’s about the thickness of a cookie.
- Use a cup or cookie cutter to make circles.
- Dip your fingertip in water and smooth the edges — it makes SUCH a difference.
- Let them dry completely (usually a full day).
- Sand lightly to get that clean, store-bought finish.
- Paint the edges or leave them natural.
- Seal to protect them.
Tip: If your clay cracks while drying, you can patch tiny cracks with a dot of water and clay mixed together.
2. Marbled Clay Coasters
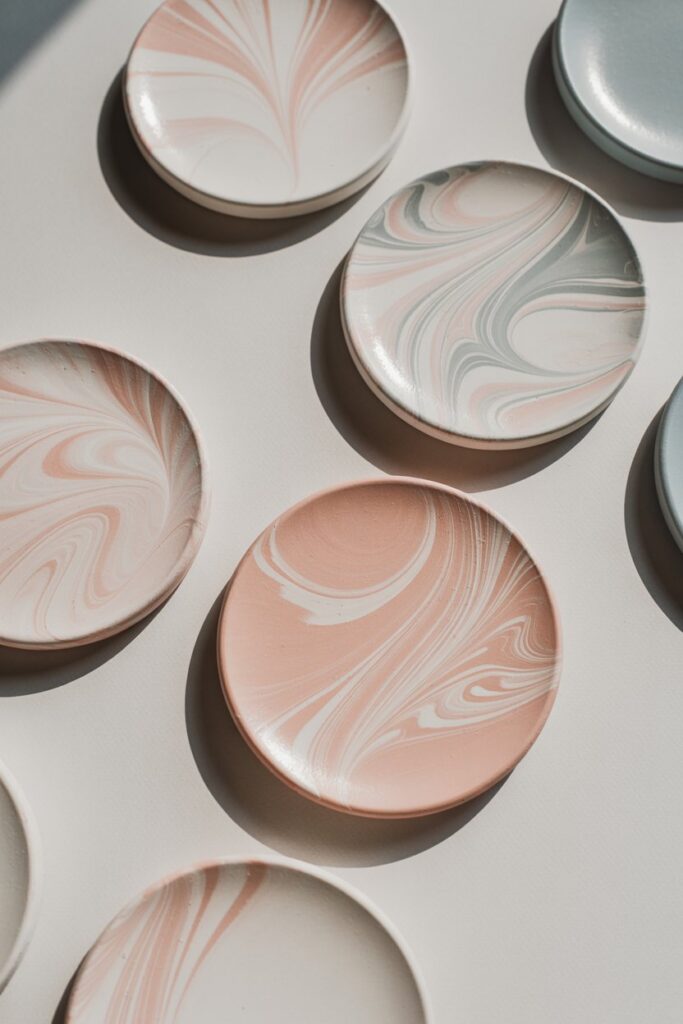
If you want something that looks designer with almost no effort, marbling is the way to go. It is one of those techniques that always turns out beautiful, even if it is your first time working with clay.
I love that no two coasters ever look the same, which makes them feel special and high end.
You can keep the colors soft and neutral or play with bolder shades, and the result still looks polished and intentional.
Supplies
- White clay + 2–3 colors
- Rolling pin
- Round cutter
- Sealant
Steps
- Roll small rope-like pieces of each color.
- Twist them together once or twice — don’t overmix.
- Fold and roll until you see pretty swirls.
- Flatten and cut your shapes.
- Let them dry.
- Seal to bring out the marbling.
Tip: Pastel colors look dreamy, but bold colors pop beautifully too.
3. Leaf-Shaped Botanical Coasters
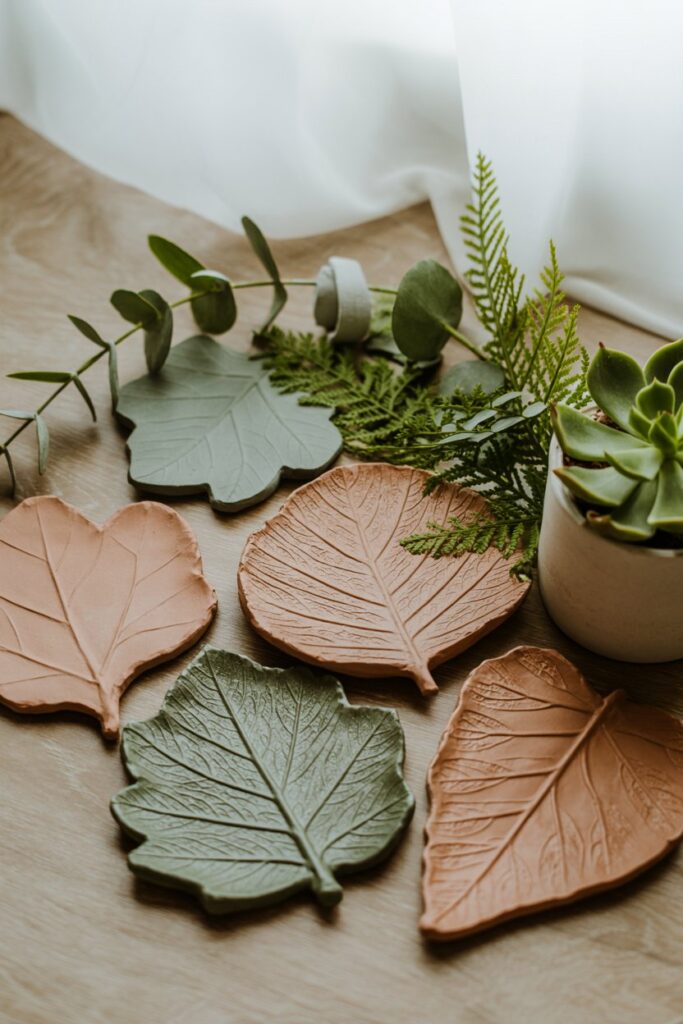
This one is perfect if you love nature-inspired décor. The leaf prints have a surprisingly detailed, delicate look, and they add a fresh, organic touch to your space.
I love how simple it is to create a natural, handmade vibe that still feels polished and intentional.
Supplies
- Air-dry clay
- Clean leaves
- Rolling pin
- Craft knife
- Sealant
Steps
- Roll out the clay.
- Press a leaf vein-side down into the clay.
- Roll gently on top to transfer the pattern.
- Cut around the leaf shape with a knife.
- Smooth the edges.
- Dry and seal.
Tip: Ferns, eucalyptus, or lemon leaves give the prettiest textures.
4. Terrazzo Style Coasters
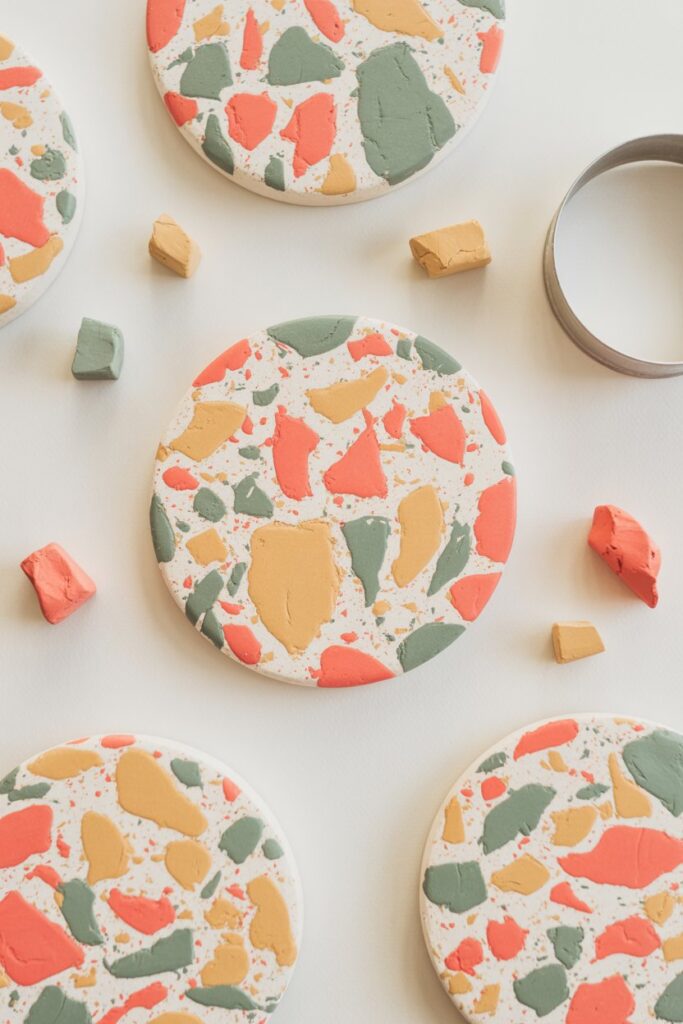
These are always a fun option. The tiny speckles add texture and interest, giving your coasters a modern, high-end look without much effort.
I love how playful yet polished they feel, and they are surprisingly versatile. They look just as good on a minimalist desk as they do on a cozy coffee table.
Every time I make a batch, I enjoy seeing how each speckle lands differently, making every coaster feel completely unique.
Supplies
- White clay
- Scraps of colored clay
- Rolling pin
- Cutter
- Sealant
Steps
- Roll tiny bits of colored clay into chips.
- Scatter them onto your white clay.
- Gently fold and roll so the colors stay visible.
- Cut your shape.
- Allow to dry.
- Seal for a glossy terrazzo effect.
Tip: The more uneven the chips, the better it looks.
5. Wavy Edge Organic Coasters
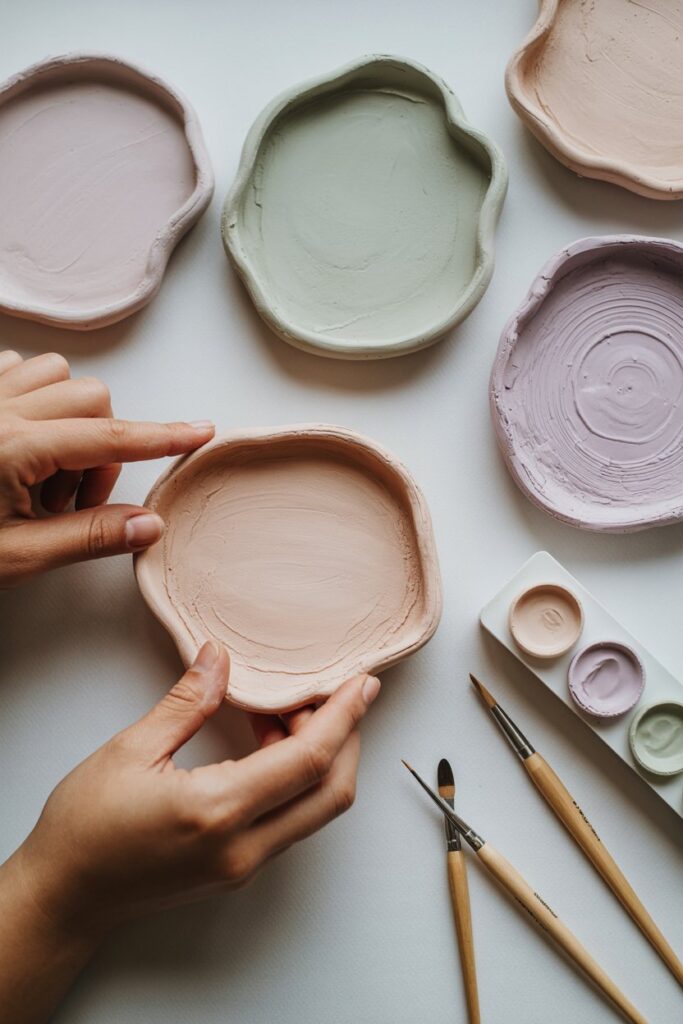
If you love soft, aesthetic designs, these are perfect. The muted colors feel calming and cozy, and the gently irregular edges give each coaster a charming, handmade quality.
I love how simple they are to make, yet they look thoughtful and elegant. They fit beautifully on a coffee table, desk, or bedside table and add a soft, personal touch to any space.
Supplies
- Clay
- Rolling pin
- Cutter (optional)
- Sandpaper
Steps
- Roll your clay.
- Cut a circle OR just freehand a round shape.
- Pinch the edges gently so it looks wavy.
- Let dry.
- Sand lightly to soften the waves.
- Paint or seal.
Tip: Pastel colors look especially cute with this style.
6. Stamped Pattern Coasters
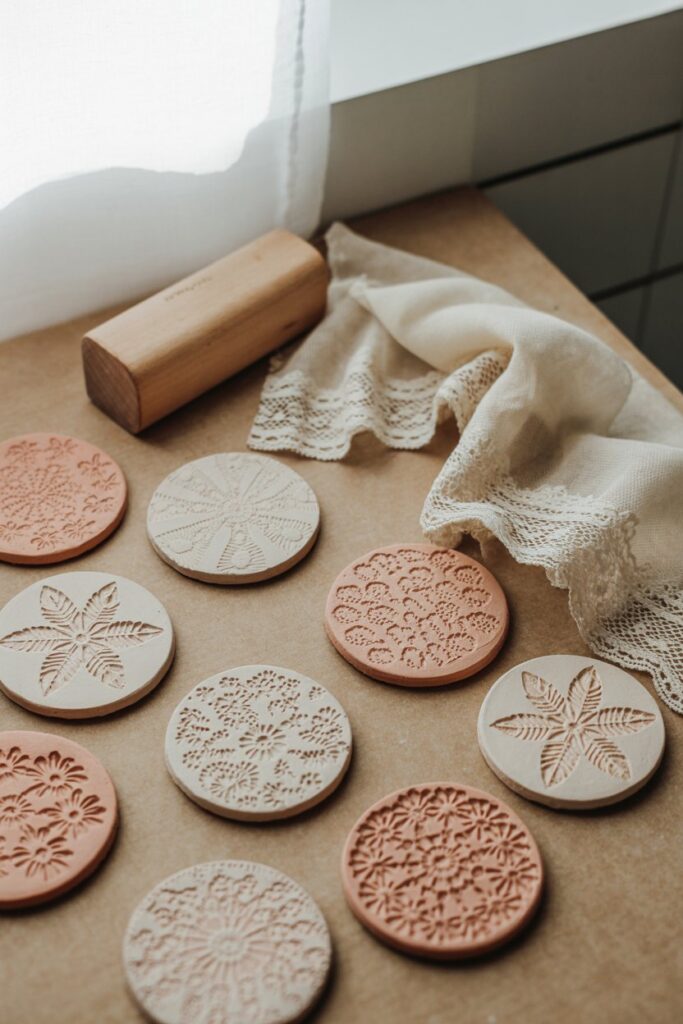
These are perfect if you want a pretty, textured design without the fuss of painting detailed art.
I love using simple stamps or household items to press patterns into the clay. It adds depth and visual interest while keeping the process easy and relaxing.
Each coaster ends up with a unique texture, and the patterns look surprisingly professional, making them a great choice for beginners or anyone who loves a handmade, modern look.
Supplies
- Clay
- Lace fabric, rubber stamps, or texture sheets
- Rolling pin
- Cutter
- Paint (optional)
- Sealant
Steps
- Roll your clay a bit thinner than normal.
- Lay your texture item on top.
- Press gently and evenly.
- Peel off the fabric/stamp.
- Cut your shape.
- Dry completely.
- Brush a tiny bit of paint over raised areas (optional).
- Seal.
Tip: Metallic paints look chef’s kiss on textured clay.
7. Geometric Hexagon Coasters
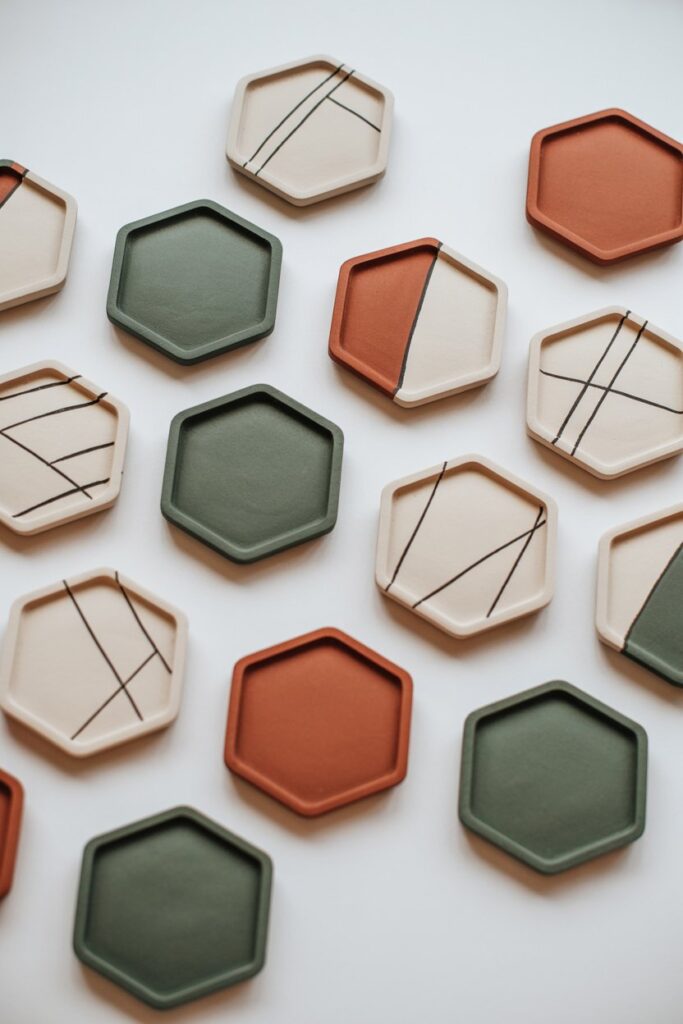
These coasters look incredibly modern and polished. I love how the clean lines and structured shape give them a sleek, contemporary feel.
They are perfect if you enjoy symmetry and minimalist design, and they make a striking addition to any desk, coffee table, or side table.
Even though the shape is precise, they are still approachable to make with a little care, and each one ends up looking professional and stylish.
Supplies
- Clay
- Hexagon cutter or paper template
- Knife
- Ruler
- Paint
- Sealant
Steps
- Roll your clay evenly.
- Place your template on top.
- Cut clean edges using a ruler as a guide.
- Smooth with water.
- Dry and sand.
- Paint color blocks or thin line accents.
- Seal.
Tip: A tiny line of gold paint instantly makes them look fancy.
8. Faux Stone Coasters
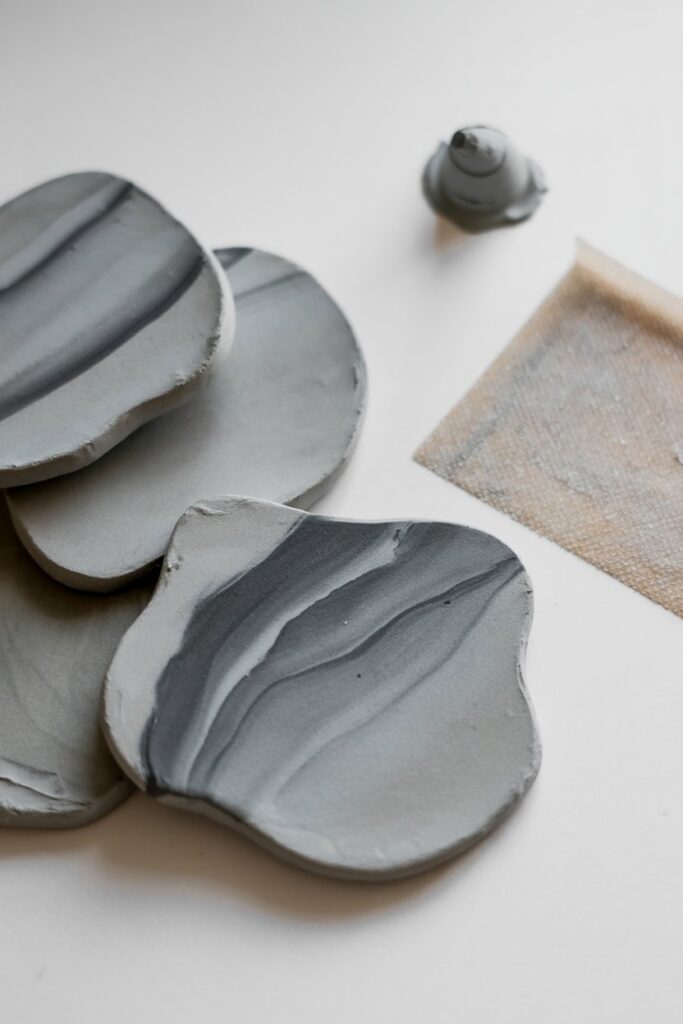
These coasters have the look of polished stone but are surprisingly easy to make. I love how the subtle swirls and speckles give them a natural, sophisticated appearance.
They feel elegant and high-end without needing any real stone or complicated techniques. These are perfect if you want your DIY to look chic and modern while still keeping the process simple and fun.
Supplies
- Air-dry clay
- Acrylic paint (gray/black)
- Sandpaper
- Sealant
Steps
- Knead a small amount of paint into your clay.
- Don’t overmix — the streaks make it look stone-like.
- Roll and cut.
- Dry until firm.
- Sand the top to smooth it perfectly.
- Seal with a satin finish.
Tip: Speckle the top lightly with paint for a granite effect.
9. Personalized Initial Coasters
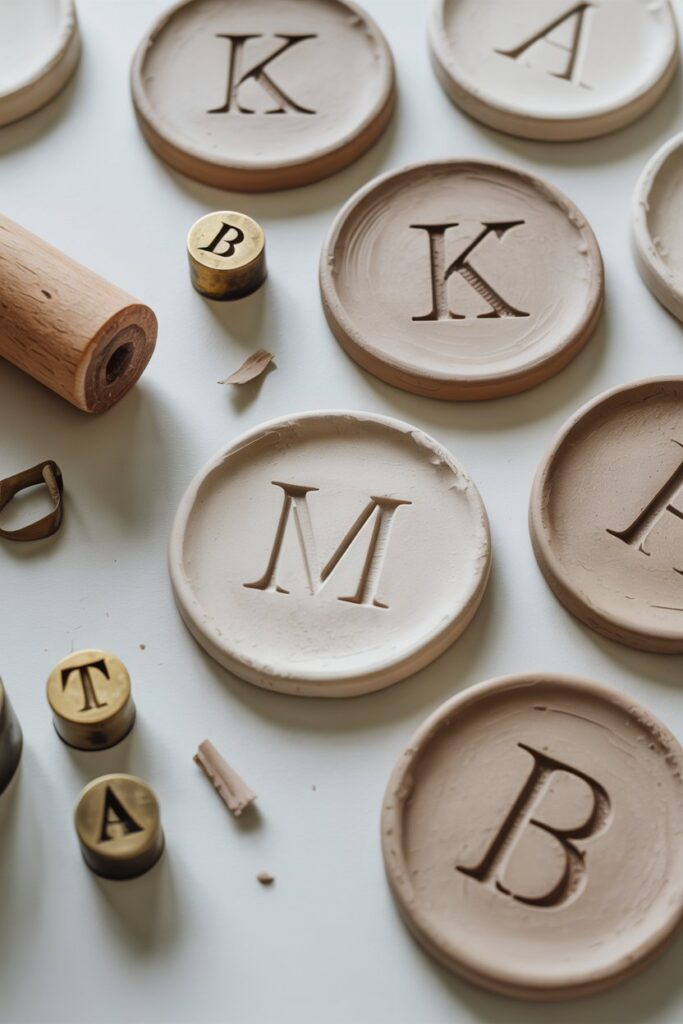
These are such a sweet and thoughtful gift. I love how adding initials or monograms instantly makes a coaster feel personal and meaningful.
They are surprisingly easy to create, even if you’ve never worked with clay before. You can keep the design simple and minimal or add a bit of color and texture to make it stand out.
They’re perfect for gifting to friends, family, or even as a little treat for yourself.
Supplies
- Clay
- Alphabet stamps OR a toothpick
- Paint
- Sealant
Steps
- Cut your coaster shape.
- Stamp or carve initials.
- Let dry fully.
- Paint the letters or outline them.
- Seal so the design lasts.
Tip: This looks really nice with neutral clay and black or gold lettering.
10. Flower-Pressed Coasters
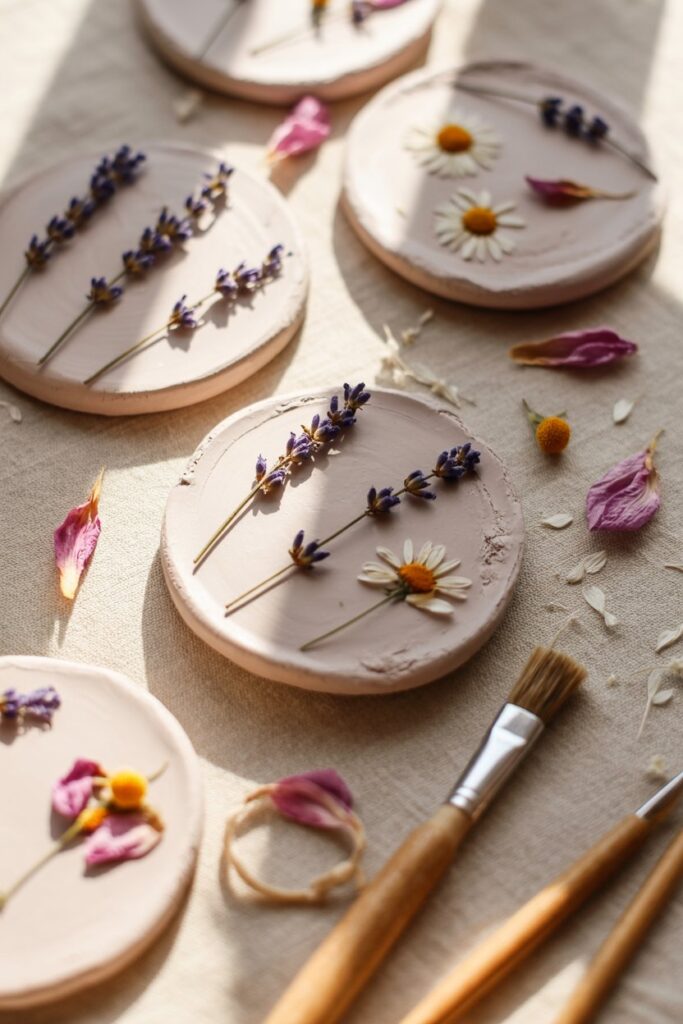
These coasters are perfect if you love soft, cottagecore vibes. I adore how pressing real flowers into the clay creates a delicate, whimsical look that feels both natural and handmade.
Each coaster ends up completely unique, capturing the beauty of the blooms in a simple, elegant way. They’re perfect for brightening up a coffee table, desk, or bedside space, and they make dreamy, thoughtful gifts for anyone who loves nature-inspired décor.
Supplies
- Air-dry clay
- Dried flowers
- Rolling pin
- Sealant (clear, non-yellowing)
Steps
- Roll your clay.
- Cut out your coaster shape.
- Gently press dried flowers into the surface.
- Let dry completely.
- Seal to keep the flowers protected.
Tip: Use only very flat flowers — thick ones can lift or crack as the clay shrinks.
Heres More Stuff To Help You
DIY Clay Diffuser Stones: A Beautiful, Natural Way to Scent Your Home
15 Simple and Easy Air Dry Clay Projects Your Kids Will Love
How to Glaze Air Dry Clay: A Beginner’s Guide for Moms
A Few Mistakes You Should Avoid
Working with air-dry clay is fun and beginner-friendly, but there are a few common mistakes I’ve learned to avoid so your coasters turn out beautifully.
1. Rolling the Clay Too Thin or Unevenly
If your clay is too thin, the coasters can warp or crack as they dry. I usually roll mine to about a quarter inch thick and try to keep it even across the entire piece.
This makes them sturdy and helps them dry flat.
2. Skipping Edge Smoothing
It’s tempting to leave the edges as they are, but smoothing them with a damp finger or sponge makes a huge difference.
Clean edges instantly give your coasters a polished, professional look.
3. Rushing the Drying Process
Air-dry clay needs time. If it dries too quickly on one side, it can warp or bend. I like to flip my coasters every few hours during the first day to help both sides dry evenly.
4. Forgetting to Seal
Skipping sealant is a common mistake. A clear sealant protects your coasters from moisture and keeps your design looking fresh for longer. A couple of thin coats is usually perfect.
5. Overcomplicating Designs as a Beginner
It’s easy to want to paint intricate designs right away, but simple shapes and textures often look the most polished.
Start with basic patterns or stamped designs and build your confidence before trying more complex art.
Avoiding these mistakes has made a huge difference in how my coasters turn out. A little patience and attention to detail goes a long way in creating something that looks handmade and high-end.
Conclusion
Making air-dry clay coasters is one of those simple, calming crafts that lets you be creative without any pressure. You can try one style or combine a few to create a whole themed set.
No matter what you choose, you end up with something handmade that’s cute, useful, and totally your own.
I hope these ideas inspire you to grab a block of clay, slow down for a little bit, and make something you’ll love seeing in your space every day.