Free Crochet Bandana Pattern: Easy Crochet Bandana Tutorial
I’ve made a lot of crochet accessories that looked cute in the pattern photos but somehow weren’t nearly as useful once I actually wore them. This little crochet bandana was different.
I originally wanted something simple that I could throw on when my hair needed a little help, but I also wanted it to look like an actual accessory rather than a scrap of crochet tied around my head.
After playing around with the shape and sizing, I settled on this simple triangular construction. There’s no complicated lacework, no joining a bunch of separate pieces, and no confusing shaping to keep track of.
You crochet the triangle from the top point down, increasing at both sides as you go. Then you add a simple border and crochet the ties directly onto the two corners.
That makes this a particularly nice project if you’re still getting comfortable with crochet shaping.
And because the pattern is based on increases rather than a fixed complicated stitch count, it’s easy to make yours smaller, larger, shorter, or longer depending on how you want to wear it.
Why I Love This Crochet Bandana Pattern
There are a few reasons this has become one of my favorite quick crochet accessories.
First, it’s actually fast.
Once you get into the rhythm of the increases, the rows go quickly. I can usually make the main triangle in an evening while watching something.
Second, you don’t need much yarn.
This is a great project for using leftover yarn from another crochet project, especially if you have a beautiful skein sitting around with just enough left for something small.
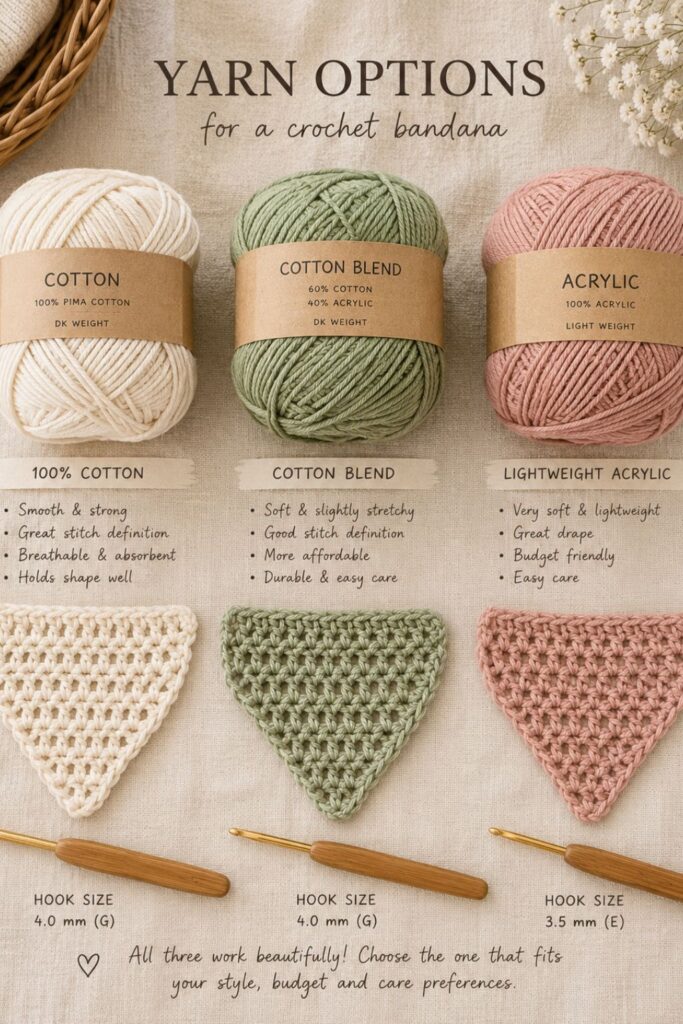
And third, you can make the finished bandana look completely different simply by changing the yarn.
A cotton yarn gives you a lightweight, practical summer bandana. A soft acrylic or cotton blend gives it a slightly cozier feel. A variegated yarn can create its own pattern without requiring you to change colors.
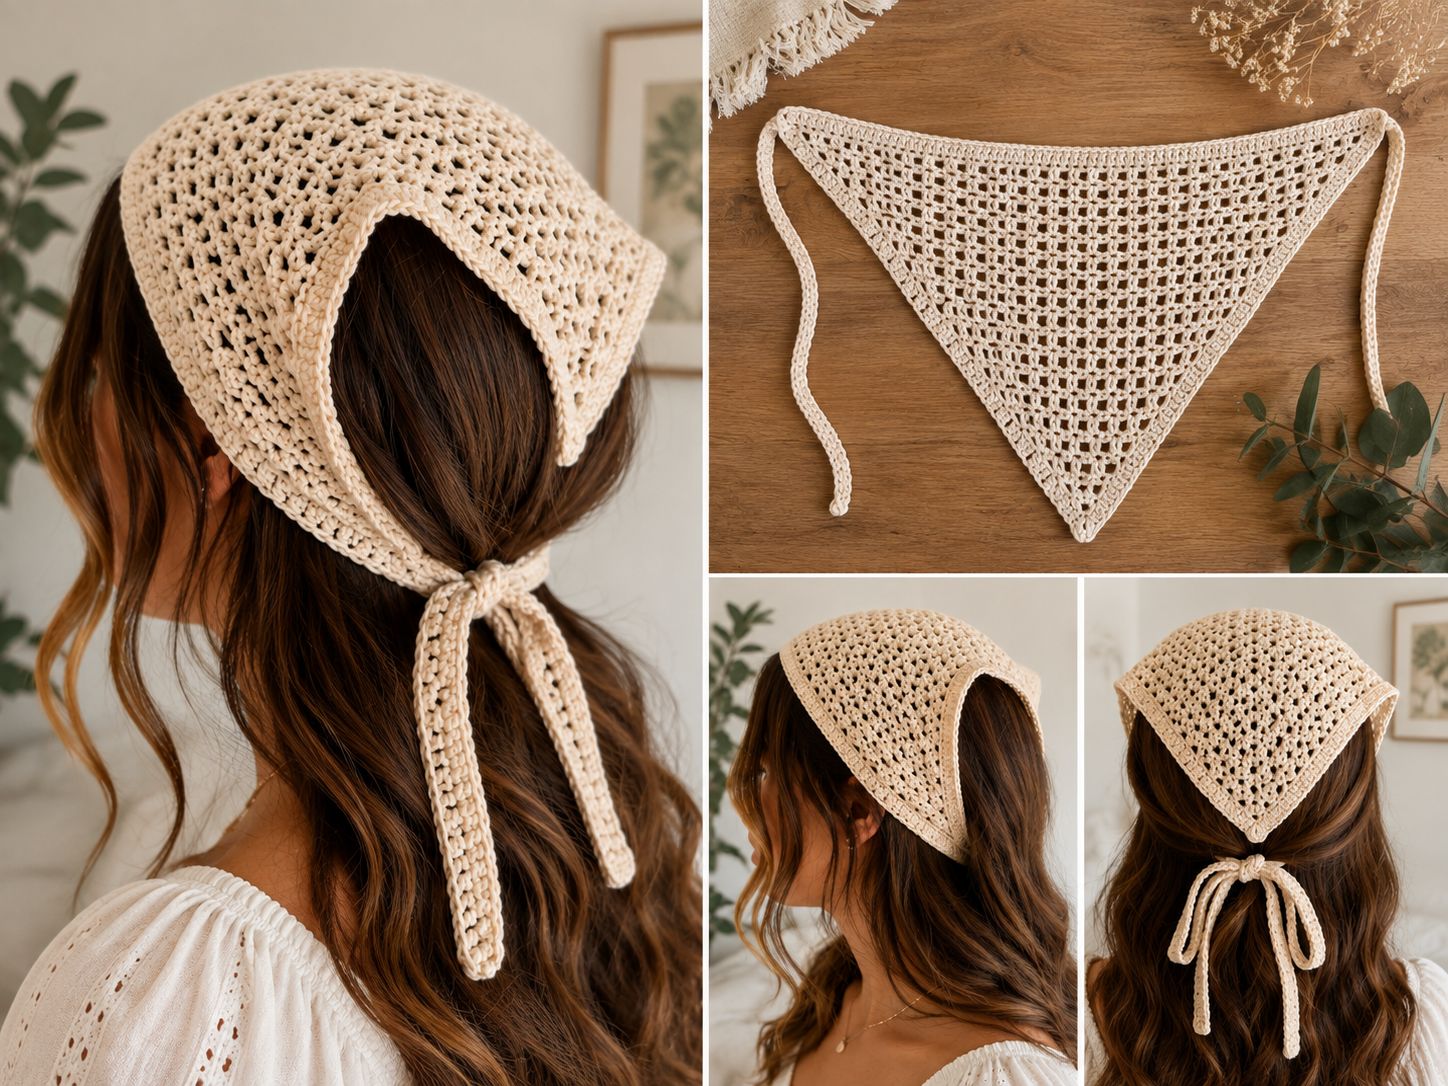
What This Crochet Bandana Actually Looks Like
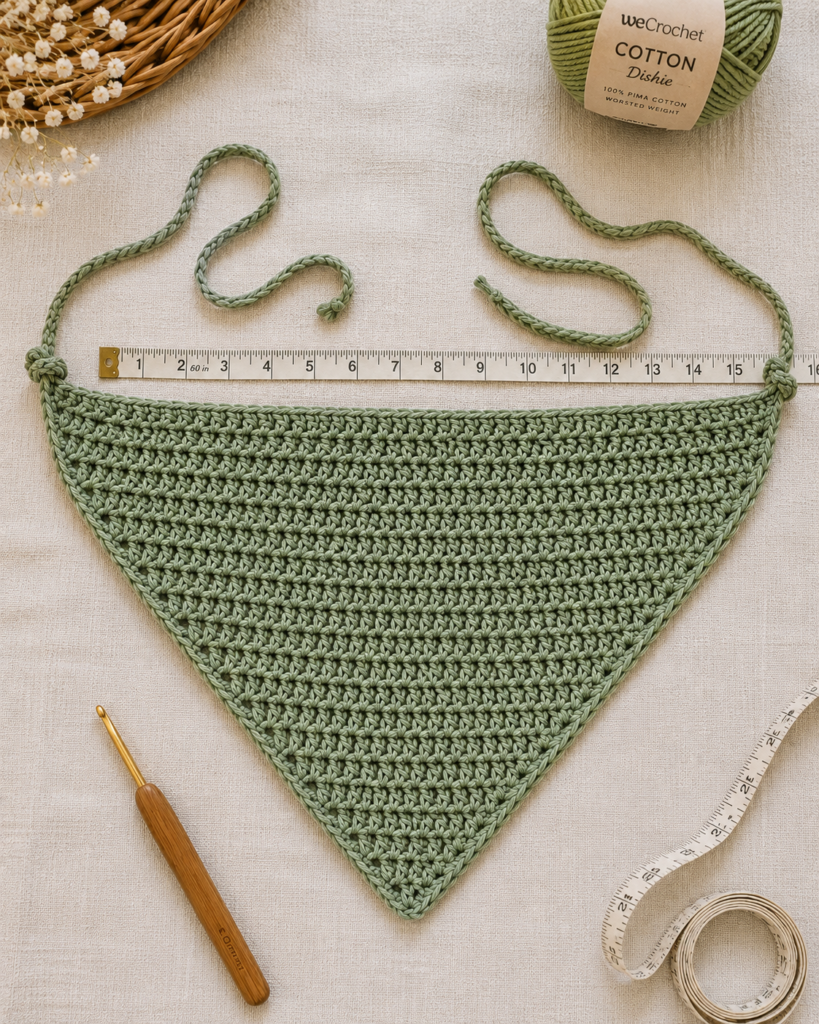
The finished piece is a simple triangular bandana with a wider straight edge and a pointed center.
The wide edge sits across the forehead, while the point hangs toward the back of the head.
Two long crochet ties are attached to the upper corners so you can tie the bandana securely behind your head.
The pattern is worked from the point toward the wider edge.
That means every row becomes slightly wider than the previous one.
You can stop whenever your triangle reaches the size you want.
Crochet Bandana Pattern Details
Skill level: Easy
Construction: One triangular piece with attached ties
Finished size: Approximately 13 to 15 inches wide across the straight edge and 9 to 11 inches from the center point to the top edge, depending on yarn, hook and tension
Time: Approximately 1 to 2 hours
Yarn: Approximately 50 to 75 yards
Hook: 4 mm crochet hook
Stitches used: Half double crochet
US crochet terminology
This pattern is designed to be adjustable, so your exact finished measurements can vary slightly depending on your tension.
Materials You’ll Need
- Worsted or DK-weight yarn
- 4 mm crochet hook
- Yarn needle
- Scissors
- Measuring tape
- Stitch marker, optional
What Yarn Works Best?
For a wearable bandana, I especially like cotton or cotton-blend yarn.
Cotton has enough structure to help the triangle hold its shape, but it isn’t overly warm.
A smooth yarn also makes the stitch pattern easier to see while you’re learning.
I would avoid very fuzzy or textured yarn for your first version because it can make it harder to see where you’re inserting your hook.
If you’re using a different yarn weight, that’s completely fine. Just expect the finished size to change.
Crochet Abbreviations
- ch = chain
- hdc = half double crochet
- st = stitch
- sts = stitches
- sl st = slip stitch
- sc = single crochet
Before You Start
There are two things worth knowing about this pattern.
The first is that the chain-1 turning chain does not count as a stitch.
The second is that every row increases by two stitches.
Those increases happen at the beginning and end of every row.
That is what creates the triangular shape.
If your stitch count isn’t increasing by two each row, stop and check your previous row before continuing.
How to Crochet the Bandana
Step 1: Make the Starting Chain
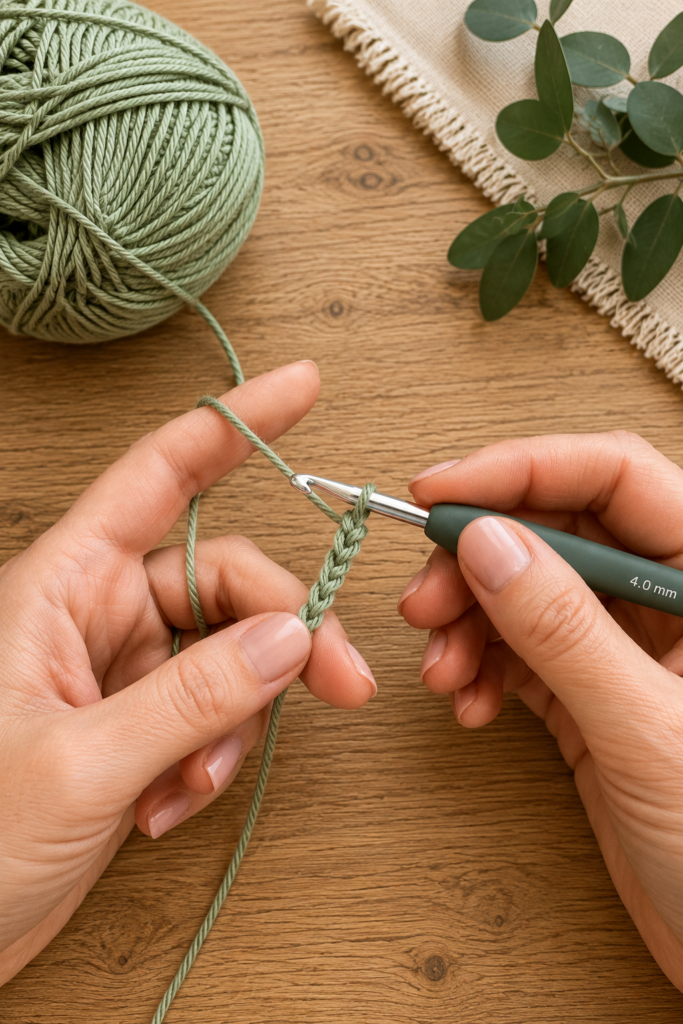
Chain 2.
You are going to work the first row directly into the second chain from your hook.
Step 2: Crochet Row 1
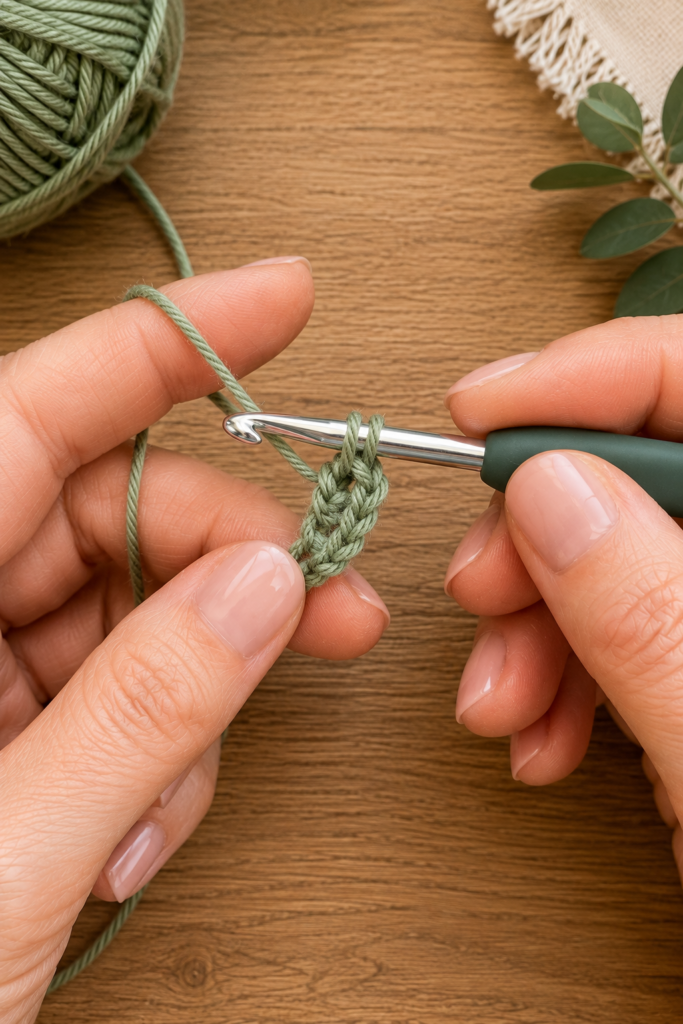
Work 2 hdc into the second chain from your hook.
You should have:
2 stitches
Turn your work.
Step 3: Crochet Row 2
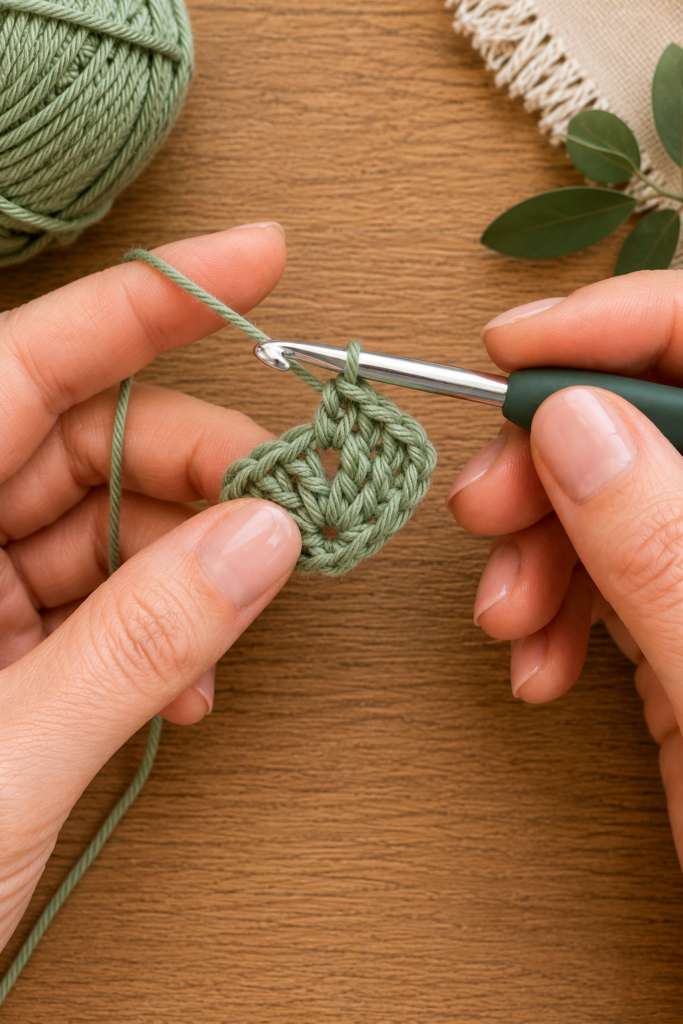
Chain 1.
The chain 1 does not count as a stitch.
Work 2 hdc into the first stitch.
Work 1 hdc into the next stitch.
You should now have:
3 stitches?
Actually, this is the point where it’s important to keep the increase pattern consistent.
For this bandana, each row needs to add two stitches, so the correct construction is:
Chain 1.
Work 2 hdc into the first stitch.
Work 2 hdc into the second stitch.
You now have:
4 stitches
Turn.
Step 4: Continue the Triangle
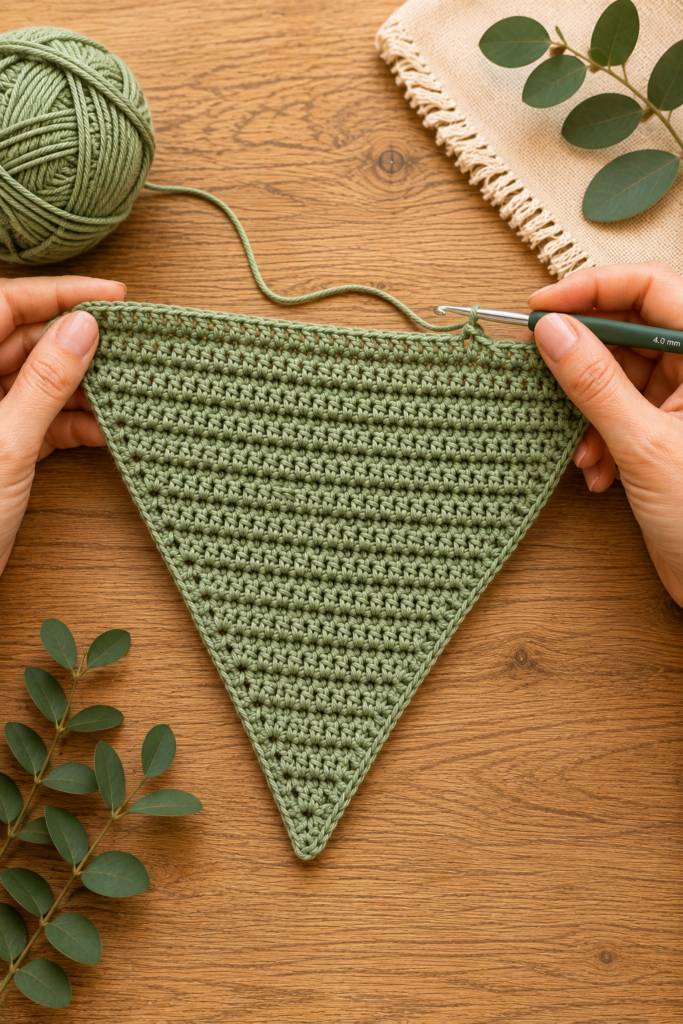
From this point forward, every row follows the same basic formula:
Chain 1, 2 hdc in the first stitch, hdc across until the final stitch, 2 hdc in the final stitch.
The chain 1 does not count as a stitch.
Your stitch count should increase by two stitches every row.
Here is the progression:
| Row | Stitch Count |
|---|---|
| 1 | 2 hdc |
| 2 | 4 hdc |
| 3 | 6 hdc |
| 4 | 8 hdc |
| 5 | 10 hdc |
| 6 | 12 hdc |
| 7 | 14 hdc |
| 8 | 16 hdc |
| 9 | 18 hdc |
| 10 | 20 hdc |
| 11 | 22 hdc |
| 12 | 24 hdc |
| 13 | 26 hdc |
| 14 | 28 hdc |
| 15 | 30 hdc |
| 16 | 32 hdc |
| 17 | 34 hdc |
| 18 | 36 hdc |
| 19 | 38 hdc |
| 20 | 40 hdc |
| 21 | 42 hdc |
| 22 | 44 hdc |
| 23 | 46 hdc |
| 24 | 48 hdc |
For the bandana pictured in my finished-project style, I recommend working through Row 24 for a comfortable adult size.
However, don’t feel like you have to stop there.
The actual size depends on your yarn and tension.
How to Check the Size While You’re Crocheting
After Row 15 or so, lay the triangle flat and measure across the widest edge.
Then hold that edge across your forehead.
If it already looks wide enough, you can stop.
If you want more coverage, continue adding rows.
Because every additional row adds two stitches, the triangle gradually becomes wider and slightly deeper.
This is one of the reasons I like this pattern for beginners.
You don’t have to completely understand complicated shaping instructions.
You’re simply repeating the same increase pattern until the bandana reaches the size you want.
Step 5: Finish the Triangle
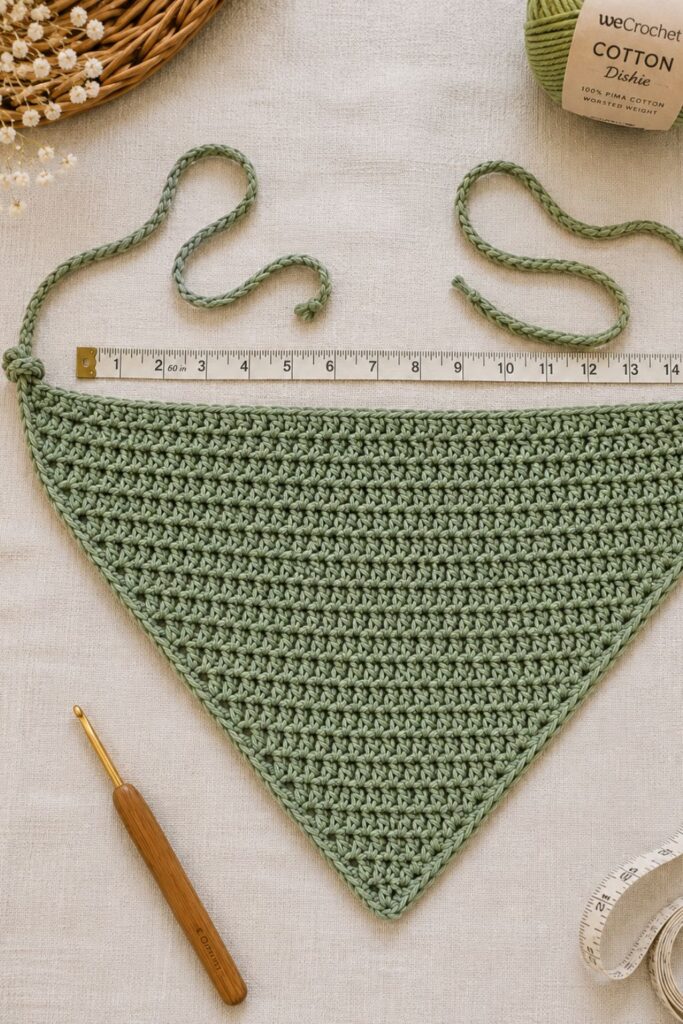
Once your triangle is the size you want, fasten off.
Leave a yarn tail long enough to weave in securely.
Use your yarn needle to weave the end through several stitches on the wrong side of the work.
Trim the excess.
At this point you should have a simple triangle with a point at one end and a wide straight edge at the other.
Don’t worry if the edges look slightly uneven.
The border will clean them up considerably.
Step 6: Add the Crochet Border
The border is optional, but I really recommend it.
It gives the bandana a more finished appearance and helps define the shape.
Attach your yarn at one of the upper corners of the wide edge.
Chain 1.
Work 1 sc evenly along the edge toward the bottom point.
When you reach the point, work 3 sc into the point stitch.
Continue working sc evenly up the other side.
When you reach the opposite top corner, fasten off.
Weave in your ends.
Don’t Stress About Exact Stitch Placement Along the Sides
This is one place where I don’t recommend trying to force a particular stitch count.
The diagonal sides aren’t made from a row of obvious individual stitches in the same way the top edge is.
Instead, work your single crochets evenly along the edge.
If your edge starts pulling or puckering, you’re probably putting too many stitches into it.
If it looks like it’s gathering inward, you probably need a few more stitches.
The goal is a flat, smooth edge.
Step 7: Make the First Tie
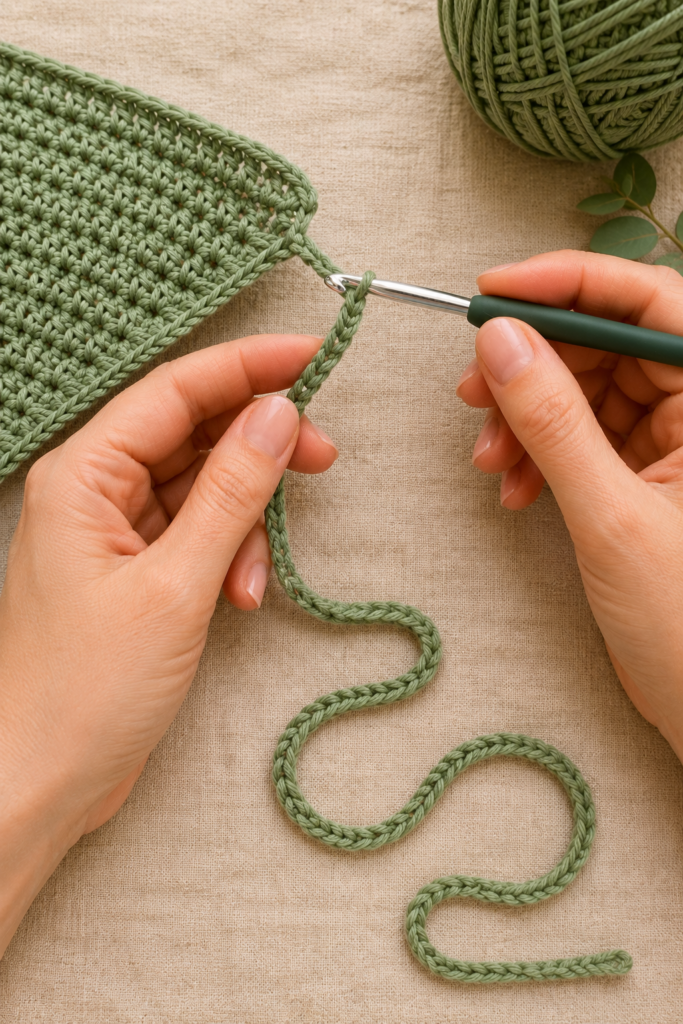
Now we’re going to add the first tie directly to one corner.
Attach your yarn to the corner of the wide edge.
Chain 45 to 55 stitches.
For a longer tie, chain 60.
For a shorter tie, chain 40 to 45.
Once you’ve reached your desired length, slip stitch back along the chain toward the bandana.
You don’t have to slip stitch into every chain if you prefer a thinner, softer tie.
For a sturdier tie, work 1 sc into each chain instead.
When you reach the corner again, fasten off and weave in the end securely.
Step 8: Make the Second Tie
Repeat exactly the same process on the opposite corner.
Try to make both ties approximately the same length.
If you’re making the bandana for yourself, I recommend trying it on before weaving in the final ends.
That way you can easily add a few chains if you decide you want longer ties.
The Finished Crochet Bandana
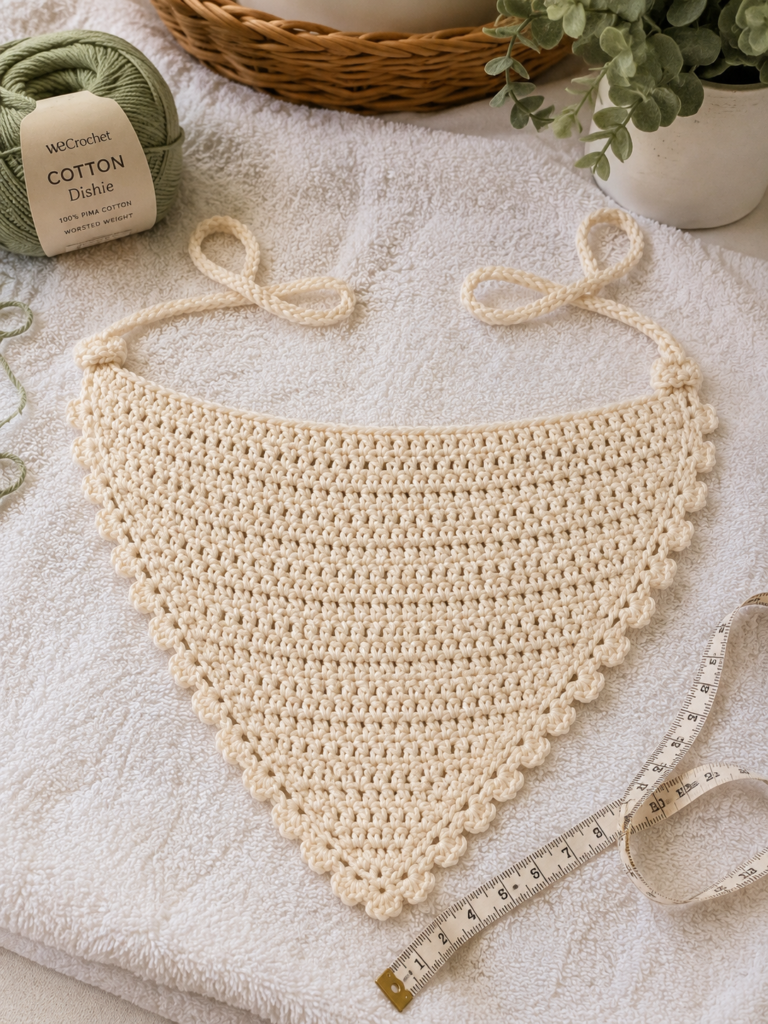
You should now have:
- A triangular crochet bandana
- A finished border around the sides
- One tie at each upper corner
- A pointed center section
- Enough length in the ties to secure it behind your head
That’s it.
No separate pieces to sew together.
No complicated assembly.
And no special crochet techniques beyond half double crochet and simple increases.
How to Make a Smaller Crochet Bandana
If you’re making this for a child or want a smaller hair accessory, simply stop crocheting earlier.
For example, you might stop around Row 16 to 18.
The most important thing isn’t the exact row number.
Measure the widest edge.
Then compare it to the size you want.
For a child’s bandana, I recommend measuring around the child’s head first rather than relying on a standard size.
How to Make a Larger Bandana
For a larger adult bandana or one with more coverage, continue past Row 24.
Keep following the same formula:
2 hdc in first stitch, hdc across, 2 hdc in last stitch.
Every additional row adds two stitches.
Once the straight edge is wide enough to sit comfortably across your forehead, stop.
How to Make the Ties Longer or Shorter
This part is even easier.
The triangle itself doesn’t need to change.
Simply change the starting chain for the ties.
Shorter ties
Chain 35 to 40.
Standard ties
Chain 45 to 55.
Longer ties
Chain 60 to 70.
If you’re making the bandana for somebody else, longer ties are generally safer because they give the wearer more flexibility when tying it.
How to Get a Nice Even Shape
The most important thing is to keep your increases consistent.
At the beginning of every row:
2 hdc in the first stitch.
At the end:
2 hdc in the final stitch.
Everything in between is simply one hdc in each stitch.
If the triangle begins curving strangely or one side looks longer than the other, check those two increases first.
My Best Tip for Keeping Track
I don’t actually count every stitch in the middle of the row once I’ve got the rhythm down.
I pay attention to the first and last stitch.
If I have the correct increases at both ends, the triangle generally takes care of itself.
But I do count the total number of stitches every few rows when I’m making a new size.
That catches mistakes before they become annoying to undo.
Common Mistakes to Watch For
Accidentally Counting the Turning Chain
Remember that the chain 1 at the beginning of the row does not count as a stitch.
If you start treating it like one, your stitch count will slowly become incorrect.
Missing One of the Increases
If you put two hdc into the first stitch but only one hdc into the final stitch, you’ll add only one stitch instead of two.
Your triangle will gradually become uneven.
Adding Too Many Stitches Along the Border
The border should lie flat.
If it starts looking wavy, you’ve probably added too many stitches along that edge.
Making the Ties Too Short
It is much easier to remove a few stitches than it is to wish you had made the tie longer after everything is finished.
When in doubt, make the ties slightly longer.
Troubleshooting Your Crochet Bandana
My triangle isn’t symmetrical.
Check the increase at both ends of each row.
You should be adding exactly two stitches per row.
Also check that you haven’t accidentally skipped a stitch somewhere in the middle.
My edges are curling.
A small amount of curling can happen naturally while you’re crocheting.
Try laying the piece flat and gently stretching it with your fingers.
If the finished piece still curls significantly, blocking should help.
My bandana is much smaller than expected.
Your crochet tension is probably tighter than the tension used for the sample.
Don’t automatically add a larger hook.
Instead, measure the actual triangle and simply continue crocheting more rows if you like the fabric you’re getting.
My bandana is too floppy.
Your yarn may be softer or thinner than expected.
Try a slightly smaller hook on your next version, or choose a cotton or cotton-blend yarn with a little more structure.
My ties twist.
Make sure your foundation chain isn’t twisting before you begin working back along it.
If you’re making the ties with sc instead of slip stitches, keep your tension loose enough that the chain doesn’t pull into a tight cord.
Blocking Your Crochet Bandana
Blocking isn’t absolutely necessary, but it can make a noticeable difference.
Especially if your triangle looks slightly uneven.
Lightly dampen the finished bandana.
Don’t soak it.
Lay it flat on a clean towel or blocking mat.
Gently shape the triangle so both diagonal edges are even.
Smooth the top edge.
Straighten the point.
Then allow it to dry completely before removing it.
Don’t stretch it aggressively.
You’re shaping the crochet, not trying to make it significantly larger.
Easy Ways to Change the Look
This pattern is intentionally simple, which makes it really easy to customize.
Add a Contrasting Border
Use one color for the triangle and another for the border.
Cream with brown.
Sage with ivory.
Terracotta with beige.
Black with a soft cream border.
These combinations look especially pretty.
Make a Striped Bandana
Change colors every few rows.
You could make two rows in one color followed by two rows in another.
Or create a simple rainbow effect with small amounts of leftover yarn.
Add a Picot Edge
If you already know how to crochet a picot border, you can substitute that for the simple single crochet edging.
It gives the bandana a more delicate, feminine finish.
Use Variegated Yarn
This is one of the easiest options.
You can keep the entire pattern exactly the same while allowing the yarn to create the color changes for you.
Ways to Wear Your Crochet Bandana
I like this bandana for more than just one hairstyle.
Classic Headband
Place the wide edge across your forehead and tie the two ends behind your head.
The point should fall toward the back.
Hair-Up Bandana
Pull your hair into a loose bun or ponytail first, then tie the bandana around your head.
This is especially nice when you want a few pieces of hair to frame your face.
Low Ponytail
Tie your hair low at the nape of your neck and position the bandana slightly farther back on your head.
Beach or Summer Look
A lightweight cotton bandana works particularly well here.
I like a simple neutral color with a loose summer dress or linen outfit.
Crochet Bandana Gift Ideas
This would make such a sweet handmade gift.
Because the pattern is fairly quick, you could make one in a recipient’s favorite color without committing to a huge crochet project.
For a gift, I’d pair it with:
- A handmade scrunchie
- A small crochet pouch
- Hair clips
- A pretty claw clip
- A handwritten note
- A small self-care gift
- A matching crochet headband
You could also make several in different colors and give them as a little handmade accessory set.
How to Care for Your Crochet Bandana
Always check the yarn label first.
For cotton yarn, I generally prefer gentle washing in cool or lukewarm water.
Avoid very hot water unless the yarn label specifically says it’s suitable.
After washing, reshape the bandana while damp and allow it to dry flat.
Don’t hang it while soaking wet because the weight of the water can stretch the triangle and ties.
Frequently Asked Questions
Is this crochet bandana beginner friendly?
Yes.
If you know how to chain, make a half double crochet, and work two stitches into the same stitch, you can make this pattern.
The main triangle uses the same increase formula over and over.
How much yarn do I need?
For the standard adult size, approximately 50 to 75 yards is usually enough.
I’d still recommend having at least 100 yards available, particularly if you’re using a different yarn weight or want longer ties.
Can I use cotton yarn?
Yes, and cotton is one of my favorite choices for this project.
It’s breathable, has good stitch definition, and works especially well for a summer bandana.
Can I use acrylic yarn?
Absolutely.
A lightweight acrylic can work nicely, especially if you already have some leftover yarn.
The finished bandana may feel softer and have slightly more drape than one made with cotton.
Can I make this crochet bandana for a child?
Yes.
Make fewer rows for a smaller triangle and shorten the ties.
Measure the finished piece against the child’s head as you go rather than relying entirely on the adult measurements.
Can I make the bandana bigger?
Yes.
Continue adding rows using the exact same increase formula until you reach the desired width.
Can I use a different stitch?
You can experiment with single crochet, double crochet, moss stitch, granny stitch or other patterns.
However, changing the stitch will change the gauge and finished dimensions, so I recommend making a small swatch first.
Do I have to add the border?
No.
The bandana works without it.
I prefer the border because it gives the edges a cleaner, more finished appearance.
Do I have to block it?
No, but I recommend it if your edges look uneven.
A gentle block can make the finished triangle look much more polished.
If You Want More DIY Crafts to Try
- Easy Crochet Baby Hat Pattern
- DIY Bath Bombs
- Air Dry Clay Incense Holder Tutorial
- Easy DIY: How to Make Candles at Home for Beginners
Final Thoughts
This is one of those crochet projects I come back to when I want to make something pretty without committing to a week-long project.
The actual construction is simple enough that I can work through the rows without constantly stopping to figure out what comes next, but the finished piece still feels like a proper handmade accessory.
And I really like that you can make the pattern your own.
Use cotton for summer, a cozy yarn for cooler weather, add stripes, keep it completely neutral, make the ties extra long, or stop a few rows earlier for a smaller version.
Once you understand that the triangle is simply increasing by two stitches on every row, the whole project becomes very straightforward.
If you make one, I’d love to know what yarn color you chose and whether you kept yours simple or added a contrasting border.