
How to Turn Your DIY Hobby Into a Blog (And Make an Income)
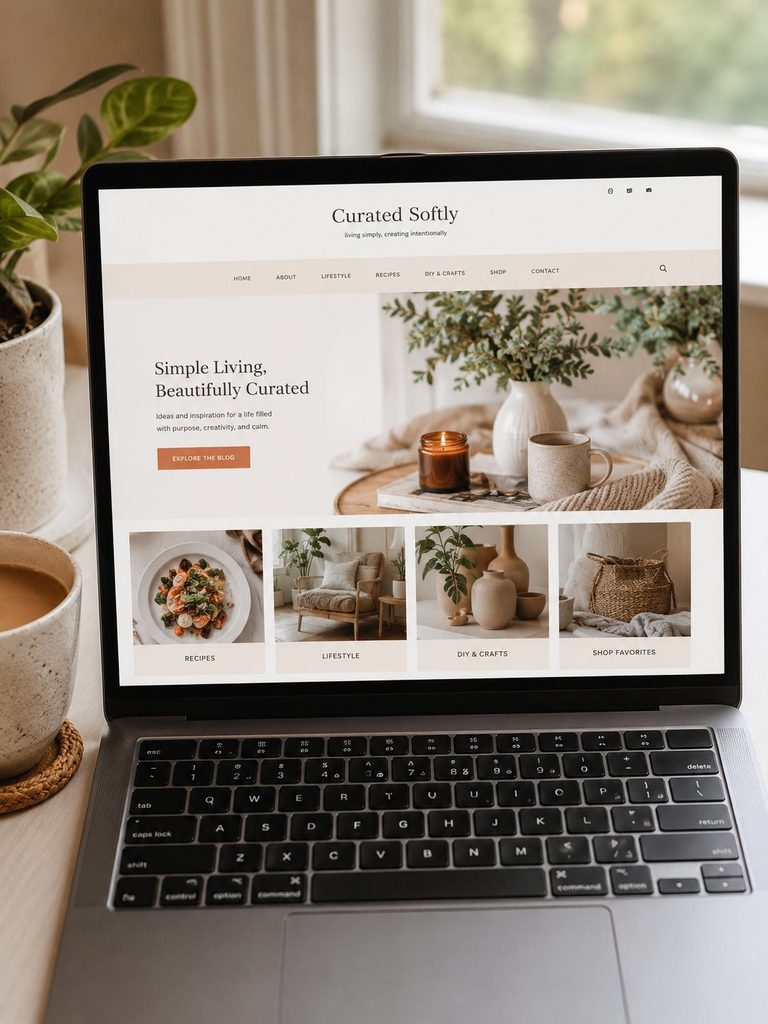
I never planned on this becoming anything more than a place to keep track of my own clay and candle experiments. I started curatedsoftly.com because I kept making things, ruining things, learning from the ruined things, and wanted somewhere to actually remember what worked.
I did not expect it to turn into something people actually visit, let alone something that’s brought in real income. But looking back, the hardest part was never the crafting. It was the fifteen minutes of feeling overwhelmed before I even got the site set up, convinced it was going to be way more technical than it actually was.
It wasn’t. And if you’re the kind of person who already makes things, whether that’s air dry clay projects, candles, soap, or anything else you’ve been posting to Instagram and hoping someone notices, a blog is a genuinely realistic next step. Not a guaranteed income, but a real foundation that’s entirely yours, not rented from a platform’s algorithm.
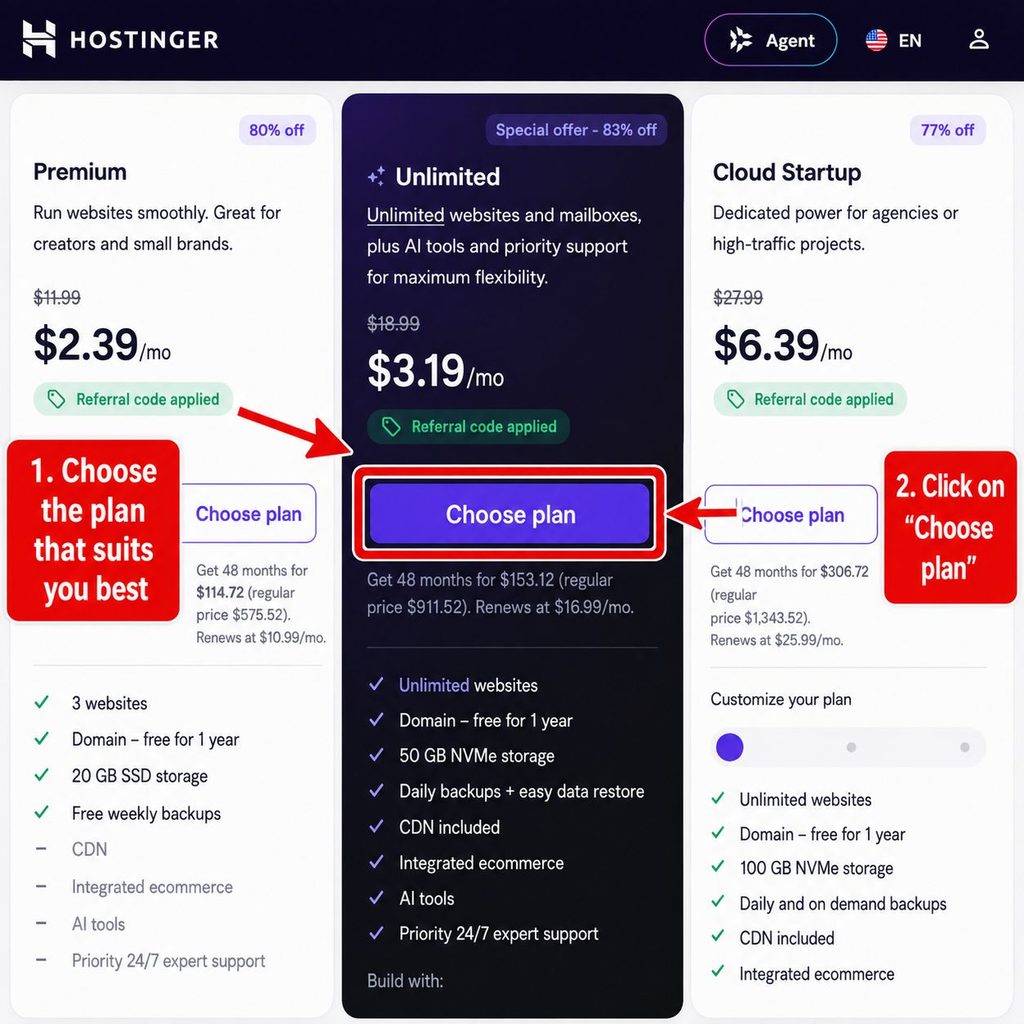
I’ve partnered with Hostinger to get you their Unlimited hosting plan for $3.19/mo with my referral code, that’s under $40 for the year, using my link below.
Before We Start: What These Words Actually Mean
I’m going to use a few words throughout this that might sound technical if you’ve never done this before. Here’s what they actually mean, in plain terms, so nothing below feels confusing:
- Hosting: think of this like renting a plot of land. It’s the computer space where your website’s files actually live so people can visit it.
- Domain name: this is your website’s address, like curatedsoftly.com. It’s what people type into their browser to find you.
- WordPress: free software that lets you actually build and manage your website, write posts, add photos, without knowing any code.
- Theme: this controls what your site looks like, colors, fonts, layout. Like picking an outfit for your site.
- Dashboard: the control panel inside WordPress where you’ll do everything, write posts, change settings, add photos.
- hPanel: Hostinger’s own control panel, separate from your WordPress dashboard, where you manage your hosting account itself (not your actual blog content).
- Plugin: a small add-on tool that adds a specific feature to your WordPress site, like a contact form or extra photo gallery options.
You don’t need to memorize any of this, just scroll back up here if a word below doesn’t make sense.
What You’ll Need Before You Start
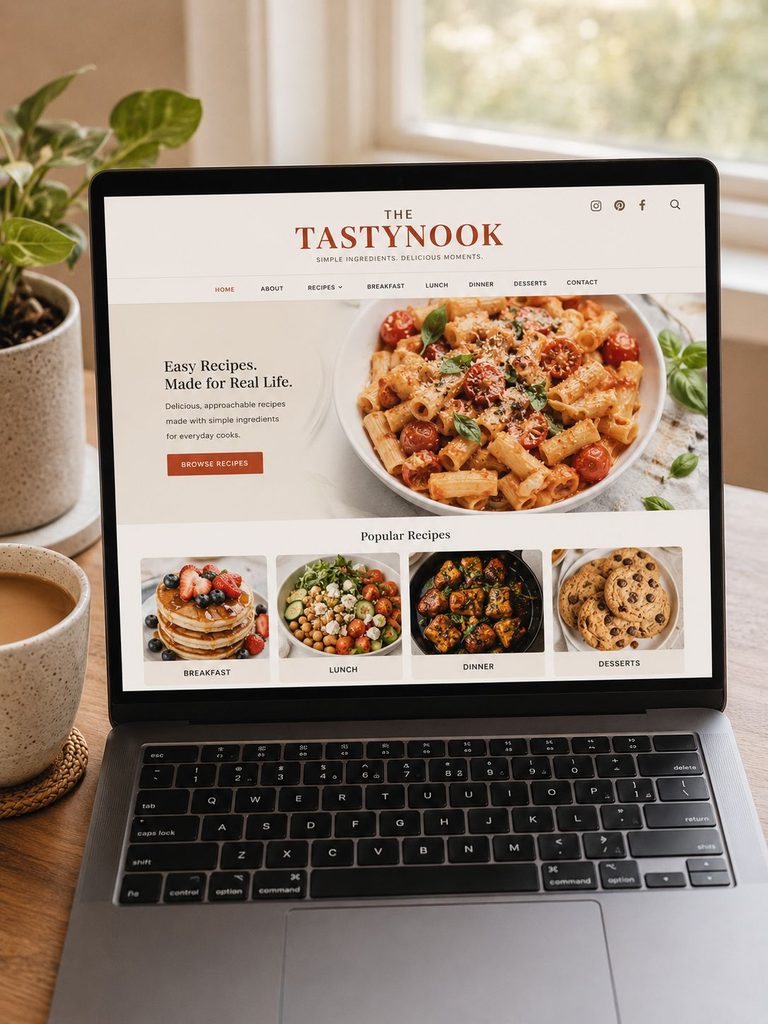
- A computer or tablet (a phone can work in a pinch, but it’s genuinely easier on a bigger screen for this first setup)
- A credit or debit card, for the hosting purchase
- An email address you check regularly, your welcome emails and login details go here
- About 30-45 minutes of quiet, uninterrupted time for the initial setup
- A name or two in mind for your blog, it’s okay if you’re not sure yet, we’ll check availability together in Step 1
Why a Blog, Specifically
If you’ve been selling on Etsy or posting your projects on social media, you already know the frustration of not really owning your audience. An algorithm change can bury your reach overnight, and a marketplace can change its fees whenever it wants.
A blog is different. It’s yours. The traffic you build, the content you create, the email list you grow, none of it can be taken away by a platform update. It’s also the foundation that made it possible for me to eventually work with brands, monetize through ads, and build something that isn’t dependent on any single sale.
If you’ve read my posts on selling candles on Etsy or starting a gift box business, a blog is really the missing piece that ties all of that together in one place you control.
You Don’t Need to Be Techy
This was genuinely my biggest fear starting out, that I’d need to learn to code, or hire someone, or spend a fortune before I could even publish a single post.
None of that turned out to be true. Setting up a blog today is mostly a handful of straightforward steps, choosing where it lives online, picking how it looks, and then just writing what you already know how to do. The technical side has gotten dramatically simpler even in the last few years.
Step 1: Choose Your Hosting and Register Your Domain
Your hosting is essentially the land your website sits on, it’s what keeps your site live and accessible to visitors. This is the one part I’d genuinely recommend not skimping on, since a slow or unreliable host can quietly hurt everything else you build on top of it.
I use Hostinger for curatedsoftly.com, and it’s what I recommend to anyone starting out. Here’s how to get set up:
- Open your web browser and go to Hostinger’s website using my link above.
- Look for a button that says “Get Started” or “Choose Plan” and click it.
- Pick the Unlimited plan, with the referral code applied it comes out to $3.19/mo, a genuinely great deal. You get real speed so your site feels fast for visitors, a free domain included, room to grow with unlimited websites if this turns into more than one blog down the line, and daily backups so you’re never at risk of losing your work. Under $40 for the whole year is hard to beat.
- Use the domain checker to find your site’s name. Type in an idea, no spaces, like “mycraftycorner,” and it’ll instantly tell you if that .com is available. If it’s taken, try a small variation or a different ending like .co.
- Once you find a name you like, select it, most plans include this domain free for your first year, which is a genuine savings, domain registration usually runs $10-20 a year on its own, so you’re not paying that fee separately.
- Continue through checkout and fill in your email and payment details like any normal online purchase.
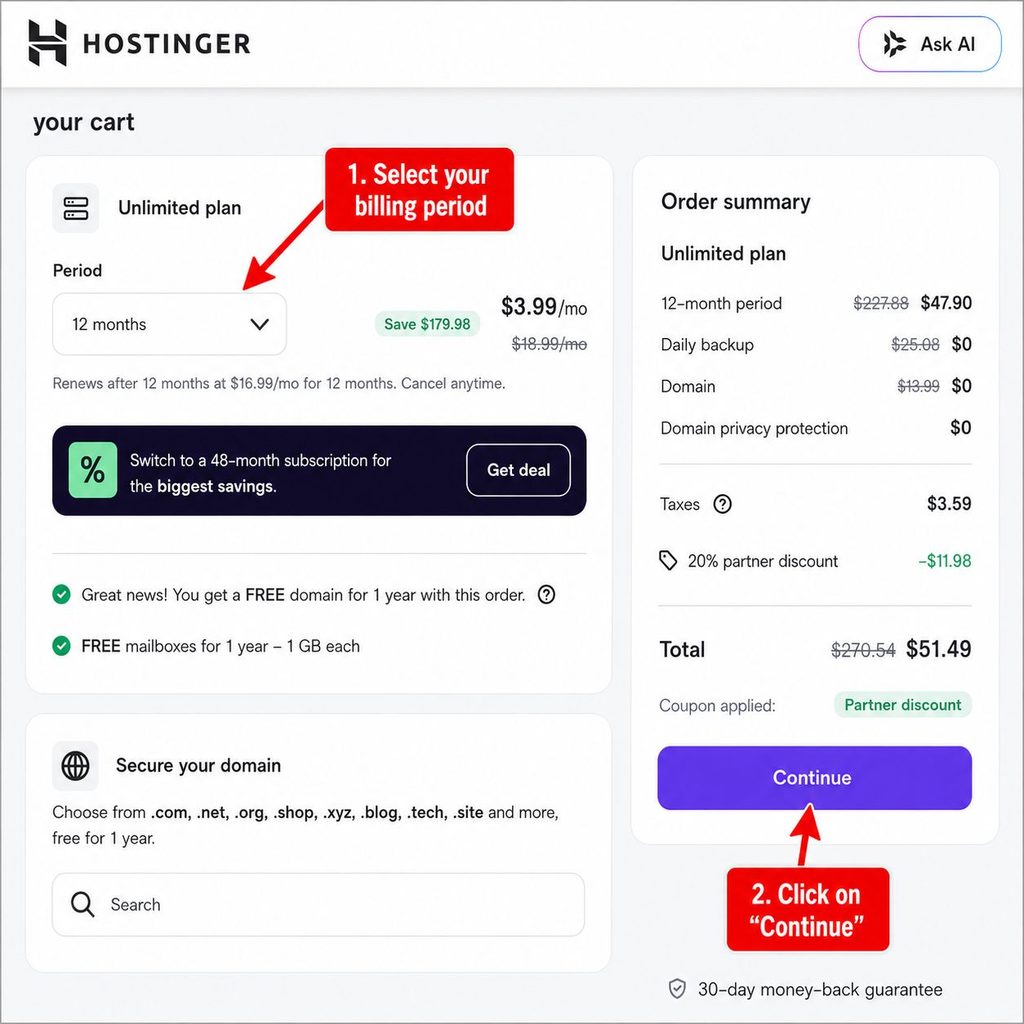
- Complete the purchase, then check your email for a welcome message from Hostinger. Keep this email, it has your login details.
- Log in using those details, this takes you into hPanel, Hostinger’s control panel for your account.
You now own a domain name and have hosting, genuinely the hardest-feeling part done, even though it was really just filling out a form.
Step 2: Install WordPress
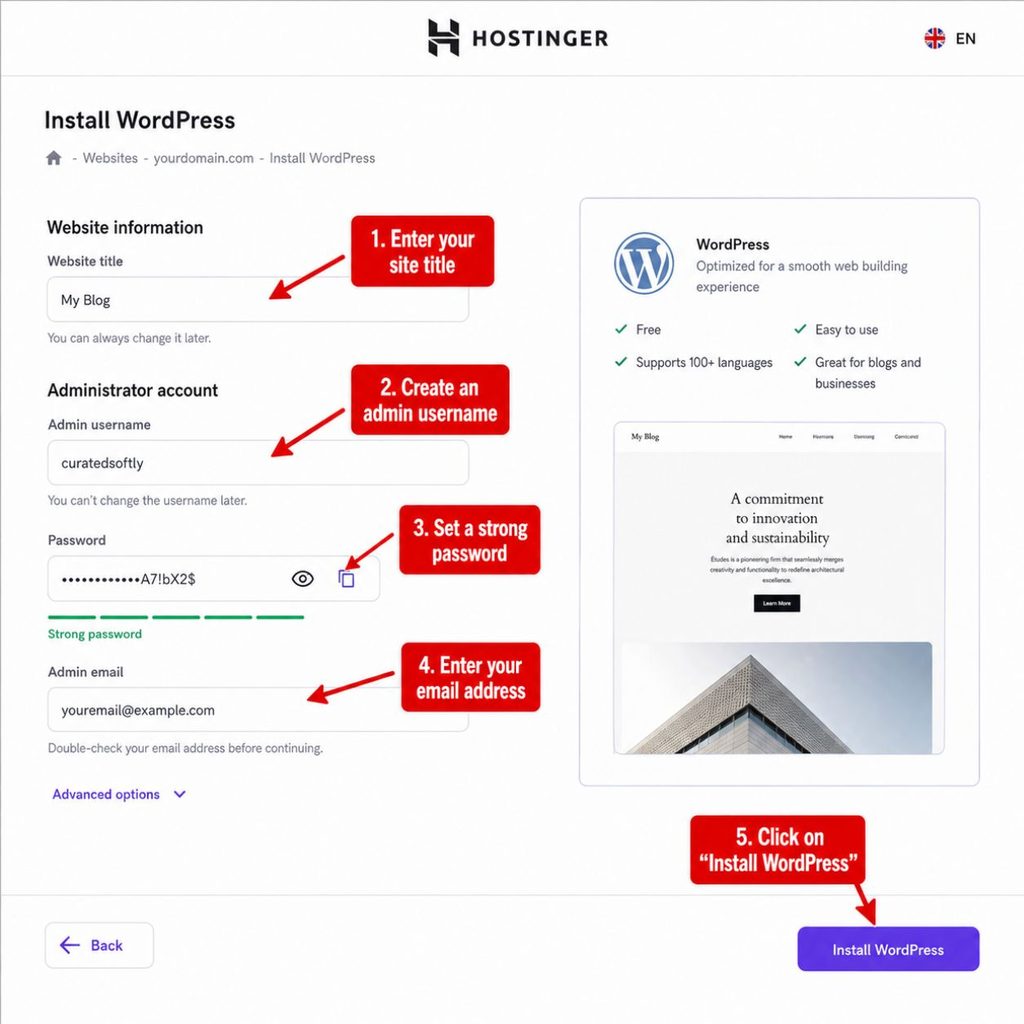
Once your hosting account is active, you need actual website software to build on top of it. WordPress is the standard choice, it’s free, and it’s what powers the vast majority of blogs, including mine.
- Log into your Hostinger hPanel, if you’re not still logged in from Step 1.
- Look for a section called “Websites” or “Auto Installer” and click it. Every dashboard is laid out slightly differently, but there’s almost always a clearly labeled WordPress option.
- Click “Install WordPress.”
- Fill in the short form: a site title (you can change this later), an admin username (not “admin”), a strong password, and your email address. Write your login details down somewhere safe.
- Click install and wait a few minutes.
- Once it’s done, click “Manage” or “Go to Dashboard,” or note the address it gives you, it’ll look like yoursite.com/wp-admin.
- Log in using the username and password from step 4.
You’re now inside WordPress itself, this is where you’ll spend almost all your time going forward.
Step 3: Install and Activate Your Theme
Your theme controls what your site actually looks like, fonts, layout, colors, structure. You genuinely do not need to pay for this starting out.
- In your WordPress dashboard, look at the menu on the left side of the screen.
- Hover over or click “Appearance,” a small submenu will open.
- Click “Themes.”
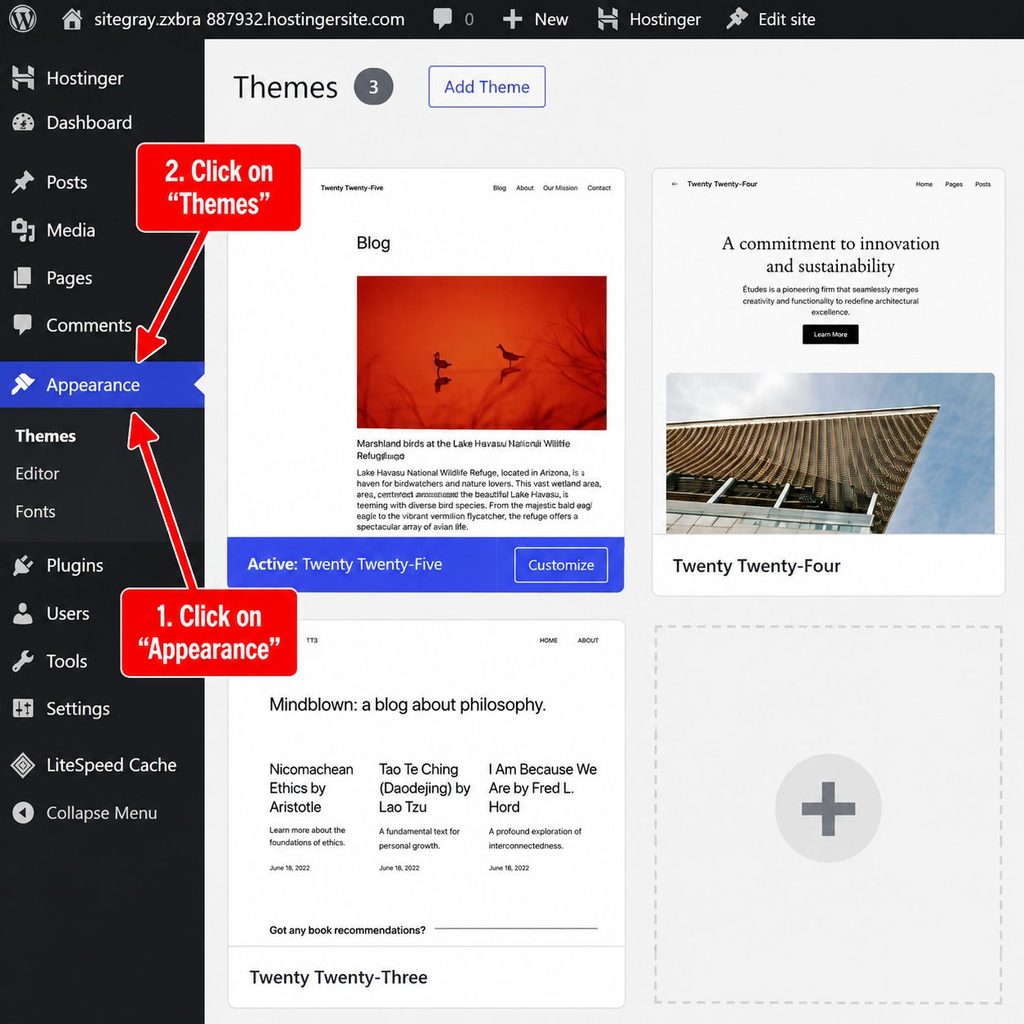
- Click “Add New Theme,” usually near the top of the page.
- Type “Kadence” into the search box and press enter.
- Hover over Kadence when it appears, then click “Install.”
- Once it finishes, the button will change to “Activate.” Click that too.
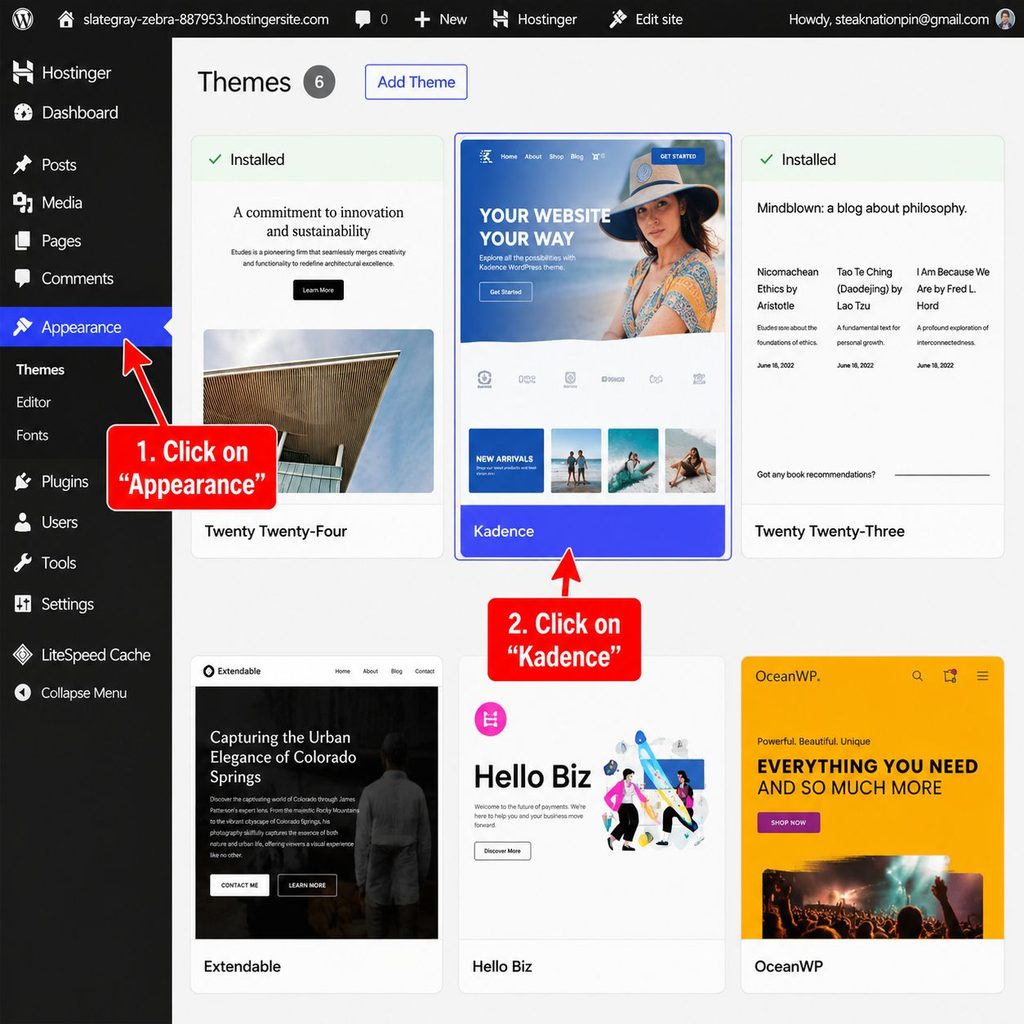
Your site now looks like Kadence’s default design instead of the plain WordPress starting look, already a big visual improvement with zero design skill required.
Optional but helpful: look for “Starter Templates” inside Kadence’s settings. Many free themes like Kadence let you import a pre-built page design with one click, giving your site a real head start instead of a blank page.
Step 4: Write Your First Post
This is the part that trips people up the most, and it’s the one part that should actually feel the easiest. You don’t need to invent new expertise, you already have it.
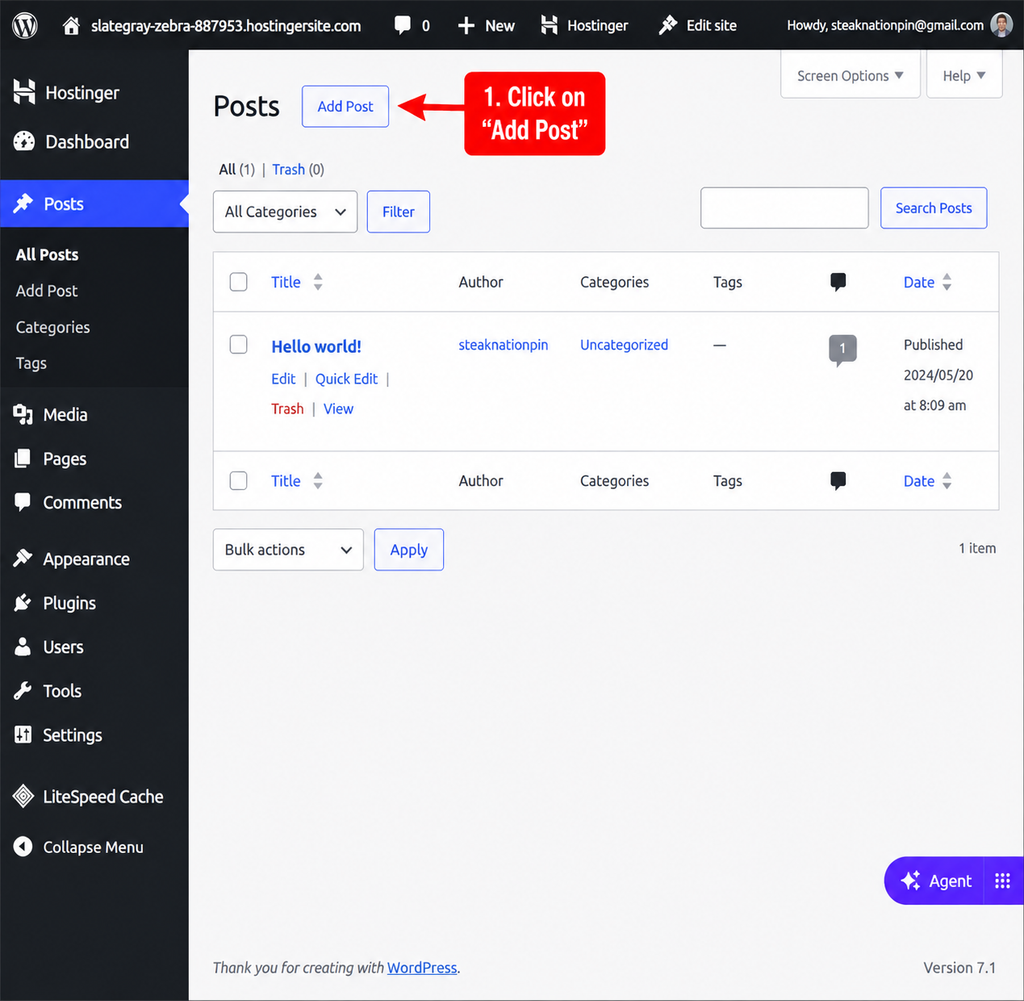
- In your WordPress dashboard, click “Posts” in the left-side menu, then click “Add New” right below it.
- Click into the title field at the top and type a clear, specific title. Not “My First Post”, something like “How I Seal My Air Dry Clay So It Doesn’t Crack” (real example, that’s genuinely one of mine).
- Click into the writing area below and start typing. Write like you’re explaining it to a friend, what did you learn the hard way? What would you tell yourself before you started?
- To add a photo, click the small “+” button inside the writing area or toolbar, choose “Image,” then upload a photo from your computer or drag one in.
- When you’re happy with it, click “Publish” on the right side of the screen, then confirm if it asks you to.
Your first post is now live on the internet. That’s genuinely it.
Step 5: Take Real, Consistent Photos
You don’t need a fancy camera. A phone with decent lighting, ideally near a window, will get you further than people expect. Consistency matters more than equipment, the same general lighting and background style across your posts makes your whole site feel more put-together, even early on.
Step 6: Publish, Then Keep Going
The first post is always the hardest one. It will not be perfect, and that’s completely fine, mine certainly wasn’t. What matters is that it exists, and that you keep adding to it.
Blogging rewards consistency far more than perfection. A steady stream of honest, useful posts will outperform a handful of over-polished ones you agonized over for weeks.
What to Realistically Expect
I want to be honest here rather than oversell this. A blog is not a guaranteed income, and it’s rarely fast. Traffic tends to build slowly over months, not days, and monetization (through ads, affiliate links, or your own products) usually comes after you’ve built up a real base of content and readers, not before.
What it can become, with consistency, is a genuine second income stream built entirely around things you already enjoy doing. That’s a very different, and much more sustainable, goal than chasing a viral post.
If Something Doesn’t Look Right
A few common snags, and the simple fix for each:
“I don’t see the WordPress install option in hPanel.” Look for a section literally called “Websites” first, sometimes the WordPress installer is tucked one click deeper than expected. If you truly can’t find it, Hostinger’s live chat support can point you to it in under a minute.
“My site looks broken or blank after installing the theme.” Give it a minute and refresh the page, sometimes it just needs a moment to fully load the first time. If it’s still blank, double check that you clicked “Activate,” not just “Install,” on the Kadence theme.
“I can’t find the Publish button.” It’s almost always on the right-hand side of the post editing screen. If your screen is very narrow (like on a small laptop or tablet), try scrolling right, or look for a small gear or settings icon that opens a side panel.
“I forgot my password already.” On the login screen, look for “Lost your password?” underneath the login box. It’ll email you a reset link.
If This Feels Like Too Much
I get messages fairly often from readers who want to start but feel stuck on the setup itself, picking a host, getting the theme installed, making the first few technical decisions. If that’s you, feel free to message me directly and I’m happy to walk you through getting set up. You don’t have to figure this part out entirely alone.
Frequently Asked Questions
Do I need to know how to code? No. Modern hosting and themes like Kadence are built specifically so you don’t need any coding knowledge to get a clean, functional site running.
How much does it cost to start? Hosting is the main real cost, and it’s genuinely affordable to start, especially with an introductory hosting plan. A free theme like Kadence means you’re not paying for design on top of that.
How long before a blog makes money? It varies enormously, but most bloggers who see real income are working with months, not weeks, of consistent posting before monetization becomes meaningful. Treat the first several months as building a foundation, not chasing quick returns.
What should my first few posts be about? Whatever you already know how to do. Don’t overthink the topic selection starting out, write about the projects you’ve actually made and the mistakes you’ve actually learned from.
Can I really message you for help? Yes, genuinely. If the setup steps feel overwhelming, reach out and I’ll help walk you through it.
Final Thoughts
Starting curatedsoftly.com wasn’t some grand plan, it was just wanting a place to keep track of my own clay and candle experiments. The blog part came together far more easily than the anxiety leading up to it suggested it would.
If you already make things, you already have the hardest part figured out. The setup is genuinely the easy part, choose a solid host, a free theme, and start writing about what you already know. Everything else builds from there.





One Comment