How to Make an Air Dry Clay Mushroom House: Easy DIY Tutorial
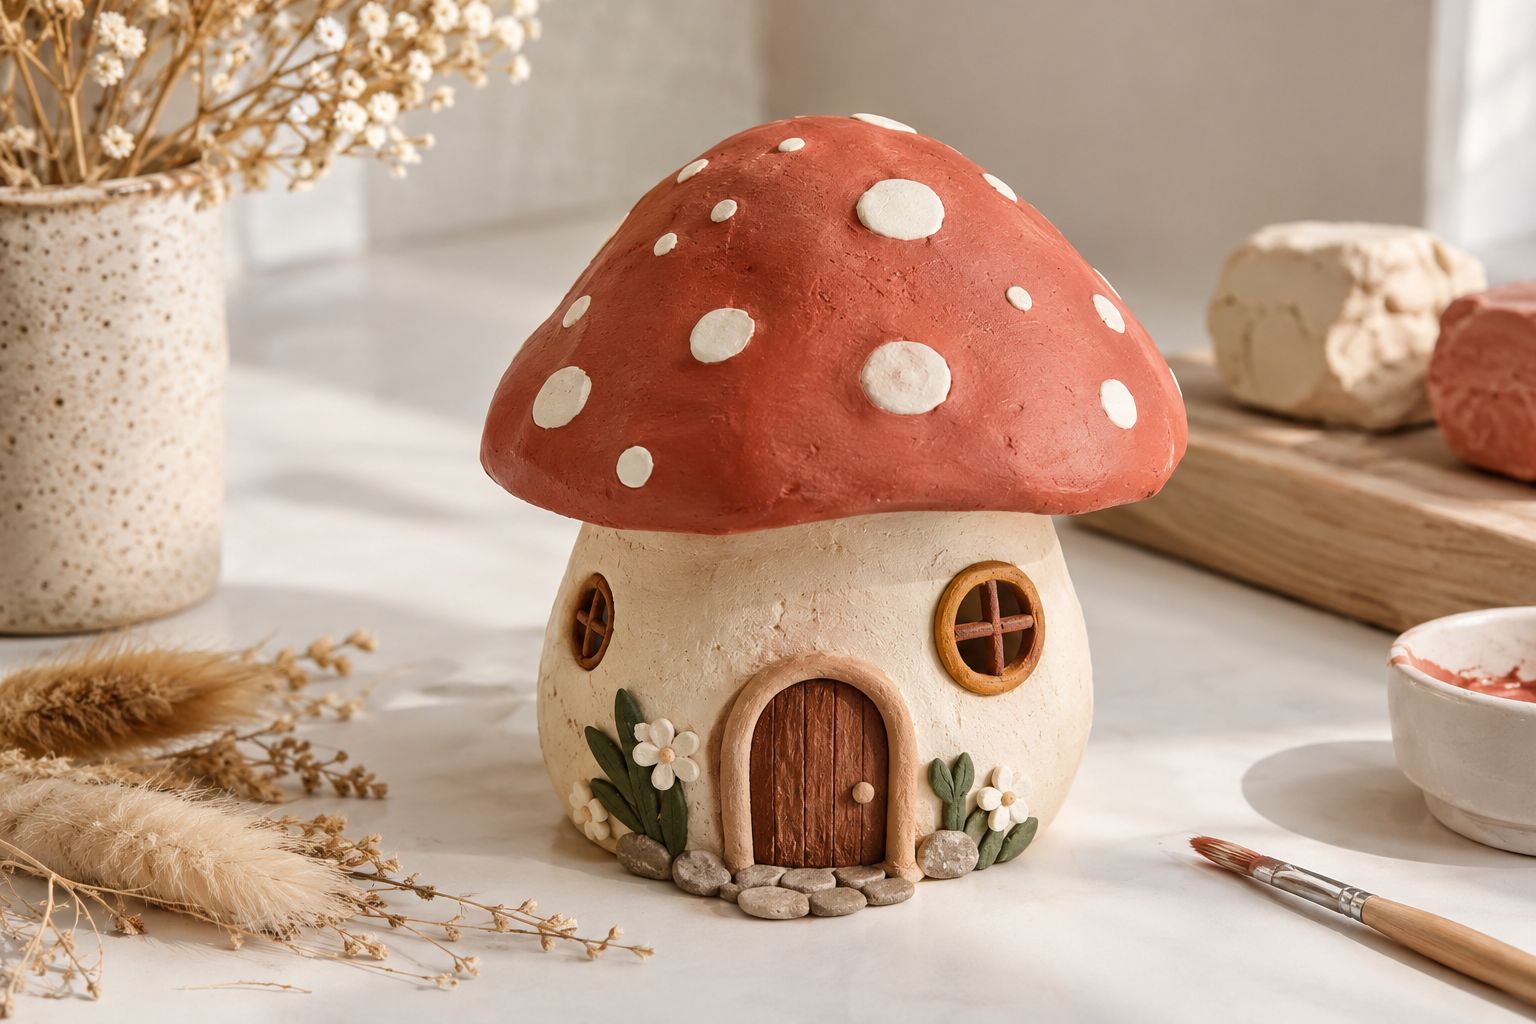
I love, love, LOVE a tiny handmade house, and an air dry clay mushroom house is one of those projects that looks far more complicated than it actually is. With its rounded mushroom cap, little arched door, and tiny windows, it has that whimsical fairy-cottage look that makes you want to create an entire miniature village.
What I especially love about this project is that you don’t have to sculpt the whole thing from a solid lump of clay. A lightweight foil core helps support the mushroom cap, so you can create a larger dome without using as much clay.
You can keep the design simple with a cream stem and a red cap, or give it a more natural look with earthy browns, muted terracotta, mossy green details, and little handmade imperfections.
You don’t need advanced sculpting skills, either. If you’re comfortable rolling out clay, smoothing seams, and adding a few small details, you can make a mushroom cottage that’s completely your own.

In this tutorial, I’ll walk you through shaping the cap, creating the stem, attaching the pieces, adding doors and windows, and painting and sealing your finished house.
I’ll also share the mistakes worth avoiding, because getting the structure right before you decorate it makes a big difference.
If you’re still getting comfortable with the material, start with my air dry clay beginner tips before you begin.
Why You’ll Love This Mushroom House Project
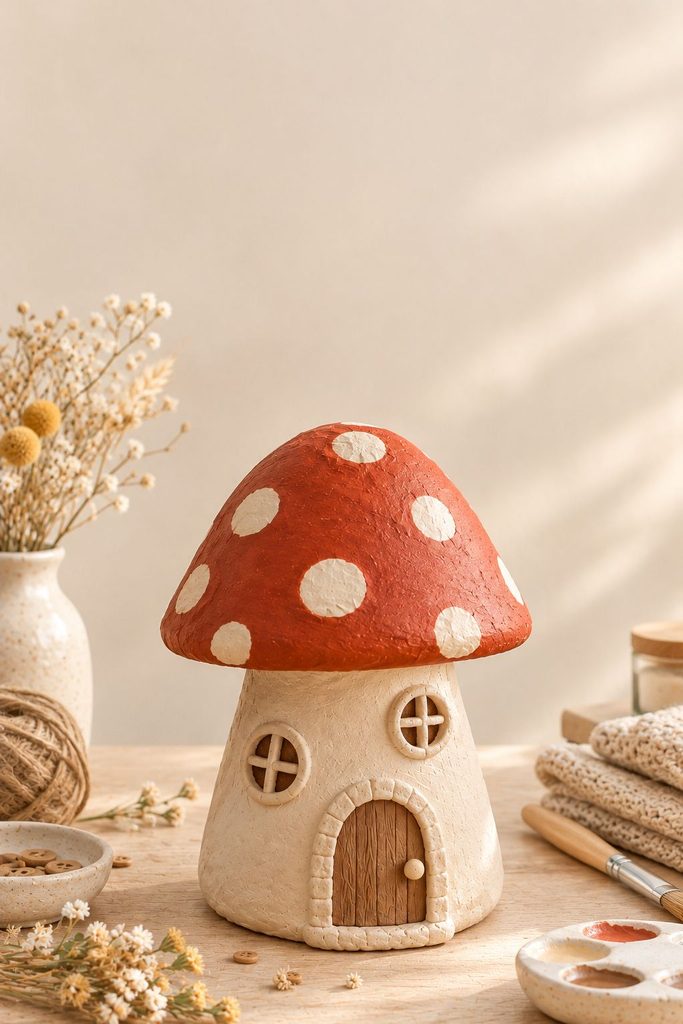
You can make it with basic supplies. Air dry clay, aluminum foil, a rolling pin, a few simple sculpting tools, and acrylic paint are enough to create the basic shape.
The foil core keeps the cap lightweight. Instead of making the entire mushroom cap from solid clay, you form a dome over tightly packed foil. This reduces the amount of clay needed, although the clay shell still needs to be an even thickness and dry thoroughly.
It doesn’t need to look perfect. A slightly crooked door, an uneven mushroom cap, or a little variation in the spots adds to the handmade fairy-house look. You don’t need perfectly symmetrical shapes to get a beautiful result.
You can personalize every detail. Add round windows, a tiny chimney, a textured doorway, miniature steps, painted flowers, or little vines climbing up the stem.
It’s lovely as seasonal decor. Display your finished mushroom house on a bookshelf, a bedside table, a fall mantel, or a small decorative tray. You can also make several in different sizes to create a miniature mushroom village.
Materials You’ll Need
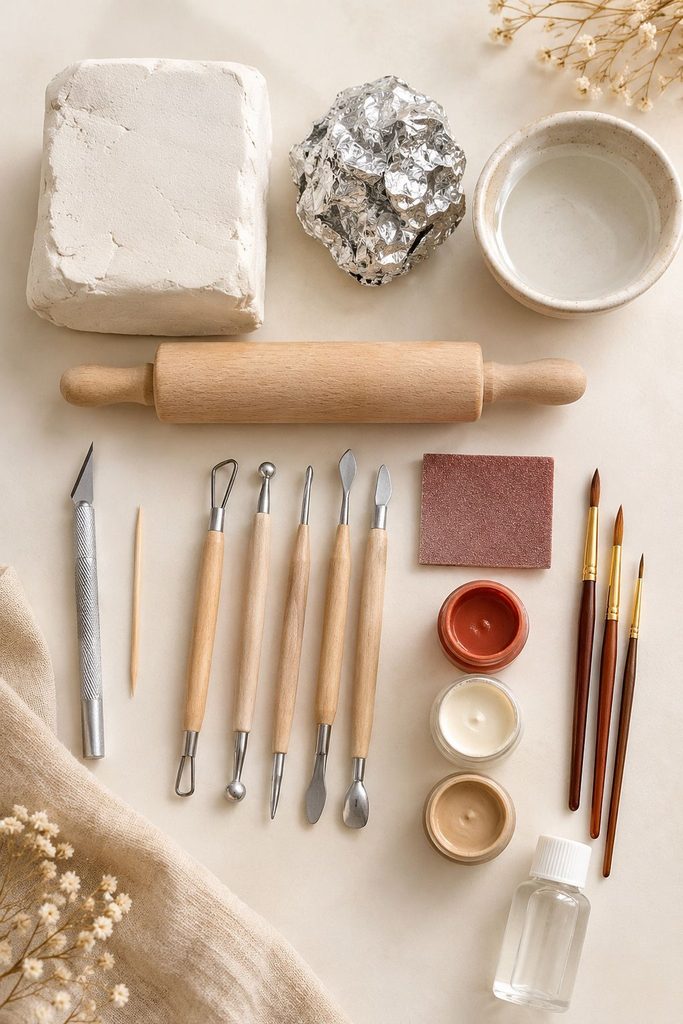
Gather everything before you start so you aren’t searching for tools while the clay is exposed and beginning to dry.
- Air dry clay: Enough for the mushroom cap, stem, and small decorative details. A standard block may be sufficient for a small or medium house, depending on its size and the clay’s thickness.
- Aluminum foil: To create the lightweight dome core.
- Rolling pin: A small craft rolling pin works well, but a clean kitchen rolling pin can also be used for crafts.
- Craft knife: For trimming the clay and cutting simple door and window shapes.
- Clay modeling tool or toothpick: For carving details, adding texture, and shaping small features.
- Small bowl of water: For lightly smoothing the clay and preparing joining slip.
- Fine-grit sandpaper: For smoothing rough edges after the clay has completely dried.
- Acrylic paints: Choose your favorite mushroom cap color, plus cream, beige, brown, or other shades for the stem and details.
- Small paintbrushes: One medium brush for larger surfaces and a fine brush for spots and tiny details.
- Clay-safe adhesive: Optional, for repairing a separated joint after drying.
- Sealant suitable for air dry clay: To protect the painted finish from dust and light handling.
- Battery-powered LED tea light: Optional, if your design has a suitable hollow space for a decorative glow.
A quick safety note: air dry clay is not designed to withstand the heat of an open flame. Use only a battery-powered LED light, and make sure the light fits safely inside the design.
Before You Begin: Choose Your Mushroom House Design
Before rolling out the clay, decide what kind of mushroom house you want to make. This helps you work out the size of the cap, the shape of the stem, and where the door and windows will go.
Classic fairy mushroom: A rounded red or terracotta cap with cream spots and a warm ivory stem.
Woodland cottage: A brown or muted rust cap, beige stem, and small windows with earthy details.
Soft neutral mushroom: An off-white cap with pale beige spots, a cream stem, and minimal decoration. This version looks especially lovely with neutral home decor.
Whimsical cottage: A slightly oversized cap, a tiny arched door, little windows, and decorative flowers or vines around the base.
For your first attempt, I’d keep the house relatively small and the details simple. A compact mushroom is easier to handle while the clay is wet, and you can always make a larger, more detailed version once you’re familiar with the process.
How to Make an Air Dry Clay Mushroom House
Step 1: Shape the Foil Core
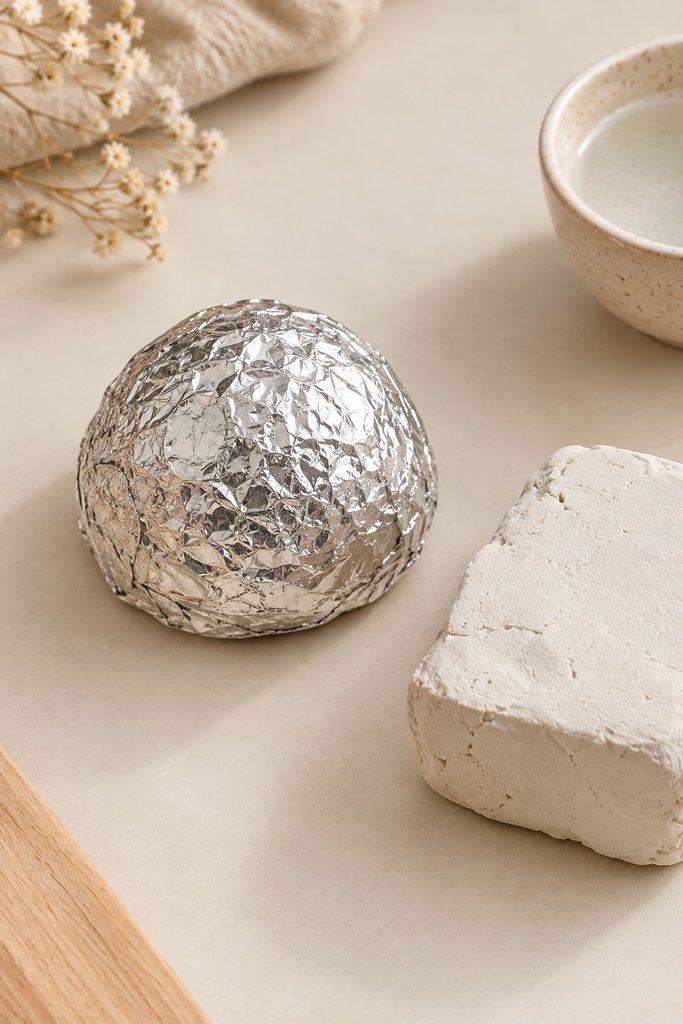
Start by tearing off a sheet of aluminum foil and crumpling it into a rounded dome. Press the foil firmly together as you work so the core feels compact rather than loose and springy.
Think about the mushroom cap you want to create. A wider, flatter dome gives you a classic mushroom silhouette, while a taller, rounder dome looks more like a fairy cottage.
Smooth the foil as much as you can by pressing down the sharp folds and protruding edges. You don’t need a perfectly polished foil surface, but large bumps can show through the clay shell.
Check the size of your core against the space where you’ll display the finished house. Remember that the clay adds thickness around the outside.
My tip: Keep the underside of the dome open if you want access to the foil later. This makes the construction easier to inspect, although the foil does not always need to be removed from a decorative piece.
Step 2: Roll Out the Clay for the Cap
Take a portion of air dry clay and knead it gently until it becomes workable. If the clay feels unusually dry or crumbly, follow the manufacturer’s instructions for conditioning it rather than adding large amounts of water.
Place the clay on a clean craft surface and roll it into an even slab, approximately ¼ inch thick as a starting point. The exact thickness will depend on your mushroom’s size and the clay you’re using.
Try to keep the middle and edges reasonably consistent. A section that’s much thicker than the rest may dry more slowly, while an overly thin area can become fragile.
Roll out enough clay to cover the entire foil dome, leaving a little excess clay around the bottom edge for trimming.
My tip: If your rolling pin sticks, use a clean nonstick craft surface and lift the clay occasionally. Don’t keep pulling hard at the slab, because stretching it can make the thickness uneven.
Step 3: Cover the Foil Core
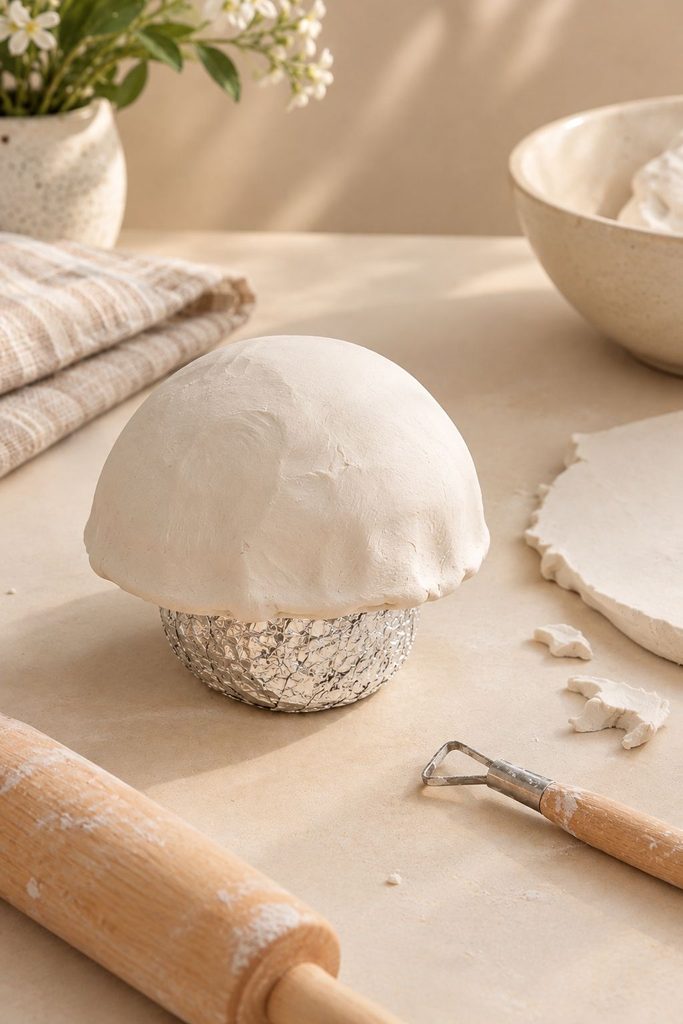
Carefully lift the clay slab and drape it over your foil dome.
Use your fingertips to press the clay gently against the curved surface, working from the top toward the bottom. Smooth out large folds as you go, taking care not to stretch one area thinner than another.
If you notice small creases forming around the lower edge, gently lift and reposition the clay before pressing it down again. Trim excess clay with your craft knife to create a clean lower rim.
You can make the rim slightly wavy if you want a natural mushroom shape. A perfectly straight edge isn’t necessary.
Run a lightly damp fingertip over the outer surface to smooth obvious marks. Use very little water, because excessive moisture can weaken the surface and make the clay harder to handle.
Set the cap aside on a supportive surface while you work on the stem. Check that the dome hasn’t flattened or shifted under its own weight.
Step 4: Shape the Mushroom Stem
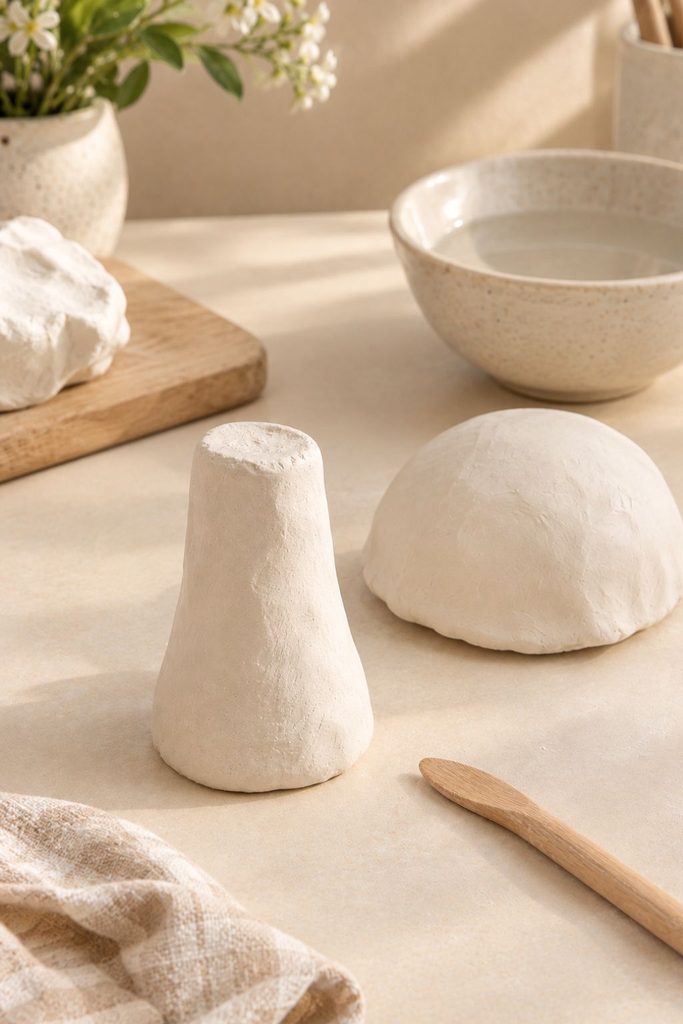
Take another portion of clay and roll it into a thick cylinder. Shape it into a stem that’s slightly wider at the bottom and narrower at the top.
The stem should be broad enough to support the cap without making the whole house look top-heavy. For a whimsical cottage, you can make the stem slightly curved or irregular rather than perfectly cylindrical.
Smooth the surface with your fingers or a modeling tool. If the clay is beginning to dry, avoid repeatedly wetting it to make it slippery. A small amount of water is enough for light smoothing.
Check the cap against the stem before the clay becomes too firm. The top of the stem should meet the underside of the cap securely.
If you want a hollow house for a decorative LED, plan the interior space from the beginning. A solid stem won’t create a useful cavity, and the cap and stem need to be constructed with a suitable opening rather than sealed into a solid form.
Step 5: Add the Door and Windows
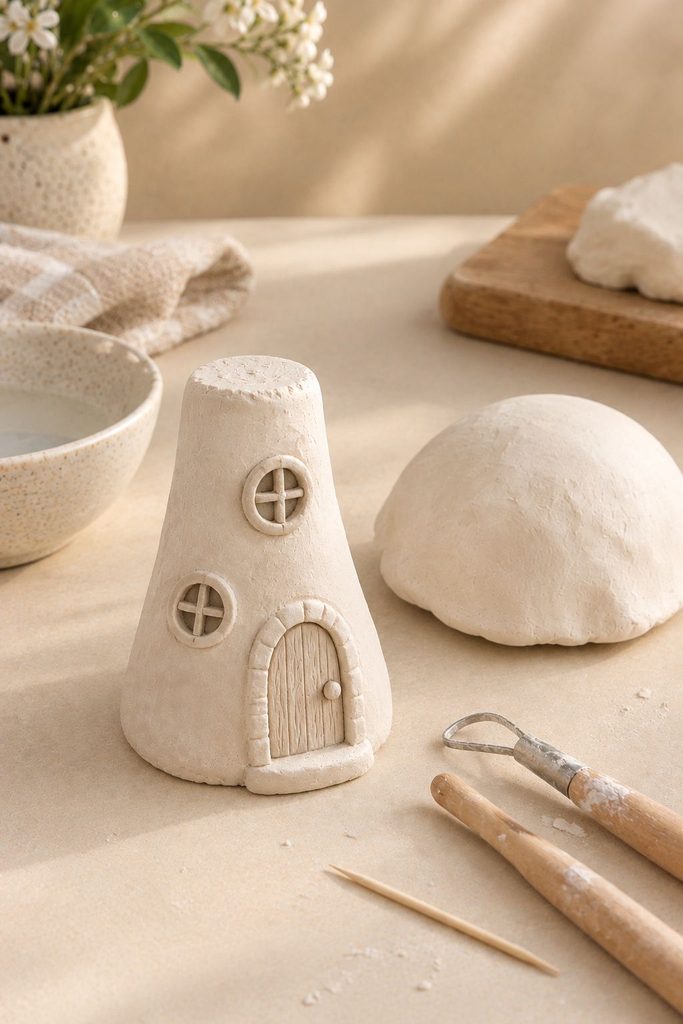
This is where the mushroom starts to look like a tiny house.
For a simple arched door, roll a small piece of clay into a thin slab and cut out an arch shape. You can gently curve the top of a rectangular shape to create the arch.
Attach the door to the front of the stem, or press a shallow doorway into the clay if your stem is thick enough to accommodate it. Avoid cutting too deeply into a narrow stem, because this can weaken the structure.
For windows, make small circles using a clay tool, the rounded end of a tool, or a toothpick. You can leave them as shallow decorative recesses or add tiny raised window frames made from thin clay coils.
Use a toothpick to add a door handle, window divisions, or a few simple lines around the door frame.
If you want the cottage to look more detailed, add a tiny doorstep, a miniature chimney, or a few small mushrooms around the base.
My tip: Don’t add every detail you can think of. A door, one or two windows, and a little texture often look more charming than a stem covered in decorations.
Step 6: Attach the Cap to the Stem
This is one of the most important stages because the cap needs to stay attached as the clay dries.
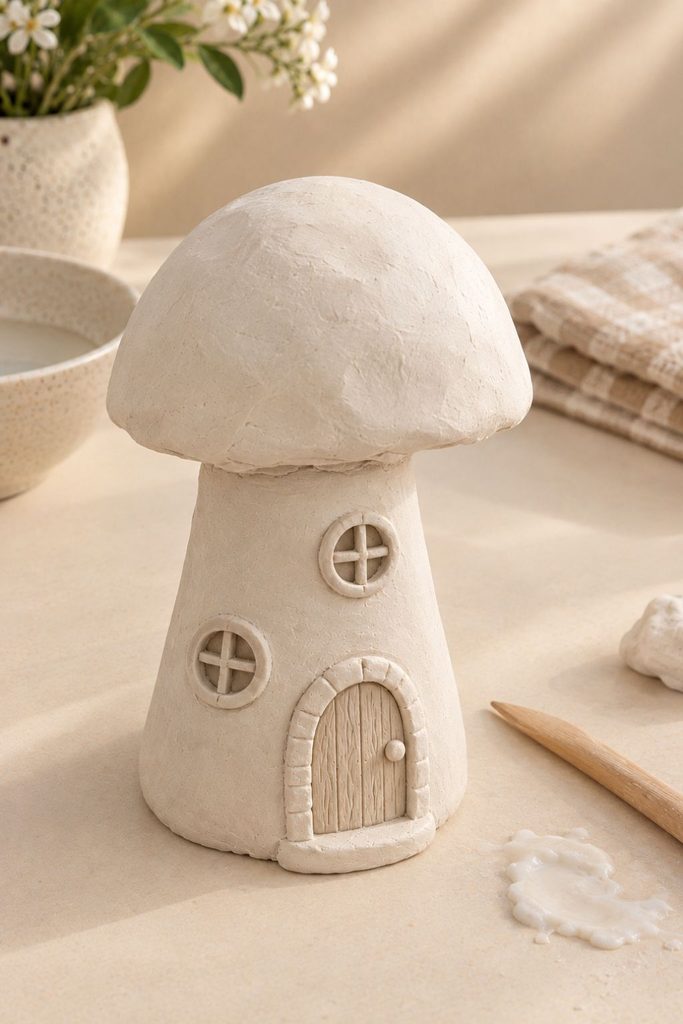
First, check that the cap and stem meet naturally. If the stem is too narrow or the underside of the cap is uneven, adjust the shapes before joining them.
Lightly score the contact areas on both pieces with a clay tool. Scoring means making small crosshatch scratches that give the joining material a better surface to grip.
Apply a small amount of joining slip, if appropriate for your clay. You can make slip by mixing a little compatible clay with water until it forms a smooth paste.
Press the cap and stem together gently, supporting the cap so you don’t squash the dome. Smooth the visible seam with a modeling tool or lightly damp fingertip.
If the cap is particularly wide or heavy, support it in its intended position while the joint firms up. Don’t rely on a thin, wet joint to support a large cap immediately.
My tip: Scoring and slip can improve the bond, but they aren’t a guarantee against separation. A compatible clay, a well-fitted joint, and careful drying are just as important.
Step 7: Let the Mushroom House Dry Slowly
Place the mushroom house in a dry, well-ventilated area away from direct sunlight, radiators, hair dryers, and other strong heat sources.
Drying time depends on the clay brand, humidity, the size of the piece, and the thickness of the clay. A small, thin piece may dry in a couple of days, while a larger mushroom house can take considerably longer.
The 48-to-72-hour window is only a rough starting point, not a guarantee that the entire piece is dry. Check the manufacturer’s instructions and allow extra time if the cap or stem is thick.
If the cap and stem are separate pieces during part of the drying process, make sure they’re supported so they don’t warp. If you’ve already joined them, keep the piece stable and avoid repeatedly moving it.
Don’t paint or seal the house while the clay still feels damp or appears darker in areas. Trapping moisture under paint or sealer can cause problems later.
For more help, see my guide on how to avoid cracks in air dry clay.
Step 8: Check the Underside and Sand Rough Areas
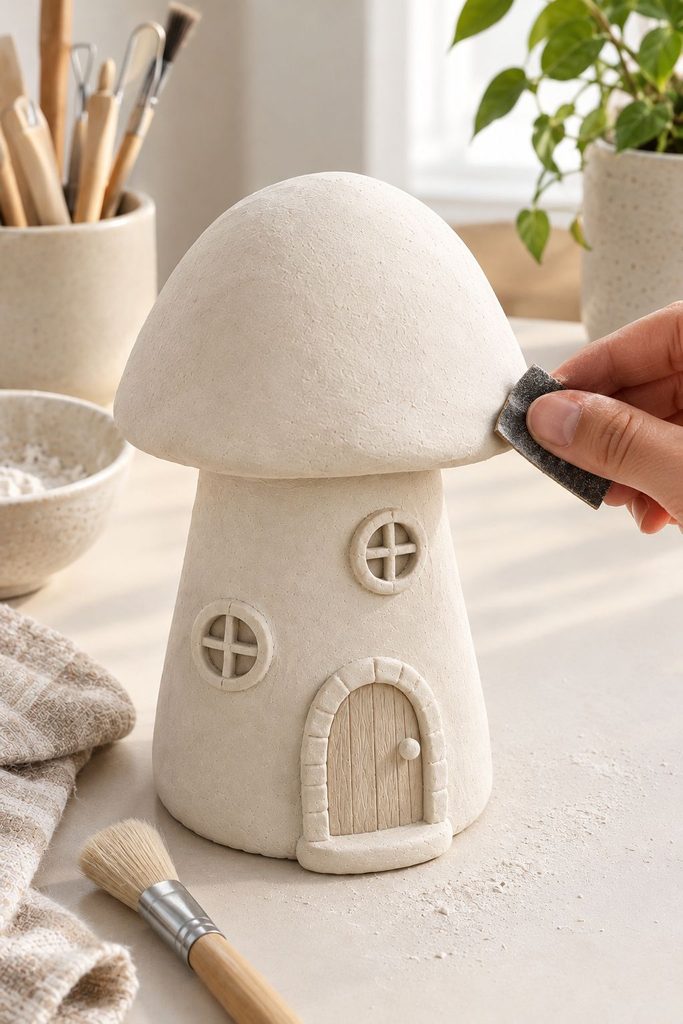
Once the house is completely dry, inspect the cap, stem, and joint carefully.
If the foil core is accessible through the open underside, you can gently remove it if the structure is strong enough to support itself. Don’t force the foil out through a narrow opening or pull against a thin clay shell. If the foil is fully enclosed, you can leave it in place for a decorative piece.
Use fine-grit sandpaper to smooth rough edges, dried slip, and minor surface imperfections. Work gently, especially around the door, windows, and lower cap rim.
Wipe away the sanding dust with a soft, dry brush or cloth before painting.
My tip: Sanding is best for small imperfections, not for correcting a badly uneven dome. If the shape needs major changes, it’s easier to correct it while the clay is still workable.
Step 9: Paint Your Mushroom House
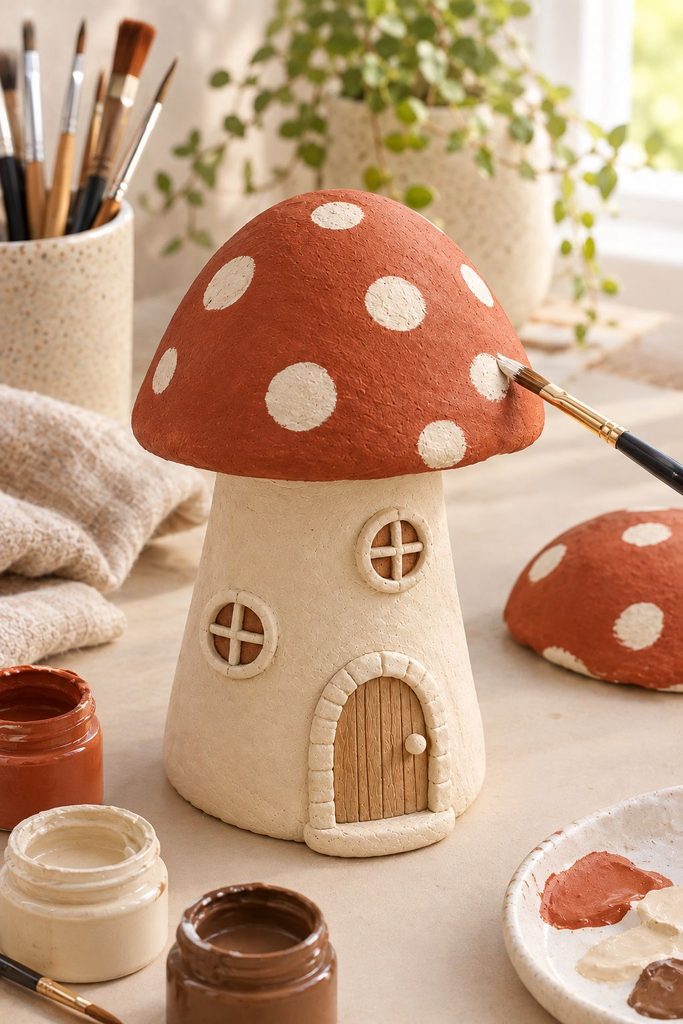
Choose your colors before you begin so the cap and stem work together.
For the classic fairy-house look, paint the cap red or terracotta and the stem warm cream. Once the base coat is completely dry, add white or cream spots using a small brush or the rounded end of a tool.
For a woodland design, try a warm brown cap, a beige stem, and muted green details. A neutral mushroom house looks beautiful with an ivory cap, soft taupe spots, and a pale stone-colored stem.
Apply acrylic paint in thin, even coats. Let each coat dry before applying another. This gives you better coverage and helps prevent thick, streaky paint from collecting around the curves.
Use a smaller brush for the door, window frames, and tiny decorative details. You can add subtle shading around the door or under the cap to give the cottage more depth.
If you’re unsure which paint to choose, my how to paint air dry clay guide explains how to get an even finish without obvious brush marks.
Step 10: Seal the Finished House
Once the paint is fully dry, apply a compatible sealant according to the manufacturer’s instructions.
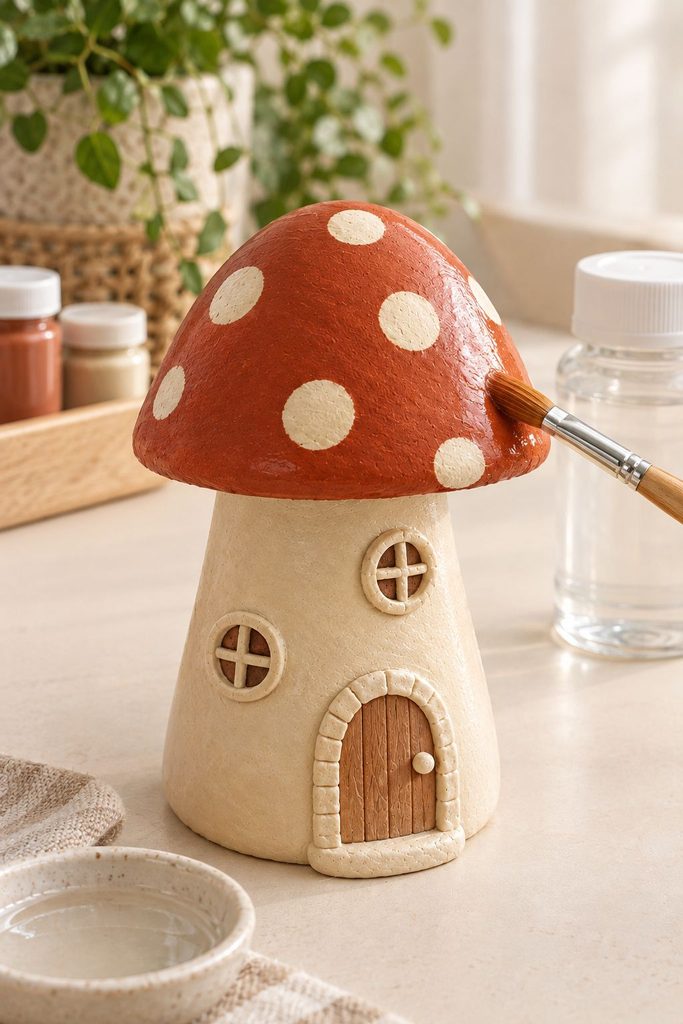
Choose a product suitable for painted air dry clay and the type of finish you want. A matte finish gives the house a soft, natural look, while a satin finish adds a gentle sheen.
Apply thin coats rather than one heavy layer, and allow each coat to dry properly. Make sure the piece is completely dry before sealing it, and follow the product’s ventilation and safety instructions.
Keep in mind that sealing does not make ordinary air dry clay waterproof, food-safe, or heat-resistant. Your mushroom house is best treated as decorative indoor art.
For more details on choosing a finish, read my guide to sealing air dry clay.
If you’ve designed a suitable hollow space for a light, place a battery-powered LED tea light inside only after the clay and finish have fully dried. Check the light’s instructions and don’t use a real candle or other heat source.
Tips for Getting the Best Results
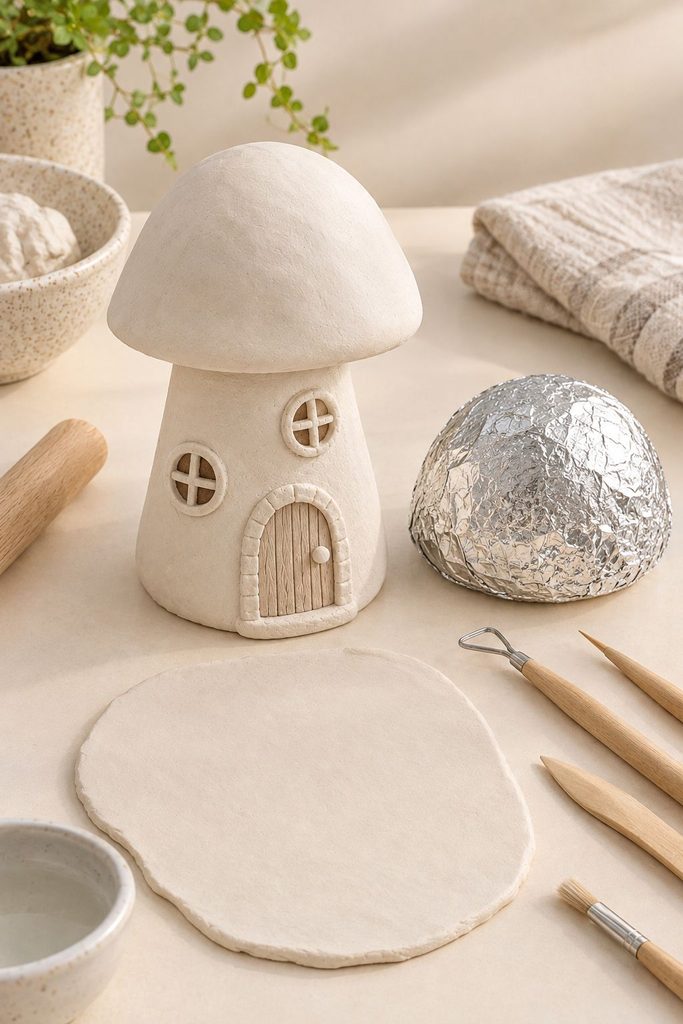
Keep the cap thickness consistent. This is one of the simplest ways to reduce uneven drying. A thin shell isn’t automatically crack-proof, but a consistent thickness is easier to dry than a mixture of very thick and very thin areas.
Make the foil core firm. Loose foil can shift under the wet clay and leave dents in the dome. Compact the foil carefully before covering it.
Support the cap while attaching it. A wide cap can pull on the stem before the joint firms up. Make sure the pieces fit together well and support the dome as needed.
Use water sparingly. A little moisture helps smooth marks, but too much can turn the surface sticky or weaken the clay.
Keep decorative additions lightweight. Thick door frames, heavy chimneys, and large clay flowers can make a small house unstable or increase drying time.
Let every layer dry. Allow the clay to dry completely before painting, and let the paint dry before applying sealant.
Take advantage of handmade imperfections. A slightly uneven cap or an imperfect door can make the cottage feel more organic. Concentrate on a stable structure and a smooth enough surface for the finish you want.
Common Mistakes to Avoid
Making the Foil Core Too Loose
If the foil is loosely crumpled, it can shift under the clay and create bumps in the cap. Press it firmly into a compact shape before covering it.
Making the Cap Too Thick
A thick shell may take longer to dry and can develop cracks if moisture leaves unevenly. Use a consistent slab thickness appropriate for the size of your mushroom.
Attaching the Cap Without Preparing the Joint
Simply balancing the cap on top of the stem is unlikely to create a reliable bond. Fit the pieces together carefully, score the contact areas, and use compatible slip where appropriate.
Adding Too Many Details Before the Structure Is Stable
A large chimney, thick door frame, or many raised decorations can make the piece difficult to handle while wet. Start with the main silhouette, door, and windows, then add a few extra details.
Painting Before the Clay Is Dry
The surface may look dry before the interior is ready for paint or sealer. Give the entire piece enough time to dry, taking its size and the room’s humidity into account.
Using a Real Candle
Air dry clay is not designed for open flames or high heat. Use a battery-powered LED light for a decorative glow, and follow the light manufacturer’s safety instructions.
Troubleshooting Your Mushroom House
The Cap Cracked While Drying
Check whether the clay shell was uneven, the piece dried too quickly, or the clay was handled before it had enough strength. Small cracks may be repairable once the piece is fully dry, depending on their size and location.
Read my guide on how to fix cracked air dry clay for repair options.
The Cap and Stem Separated
A joint can fail if the surfaces didn’t fit well, the bond was weak, or the cap put too much weight on the stem. If the pieces are fully dry, use an adhesive compatible with your materials and repair the seam carefully. Follow the adhesive instructions and allow it to cure fully before decorating or handling the piece.
The Surface Looks Bumpy
Small rough areas can be sanded after the clay dries. If the bumps are deep or the dome is uneven, consider adjusting the foil core more carefully next time and smoothing the slab before the clay firms up.
The Paint Looks Streaky
Use a suitable brush and apply thinner coats. Let each coat dry fully before adding another, particularly on the curved cap where brush marks can be easy to see.
The House Feels Fragile
Check the stem thickness, cap weight, and any deeply carved details. A narrow stem supporting a wide cap may need a redesign rather than extra surface decoration. Handle the piece gently until the clay, paint, and finish are completely dry.
Cute Variations to Try
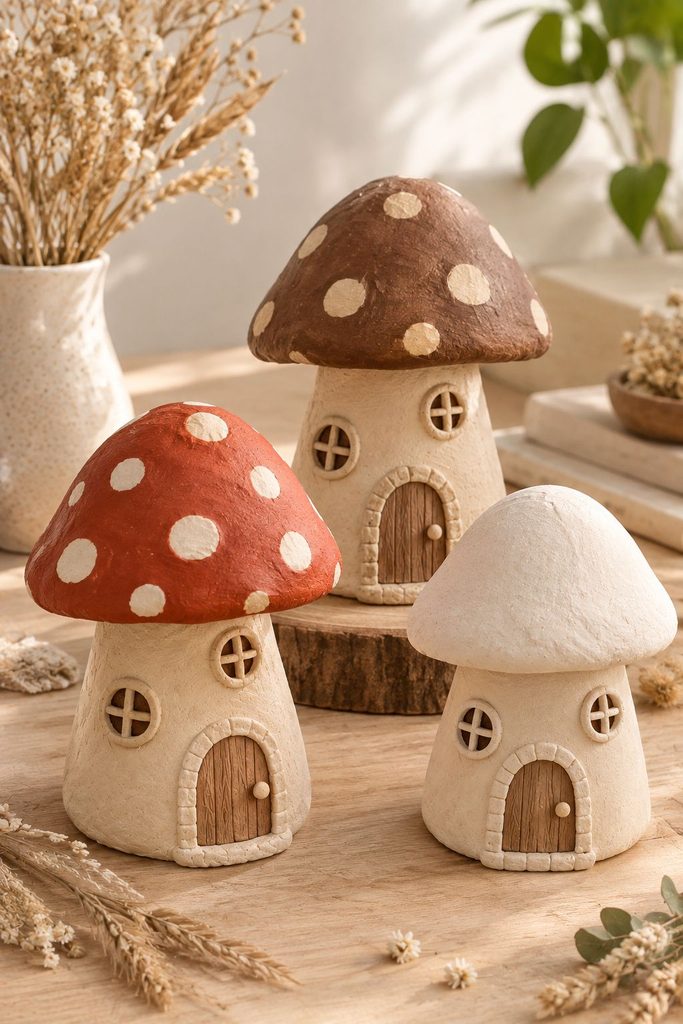
1. Make a Mini Mushroom Village
Create three or four mushroom houses in different sizes. Give each one a slightly different cap shape, door, and color, then arrange them together on a wooden tray or shelf.
A combination of cream, terracotta, muted red, and brown caps looks lovely without becoming too colorful.
2. Create a Woodland Mushroom Cottage
Use earthy shades such as mushroom brown, beige, olive, and rust. Add a textured doorway, small painted leaves, or a few miniature mushrooms around the base.
This style works particularly well with natural wood, dried grasses, and other rustic decor.
3. Make a Neutral Mushroom House
Paint the entire house in cream, ivory, and taupe. Use a slightly darker beige for the spots and door, and keep the details simple.
This version is easy to coordinate with shelves, bedside tables, and neutral seasonal displays.
4. Turn It Into a Decorative LED Mushroom Lantern
Plan a hollow interior and a suitable opening while constructing the house. Use a battery-powered LED light only, making sure the light fits safely and the design allows appropriate access and ventilation.
Don’t try to force a light into a solid sculpture after it has dried, and never use a real flame.
5. Make a Mushroom Trinket Box
For a trinket box, design the cap as a removable lid rather than permanently attaching it to the stem. The cap and base need to fit together neatly without sticking, and you should allow enough space for the clay’s shape and finish.
This variation is useful for holding lightweight items such as rings or earrings. If you enjoy making small functional clay projects, my DIY air dry clay mini pots tutorial is another project worth trying.
How to Style Your Finished Mushroom House
Once your mushroom house is dry, painted, and sealed, you can display it in several ways.
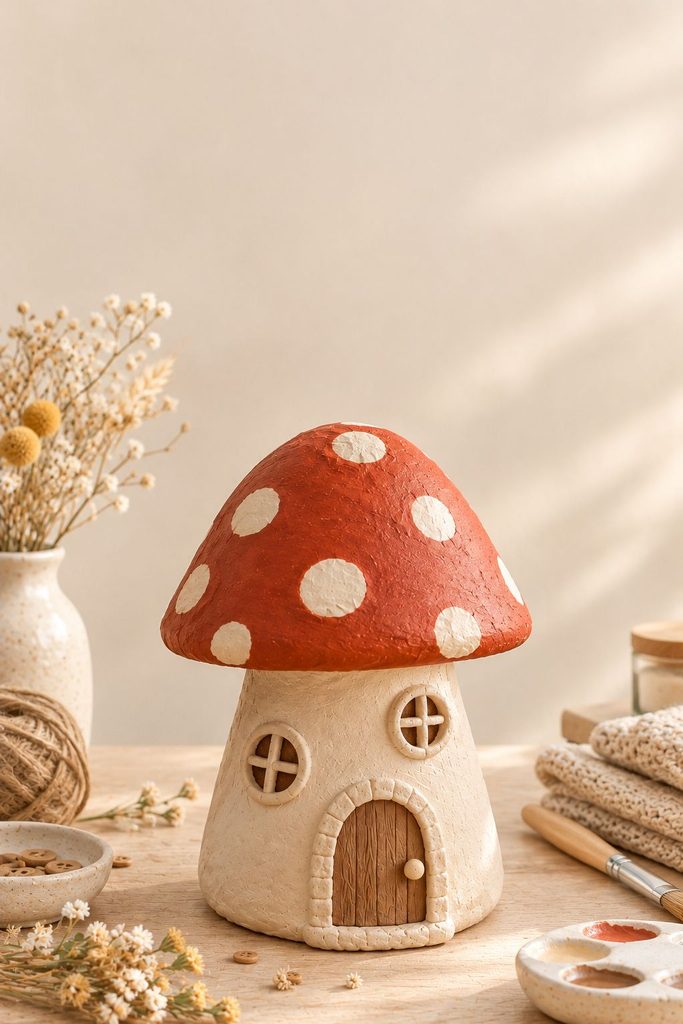
- On a bookshelf: Place it beside a few books, a small plant, or a handmade dish.
- On a fall coffee table: Add it to a wooden tray with a candle, pinecones, and a small pumpkin.
- On a bedside table: Pair a neutral mushroom house with a little ceramic dish and a warm lamp.
- In a fairy-garden display: Group several sizes together with moss-inspired decorative elements and small woodland accessories.
- On a seasonal mantel: Combine terracotta and cream mushroom houses with dried branches and warm neutral decor.
Keep the finished piece indoors and away from water, damp surfaces, and strong direct sunlight. Air dry clay can soften or deteriorate with prolonged moisture, even when it has been sealed.
Storage and Care
Dust your mushroom house with a soft, dry brush or cloth. Avoid soaking it, washing it under running water, or leaving it in a humid location.
If you’re storing it between seasons, wrap it in soft tissue paper and place it in a sturdy box where the cap won’t press against other objects. Avoid stacking heavy decorations on top.
If the house contains an LED light, remove the light before storing the sculpture for a long period. Follow the battery manufacturer’s instructions and check for leakage before putting the light back inside.
Frequently Asked Questions
How long does it take to make an air dry clay mushroom house?
The hands-on work may take a few hours, depending on the size and the amount of detail you add. Drying takes longer and depends on the clay, thickness, and humidity. Allow several days or more if needed, and don’t rely on a fixed 48-to-72-hour period as proof that the whole piece is dry.
Can I make a mushroom house without aluminum foil?
Yes. You can make a smaller solid-clay mushroom, but a thick solid cap may take longer to dry and can be more prone to uneven drying. A lightweight core is useful when you want a larger dome without using a large amount of clay.
Can I leave the foil inside the mushroom cap?
Yes, if the foil is fully enclosed and the finished piece is intended only for decoration. You don’t have to remove it. If you want an open or hollow interior, plan the construction so you can access the core without forcing it through a narrow opening.
What paint works best on an air dry clay mushroom house?
Acrylic paint is a practical option for decorative clay pieces. Apply it to fully dry clay in thin coats and allow it to dry before sealing. The best colors depend on your design, from classic red and cream to muted terracotta, beige, brown, and olive.
Do I need to seal my mushroom house?
Sealing is optional for a purely decorative piece, but a compatible sealant can help protect the painted finish from dust and light handling. It does not make the sculpture waterproof or heat-resistant.
Can I put a real candle inside my mushroom house?
No. Air dry clay is not designed for an open flame or high heat. Use a battery-powered LED tea light instead, and ensure the light fits safely inside the design.
Why did my mushroom cap come away from the stem?
The joint may not have had enough contact, the clay surfaces may not have been prepared properly, or the cap may have been too heavy for the stem. A well-fitted joint, careful scoring, compatible slip, and adequate support while the pieces firm up can help reduce this problem.
Can I sell handmade air dry clay mushroom houses?
You can consider selling them as decorative handmade items, provided you describe their limitations honestly. Make sure your pricing accounts for clay, paint, sealant, packaging, your working time, and any selling fees. Clearly state that the pieces are decorative and not waterproof, food-safe, or suitable for real candles.
Final Thoughts
This is one of those projects that makes me want to keep working with clay because a few simple shapes can become something with so much personality.
The rounded cap, tiny doorway, and little windows do most of the work, and the paint is where you can really make the cottage your own.
My biggest recommendation is to focus on the structure first. Make a firm foil core, keep the clay reasonably even, take your time joining the cap and stem, and allow everything to dry thoroughly before painting.
Once those basics are right, you can have fun experimenting with colors, textures, and tiny details.
And don’t worry if your first mushroom house looks a little crooked. That’s part of the charm of handmade decor.
If you make one, I’d love to know whether you went with a classic red cap, a rustic woodland look, or a soft neutral design. You might even end up making a whole little mushroom village.
For your next project, explore my 12 super cute air dry clay ideas for more projects to try.