Easy Crochet Coffee Cup Cozy Pattern

I made my first crochet cup cozy because I wanted something small enough to finish in one sitting. After spending hours on larger projects, there was something really satisfying about making a useful little piece without needing a complicated pattern or a huge amount of yarn.
This crochet coffee cup cozy is worked as a simple rectangle and then wrapped around a takeaway cup and seamed. There is no complicated shaping, no increasing or decreasing, and no need to crochet in the round. If you can make a chain and single crochet, you can make this.

I especially like this pattern for using up leftover worsted-weight yarn. A cozy takes surprisingly little yarn, which means those half-used balls sitting in your basket can turn into something useful instead of being forgotten.
The finished cozy has a thick, textured appearance that helps give it that handmade look while also adding a little insulation between your hand and a warm coffee cup.
Why You’ll Love This Crochet Cup Cozy

This is one of those crochet projects that looks more complicated than it actually is.
The cozy is simply a rectangle worked in rows. Once you have the correct width for your cup, you continue crocheting until the piece reaches the height you want.
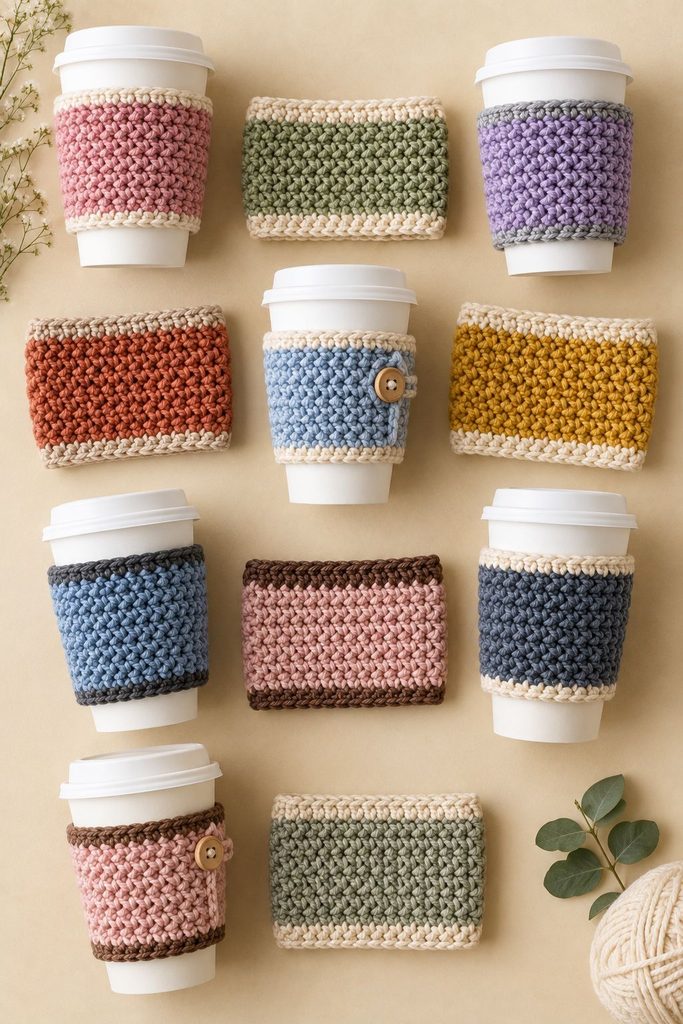
There is also plenty of room to customize it. You can make it in one color, use stripes, combine leftover yarn colors, or add a simple button and loop closure instead of sewing the two ends together.
It also makes a lovely small handmade gift. Pair one with a reusable coffee cup, a coffee shop gift card, or a bag of coffee and you have an inexpensive gift that still feels personal.
What You’ll Need
- Medium-weight worsted yarn, category 4
- 4.5 mm crochet hook
- Scissors
- Yarn needle
- Measuring tape
- Stitch marker, optional
For one standard cup cozy, you only need a small amount of yarn, usually around 25 to 40 yards depending on the cup size and stitch tension.
I recommend choosing a yarn that is comfortable to hold rather than anything especially delicate. Cotton or a cotton blend works particularly well because it holds its shape nicely.
Finished Size
The finished cozy in this pattern is approximately:
- Width: 10 to 11 inches
- Height: 3.5 to 4 inches
This is designed to fit around a typical takeaway coffee cup, but cup sizes vary considerably.
Before fastening off, wrap your crochet piece around the cup you intend to use. It should sit comfortably without stretching excessively.
If you’re making cozies to sell, I recommend measuring against the actual cups your customers are likely to use rather than relying only on the measurements above.
Crochet Gauge

Gauge isn’t as important here as it is for a sweater or other fitted garment, but your tension will affect the final size.
A good starting point is approximately:
16 to 18 single crochet stitches = 4 inches
If your stitches are much tighter, your cozy will be smaller and denser. If they’re very loose, it will be larger and more flexible.
For this project, getting the cozy to fit your cup matters more than matching an exact gauge number.
Stitches You’ll Use
- Chain (ch)
- Single crochet (sc)
- Slip stitch (sl st)
That’s it.
If you’re comfortable with single crochet, this is a very manageable beginner project.
How to Crochet the Coffee Cup Cozy
Step 1: Make the Starting Chain

Chain 16 stitches.
This creates a cozy approximately 3.5 to 4 inches tall.
If you want a taller cozy, add a few chains. If you’re making one for a smaller cup, reduce the starting chain accordingly.
The important thing to remember is that the starting chain determines the height of the cozy, while the number of rows determines its length around the cup.
Step 2: Work the First Row
Single crochet in the second chain from your hook.
Continue working one single crochet into each chain across.
You should have 15 single crochet stitches.
Chain 1 and turn.
Step 3: Continue Working the Rows
Single crochet across the entire row.
Chain 1 and turn.
Repeat this same row until the rectangle is long enough to wrap comfortably around your cup.
For many standard takeaway cups, you’ll need approximately 35 to 45 rows, but don’t rely on the row count alone.
Your yarn, hook size, tension, and cup size will all affect the finished measurement.
Step 4: Check the Fit
After several rows, wrap the crochet piece around your cup.
You want the two short ends to meet without forcing the fabric to stretch tightly.
If there is a large gap, continue crocheting additional rows.
If the cozy wraps around too far and overlaps considerably, you’ve made it longer than necessary.
This simple fit check is much more reliable than trying to make every cozy with an identical row count.
Step 5: Fasten Off
Once the rectangle reaches the correct length, cut the yarn, leaving a tail of several inches.
Pull the yarn through the final loop and tighten gently.
Weave the end through the stitches on the wrong side using your yarn needle.
Repeat with the starting yarn tail.
Step 6: Join the Ends

Wrap the finished rectangle around your cup with the right side facing outward.
Bring the two short ends together.
Using a yarn needle and matching yarn, stitch the ends together securely.
You can use a whip stitch for a simple seam or mattress stitch if you want a more subtle join.
Work through both layers several times near the top and bottom of the seam so it doesn’t loosen with use.
Once you’re happy with the seam, weave in the remaining yarn ends.
How to Make a Button Closure Instead

If you don’t want to permanently sew the cozy into a circle, you can add a button-and-loop closure.
This is especially useful if you want the cozy to fit several slightly different cup sizes.
Instead of sewing the short ends together, leave them separate.
Sew a small button securely to one end.
At the opposite end, attach a short chain loop that can stretch around the button.
When the cozy is wrapped around the cup, fasten the loop over the button.
This also gives the finished cozy a more decorative appearance.
How to Make the Cozy Smaller or Larger
One of my favorite things about this pattern is how easy it is to adjust.
To Make It Taller
Add stitches to your starting chain.
For example, if 16 chains give you a cozy around 4 inches tall, adding four or five chains will create a taller version.
To Make It Shorter
Start with fewer chains.
This works well for smaller espresso-style cups or if you want a narrow band around the middle of the cup.
To Make It Wider
Simply crochet more rows.
Keep wrapping the piece around your cup as you work until the ends meet comfortably.
There is no need to calculate complicated increases or decreases.
Choosing the Best Yarn

For everyday cup cozies, I usually prefer cotton or a cotton blend.
Cotton creates a sturdy fabric and doesn’t have quite as much stretch as some acrylic yarns. It also gives the cozy a clean, structured appearance.
Acrylic yarn can work too, especially if you’re making decorative cozies or using up yarn you already have.
I’d avoid extremely fuzzy yarn for this particular project because the texture can make the stitches harder to see and can make the cozy less practical to wash.
Color Ideas for Crochet Cup Cozies
This is a great project for experimenting with color because each cozy uses so little yarn.
Some combinations I love are:
- Dusty pink and cream
- Sage green and ivory
- Lavender and soft gray
- Terracotta and beige
- Baby blue and white
- Mustard and cream
- Dusty blue and charcoal
- Blush pink and brown
You can also make a set using several coordinating colors.
That’s particularly cute if you’re making these as gifts or selling them as a small handmade collection.
How to Add Stripes
Stripes are one of the easiest ways to change the appearance of this pattern.
Work three or four rows in your first color, then change to your second color.
Continue alternating colors until the cozy reaches the desired length.
For cleaner stripes, change colors at the end of the final stitch of a row, before completing the last yarn-over.
You can make narrow two-row stripes or wider blocks of color depending on the look you want.
Tips for a Neater Crochet Cozy
Keep your tension consistent. Because this project is so simple, uneven tension is much more noticeable than it would be in a complicated pattern.
Count your first row carefully. Once you have the correct stitch count, the remaining rows are straightforward.
Check the cup as you work. Don’t wait until the very end to discover that the cozy is too loose or too tight.
Keep your seam secure. The seam gets repeated handling, so don’t rely on just two or three stitches to hold it together.
Weave in your ends properly. Loose yarn tails can work their way out with washing and regular use.
Common Problems
My cozy is too loose around the cup.
The finished rectangle is probably too long for your cup.
Undo a few rows and check the fit again, or add a button closure so the size can be adjusted.
My cozy is too tight.
Add more rows before fastening off.
You can also try a slightly larger hook if your fabric is very dense and stiff.
My edges aren’t straight.
This usually comes from accidentally adding or losing stitches at the ends of rows.
Count your stitches occasionally. You should have the same number of single crochet stitches in every row.
The fabric feels too stiff.
Your tension may be too tight.
Try going up half a hook size and see whether the fabric becomes softer and more flexible.
My seam looks bulky.
Try using mattress stitch and avoid pulling the yarn excessively tight as you sew.
A seam should hold the two ends together without gathering the crochet fabric.
Can You Wash a Crochet Cup Cozy?
Yes, provided you’ve chosen a washable yarn.
For cotton or washable acrylic, gently hand wash or use a delicate cycle according to the yarn manufacturer’s instructions.
Let the cozy dry flat rather than putting it on a hanger or stretching it while wet.
Because coffee and other drinks can occasionally spill, being able to wash your cozy is one of the reasons I prefer practical yarns for this project.
Can You Sell Crochet Cup Cozies?
Absolutely. They’re small, inexpensive projects that can be made in batches, which makes them interesting for craft fairs, markets, and handmade shops.
The key is making them look intentional rather than simply using random leftover yarn.
Create small collections with coordinated colors, add a simple button or handmade tag, and offer them individually or as sets.
They’re also a useful project for testing new color combinations before committing to a much larger crochet project.
Frequently Asked Questions
How much yarn do I need for one crochet cup cozy?
Usually around 25 to 40 yards of worsted-weight yarn is enough for a standard cozy, although the exact amount depends on your stitch tension, size, and yarn weight.
What crochet stitch is best for a cup cozy?
Single crochet is an excellent choice because it creates a dense fabric with very little stretch. It also gives the cozy enough structure to hold its shape around a cup.
Can a beginner make this crochet cup cozy?
Yes. The pattern uses basic chains and single crochet stitches, and the entire project is worked in a simple rectangle.
Can I use chunky yarn?
Yes, but you’ll need to adjust the hook size and starting chain. Chunky yarn will create a much thicker cozy, so check the fit against your cup as you work.
Can I make this without sewing?
You can. Instead of permanently joining the ends, make a button-and-loop closure. This also allows the cozy to fit different cup sizes.
How long does it take to crochet one?
For a beginner, expect roughly one to two hours depending on your speed and the size of the cozy. Once you’re comfortable with the stitch pattern, you can make one much faster.
What size cup does this fit?
The basic measurements work well for many standard takeaway coffee cups, but cups vary in diameter. Always wrap your work around your specific cup before finishing.
Final Thoughts
This is exactly the kind of crochet project I like keeping around for those times when I want to make something but don’t want to commit to a huge project.
You can finish one with a small amount of yarn, experiment with colors, and actually use it when you’re done. There’s also something really nice about pulling a handmade coffee cozy onto your cup in the morning instead of reaching for another disposable sleeve.
And once you’ve made one, you’ll probably start seeing all those leftover yarn colors in your basket a little differently. A tiny amount of yarn really can be enough to make something useful.