How to Make a Polymer Clay Lighter Case (Step-by-Step Guide for Beginners)
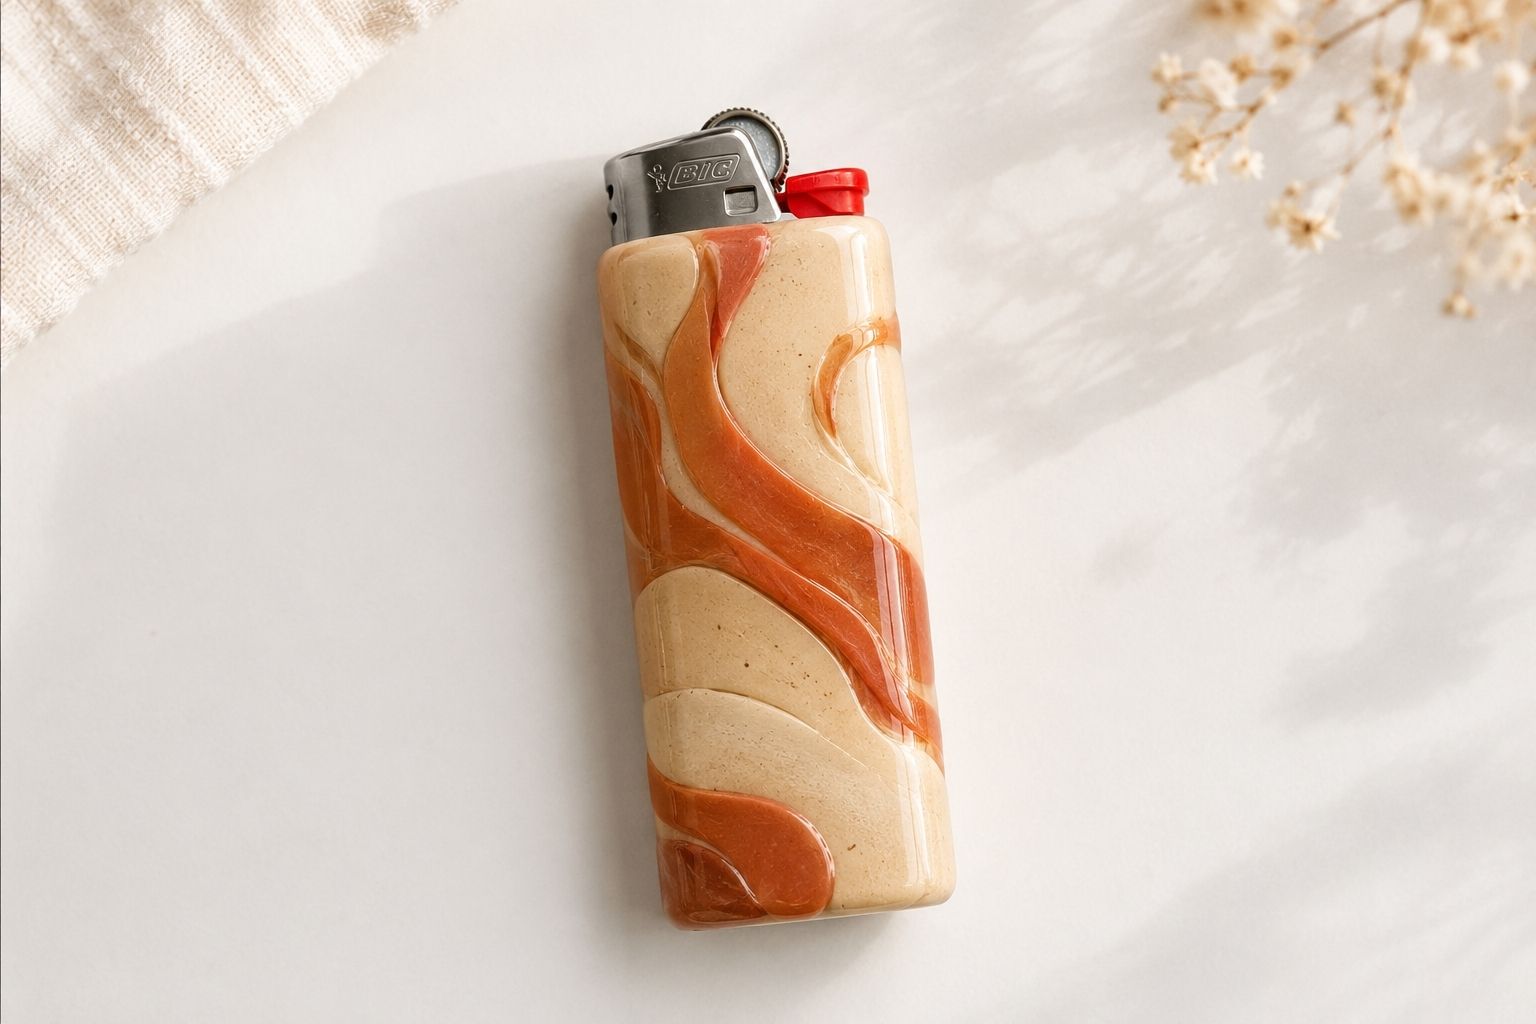
I lose lighters constantly. My BIC lighter usually starts out on the counter, then somehow ends up in a drawer, the bottom of my bag, or somewhere I definitely don’t remember putting it. I wanted something that would make it easier to spot while also turning a very plain little lighter into something more fun.
That’s where these polymer clay lighter cases came in. They’re surprisingly simple to make, and once you have the basic shape figured out, you can customize them with almost any color, pattern, or texture you like. A simple marble finish looks great, but you can also add tiny flowers, checkerboard details, initials, or seasonal colors.
For this tutorial, I’m using a standard BIC lighter because its simple shape makes it especially easy to measure and wrap with polymer clay. The finished case fits snugly around the body while leaving the entire lighting mechanism uncovered.
One important safety note before you begin: this is a decorative case, not a heat shield. Keep the flame outlet, spark wheel, ignition mechanism, and other moving parts completely clear. The lighter must also be removed from the clay before baking. Never put a lighter in the oven.
Why Polymer Clay Works So Well for This Project
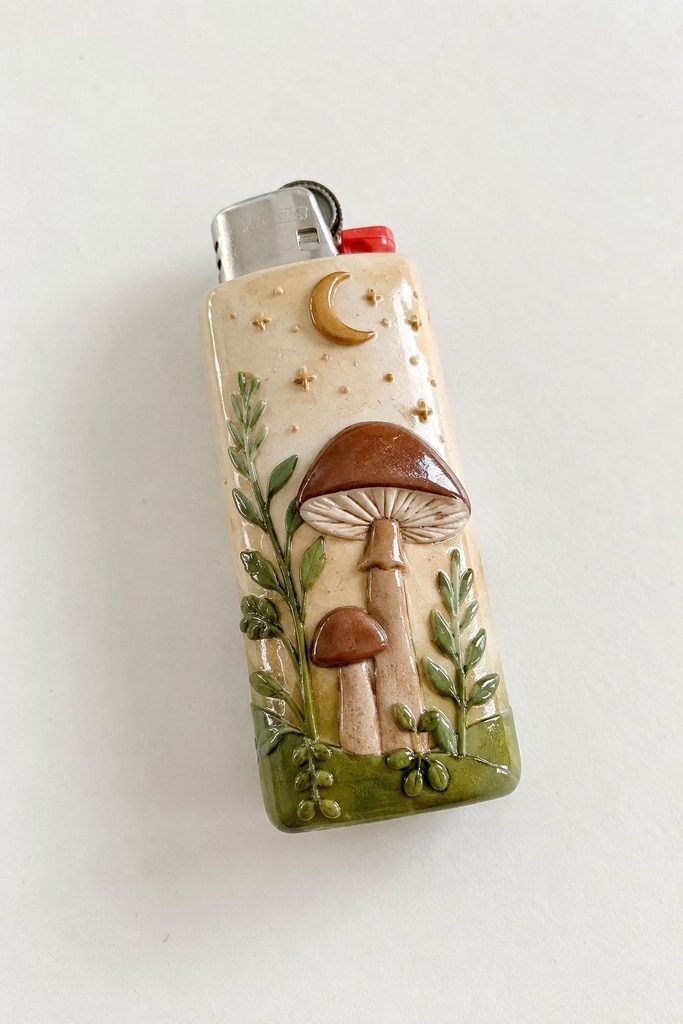
Polymer clay is a good match for a lighter case for a few reasons.
- It cures hard in a home oven, so the finished case holds its shape
- It can be sculpted, textured, and blended in almost unlimited colors
- It doesn’t shrink or crack the way air dry clay can on thin, wrapped pieces
- A well-made case adds a bit of rigidity and heat distance between your hand and the lighter body
It’s important to understand the limits of this project too. A polymer clay sleeve is a cosmetic and grip-improving case, not a heat shield or safety device. Never wrap clay directly over the flame outlet, valve, or spark wheel, and don’t use a wrapped lighter as an excuse to hold it closer to a flame than you normally would.
Polymer Clay vs. Air Dry Clay for This Project
If you’ve made air dry clay projects before, it’s worth understanding why polymer clay is the better choice here specifically, rather than assuming the two are interchangeable.
Air dry clay cures by losing moisture to the air. On a thin, wrapped shape like a lighter sleeve, that moisture loss tends to happen unevenly, the outer surface dries and shrinks while the inner layer against the lighter is still damp, and that mismatch is what causes cracking, warping, and pieces that pop off cleanly once fully dry. It also stays soft and can be scratched or dented with normal pocket or bag use.
Polymer clay cures through heat, not evaporation, so it hardens all the way through at once, evenly, regardless of how thin the piece is. Once cured, it holds up to daily handling, keys, coins, and the general wear of living in a pocket or bag far better than air dry clay does.
For anything that gets handled daily, rides in a pocket, or needs a hard, durable final surface, polymer clay is the more reliable material. Save air dry clay for display pieces, trays, and decor that won’t take regular physical wear.
Choosing the Right Polymer Clay Brand and Firmness
Not all polymer clay behaves the same way, and firmness matters more for this project than it might for something like a flat pendant or a simple bead.
Firmer clays hold crisp texture and clean seams better, and they’re less likely to distort while you’re pressing and smoothing the wrap into place. They take a little more kneading to condition but generally give a more professional-looking result for a wrapped project like this.
Softer clays are easier to condition straight out of the package and blend colors a bit more smoothly, but they can be trickier to control on a curved wrap. They’re more prone to fingerprints, sagging slightly before it firms up, and picking up texture from your hands that you didn’t intend.
If you’re newer to polymer clay, start with a mid-firm, well-reviewed brand rather than the softest option on the shelf. It’s more forgiving while you’re still learning how much pressure and smoothing a wrap actually needs.
Also check that whatever brand you choose is rated as fully oven-curing (not a soft, always-pliable novelty clay), since the case needs to hold a hard, permanent shape once finished.
Supplies You Will Need
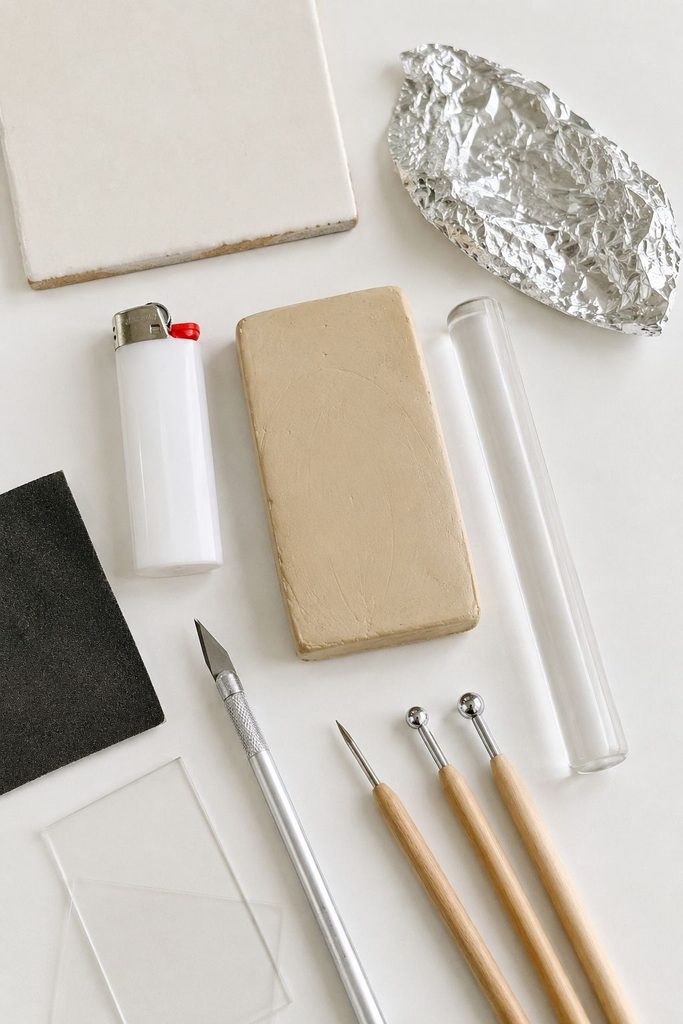
These are the basic materials for this project. Everything listed is affordable and easy to find:
- Polymer clay (a firmer, oven-bake brand works better for this than a very soft one)
- A standard disposable lighter (empty or full, cleaned and completely dry)
- Aluminum foil (a small strip, for an easy-release layer)
- A rolling pin or acrylic roller
- A craft knife or clay blade
- Fine grit sandpaper
- A ceramic tile or oven-safe glass surface for baking
- Optional: texture stamps, a needle tool, and clear polymer glaze
Step 1: Clean and Dry Your Lighter
Wipe down the lighter completely and make sure it’s dry before you start. Any residue, oil, or moisture on the surface can keep the clay from adhering evenly and may cause bubbling once it’s baked.
Leave the flame wheel, gas adjustment, and the very top of the lighter (where the flame exits) uncovered. You’re wrapping the body, not sealing the mechanism.
Step 2: Condition Your Clay
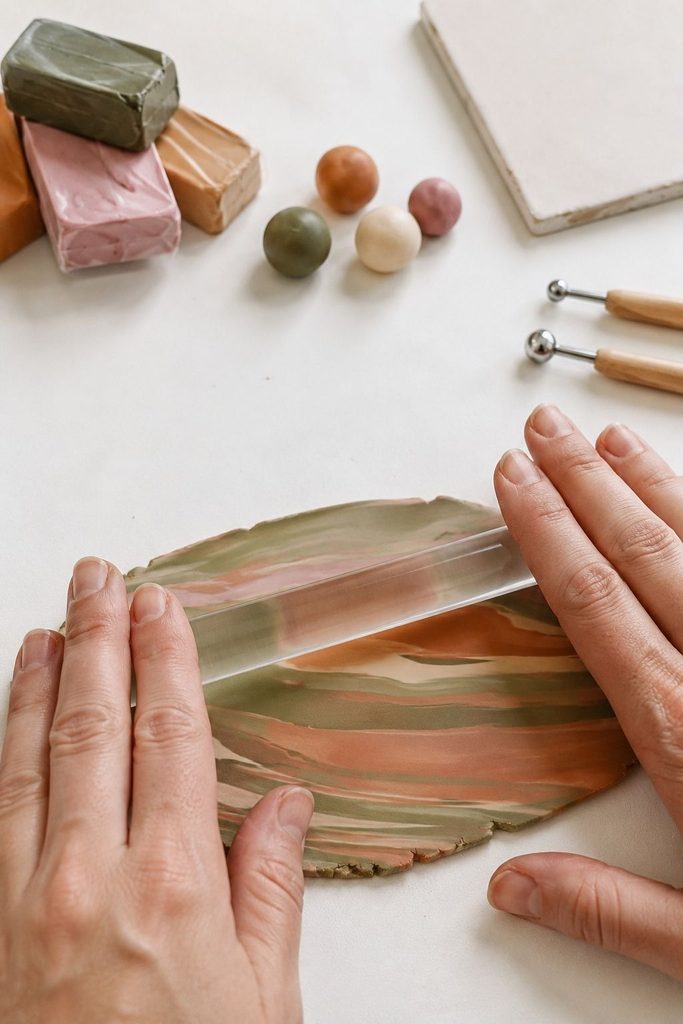
Polymer clay needs to be conditioned before you use it, meaning kneaded and rolled until it’s soft, pliable, and free of cracks.
Work a manageable amount in your hands for a few minutes, then roll it out to an even, thin sheet, somewhere around 1/8 inch thick. Too thick and the wrap will feel bulky and may not cure evenly all the way through. Too thin and it can tear or show every fingerprint.
Step 3: Cut Your Wrap Pieces
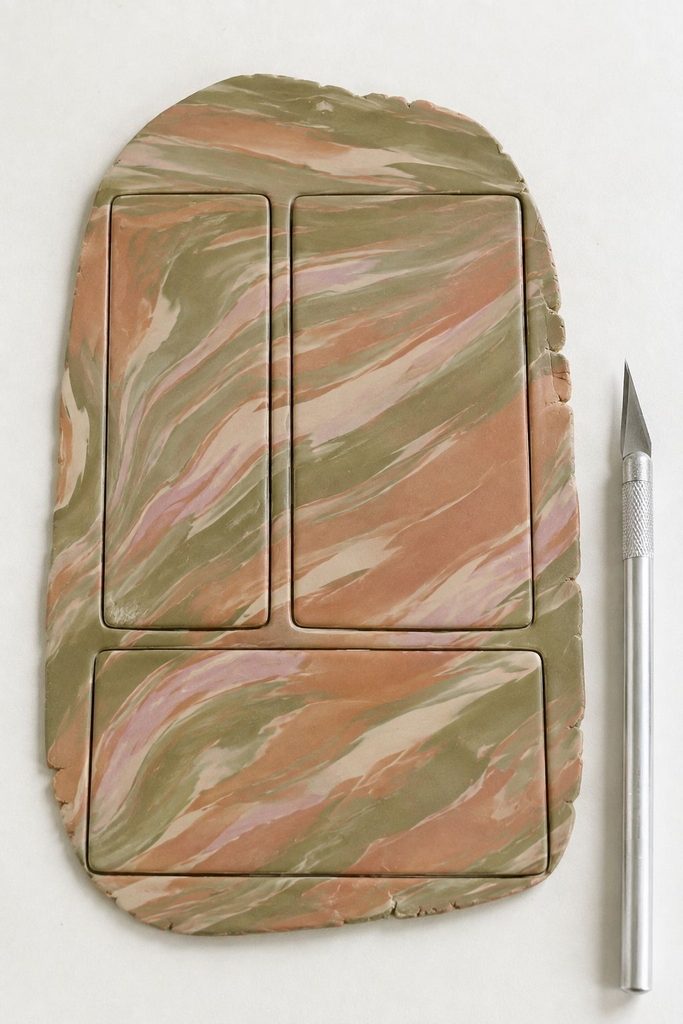
Lay the lighter on your rolled sheet and use it as a rough guide.
Most cases work best as two or three separate pieces rather than one continuous wrap:
- A main body panel that wraps around the front and sides
- A back panel
- A smaller cap or band near the top, if you want a clean edge around the mechanism
Cut each piece with a craft knife, leaving a small amount of extra clay along every edge. It’s much easier to trim excess after wrapping than to stretch a piece that came out too small.
Step 4: Wrap the Body
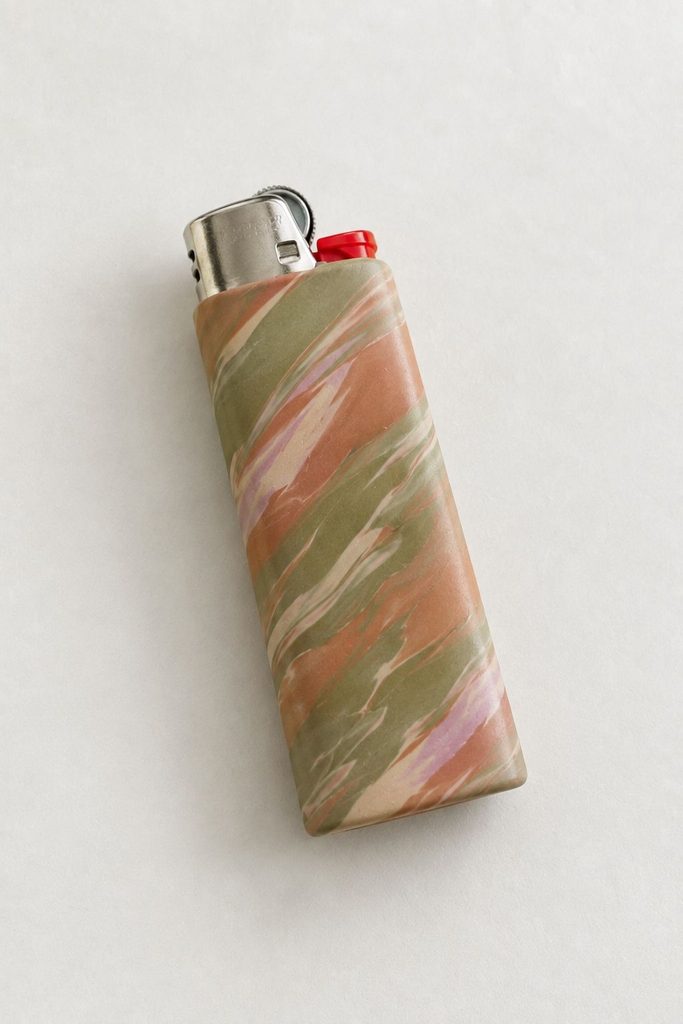
Press your first panel gently onto the lighter, starting from the center and smoothing outward toward the edges. Work slowly here.
Use your fingers or a soft tool to blend the seams where pieces meet, smoothing the clay so the transition looks intentional rather than patched together. A small amount of water or a touch of clay softener on your fingertip can help blend seams without over-thinning the clay.
Check the fit around the flame wheel and gas adjustment as you go. These areas need to stay completely clear so the lighter still functions normally once the case is finished.
Step 5: Trim and Refine the Edges
Once the wrap is fully in place, use your craft knife to trim any excess clay along the top and bottom edges.
Clean, straight cuts around the base give the case a more finished look. Around the flame mechanism, trim generously rather than leaving clay too close, since polymer clay can soften and shift slightly under heat.
Step 6: Add Texture or Detail (Optional)
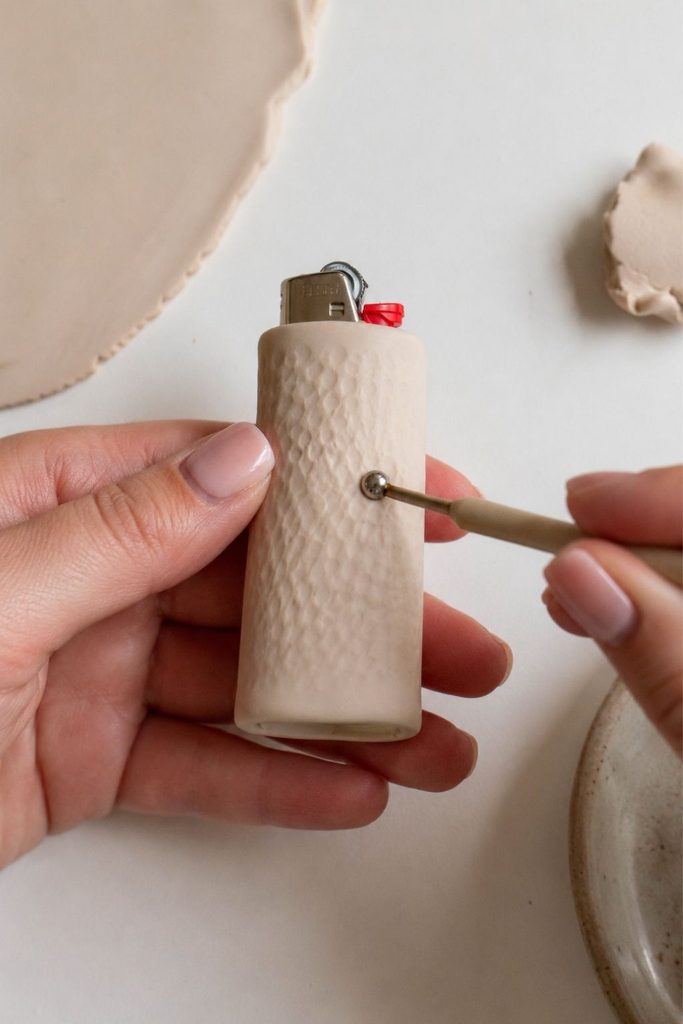
This is where the project becomes genuinely personal.
A few simple options:
- Press a texture stamp or lace into the surface before it firms up
- Use a needle tool to carve a simple pattern, initials, or a small design
- Blend two or three clay colors together for a marbled effect
- Add a thin contrasting strip around the base as a border
Keep any raised detail modest near the top of the case, since anything too built-up close to the flame area can interfere with how the lighter sits in your hand or pocket.
Color Mixing and Blending Techniques
Marbling. Twist two or three colors of conditioned clay together loosely, then roll the bundle out flat. Stop twisting and rolling while the colors are still distinct streaks rather than a fully blended new color, that partial mixing is what gives marbling its look.
Gradient blending. Roll out a small ball each of two colors, then blend a pea-sized bit of each together to create a middle-tone. Repeat with slightly different ratios to build a short series of shades, then arrange thin slices from lightest to darkest across your panel before rolling it flat. This takes more time than marbling but gives a much smoother, more polished transition.
Mica shift and pearl clays. If your brand offers pearl, gold, or color-shift clays, rolling them out and lightly sanding or burnishing the surface after curing can bring out a subtle shimmer that catches light differently depending on the angle. This works especially well as a thin accent band rather than covering the whole case.
Speckled or confetti effects. Finely chop small scraps of leftover clay from other colors and press them into a base sheet before rolling it flat. This is also a good way to use up small offcuts instead of throwing them away.
Texture Techniques Beyond Stamps
- Fabric or lace impressions: press a scrap of textured fabric or lace into the rolled sheet before cutting your panels, then peel it away to leave a raised pattern
- Toothbrush stippling: lightly press the bristles of an old toothbrush into the surface for a fine, even stippled texture
- Carved line work: once a panel is cut but still soft, use a needle tool with light, even pressure to carve simple repeating lines, dots, or geometric patterns
- Layered cutouts: cut a thin shape from a contrasting color and press it gently onto the base panel before wrapping, for a raised inlay look rather than a flat printed pattern
Whatever technique you choose, test it on a scrap piece first. Some textures look completely different once the clay has firmed up slightly compared to how they looked the moment you pressed them in.
Step 7: Let the Piece Rest
Before baking, let the wrapped lighter sit undisturbed for 20 to 30 minutes. This gives the clay a chance to firm up slightly and reduces fingerprints or smudging from handling it during the baking prep.
Step 8: Bake According to Your Clay’s Instructions
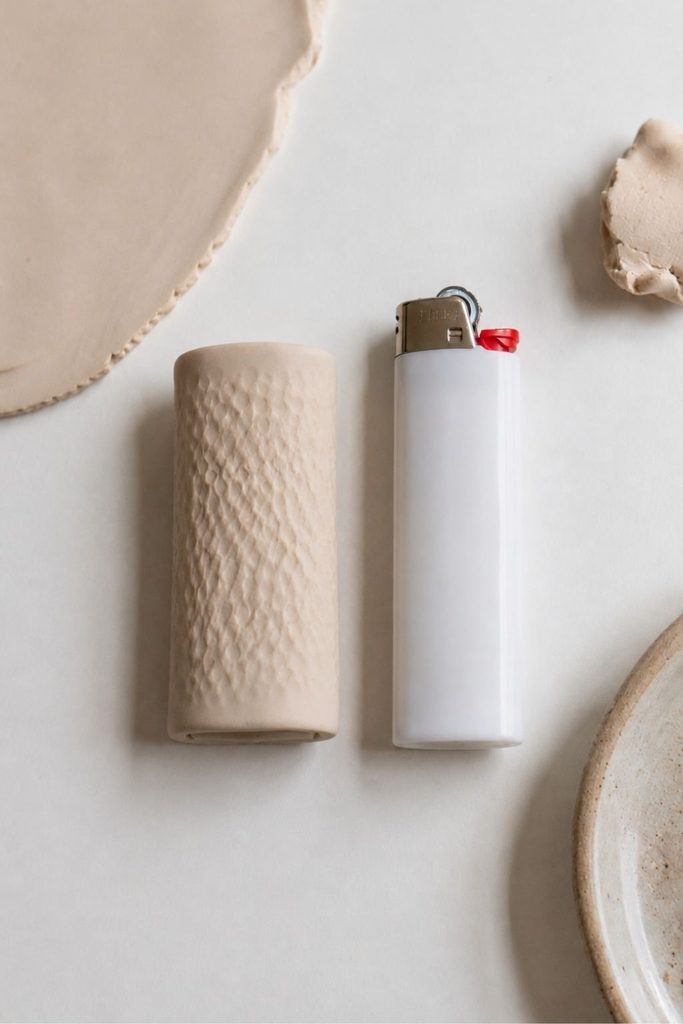
Remove the lighter from the clay wrap before baking.
This is the step people are most tempted to skip, and it’s the one that matters most. Polymer clay must be cured in an oven, and a lighter should never go into an oven. Carefully slide the cured shape off, or gently ease the clay wrap free before it fully hardens, so you’re baking the clay shell on its own, on your ceramic tile or oven-safe surface.
Follow the time and temperature listed on your specific clay’s packaging. Most oven-bake polymer clays cure somewhere in the 265–275°F range for roughly 15–30 minutes depending on thickness, but the instructions on your brand are the ones to follow, not a general estimate.
Let the cured piece cool completely on its baking surface before handling it.
Step 9: Fit the Case Back Onto the Lighter
Once the clay shell has cooled and hardened, slide your lighter back inside.
A properly sized wrap should fit snugly without needing glue. If it feels loose, a small dab of strong multi-purpose adhesive along the inside back panel can help hold it in place, applied away from the flame mechanism.
Step 10: Seal and Finish
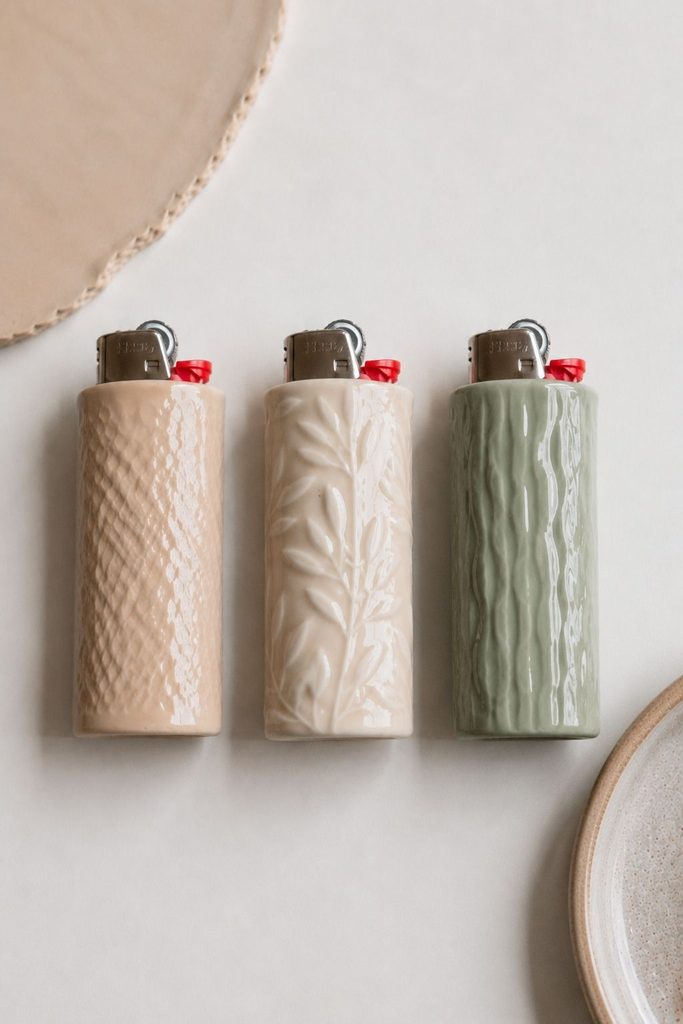
If you want extra durability and a bit of shine, a clear polymer-safe glaze brushed on in a thin, even coat can protect the surface from scuffing with everyday use.
Let the glaze cure fully according to its own instructions before using the lighter regularly.
Troubleshooting Common Problems
The clay cracked during or after baking. This usually means the wrap was too thick in some areas and thin in others, or the piece cooled too quickly straight out of the oven. Let cured pieces cool gradually on the baking surface rather than moving them to a cold countertop right away, and aim for an even thickness across the whole panel next time.
The seams are visible and won’t blend smoothly. Seams are easiest to blend while the clay is still soft, right after wrapping. If they’ve already firmed up, a small amount of clay softener or a tiny bit of water on your fingertip can help, but don’t over-wet the surface or it can go gummy. For future pieces, blend seams immediately after pressing panels into place, before moving on to texture or detail work.
The case feels loose after curing. Polymer clay can shrink very slightly during baking, which is normal, but a case that’s noticeably loose usually means it was rolled too thin or wrapped with too much stretch. Adding a dab of adhesive on the inside back panel is a fine fix for a finished piece; for future cases, roll panels slightly thicker and avoid stretching the clay tight while pressing it into place.
The surface stayed tacky or soft after the recommended bake time. This is often an oven temperature issue rather than a timing issue. Home ovens can run cooler than their dial suggests, so an inexpensive oven thermometer placed next to your piece can tell you whether you’re actually reaching the temperature your clay needs.
Fingerprints or smudges show up in the finished piece. This comes from handling the clay too much during the rest period before baking. Let the wrapped piece sit undisturbed on a stable surface rather than picking it up to check on it, and handle finished panels by the edges when you do need to move them.
Colors muddied together when you didn’t want them to. Over-blending is the most common cause. If you’re going for a marbled or gradient look, stop mixing earlier than feels natural, the colors will continue to soften into each other slightly during rolling and handling even after you stop actively blending.
Caring for Your Finished Lighter Case
A cured polymer clay case is durable, but a few habits will keep it looking good for longer:
- Avoid leaving it in a hot car or direct sun for extended periods, since prolonged heat exposure can soften polymer clay even after it’s cured
- Wipe it down with a soft, slightly damp cloth rather than harsh cleaners or solvents
- If you added a glaze finish, avoid abrasive scrubbing that could dull or scratch the coating
- Store spare lighters or refills separately from the cased one to avoid scratching the clay surface
Variations and Gift Ideas
Once you’re comfortable with the basic wrap-and-cure process, a few variations are worth trying:
- Matching sets: make two or three cases in coordinating colors or patterns as a small gift set
- Personalized initials or names: carve or stamp initials into the back panel before baking for an easy personal touch
- Seasonal themes: simple color choices, like deep orange and brown for fall or soft pastels for spring, can make a case feel occasion-specific without much extra effort
- Layered ombre effect: use the gradient blending technique across three or four panels for a case that shifts color from top to bottom
- Bundled gift: pair a finished case with a nice lighter and a small handmade box or pouch for a more complete handmade gift
Because the base project is quick once you’ve done it a few times, this is also a nice one to batch, several lighter cases at once, in an evening, if you’re making gifts for more than one person.
Common Mistakes to Avoid
Covering the flame mechanism. Always leave the wheel, gas valve, and flame outlet completely clear.
Baking the clay while it’s still on the lighter. Remove the lighter before curing, every time.
Rolling the clay too thick. A bulky case is harder to grip and more likely to crack unevenly during baking.
Skipping the rest period. Handling the piece too soon after wrapping smudges detail and softens sharp edges.
Rushing the cooling time. A piece that feels solid can still be soft underneath right out of the oven. Give it the full cooldown before handling it normally.
Frequently Asked Questions
Is it safe to put polymer clay on a lighter?
The body and base of a lighter can be wrapped safely as long as the flame mechanism, gas valve, and flame outlet stay completely uncovered, and the clay is fully cured (baked) before it goes anywhere near the lighter again.
Can I bake the clay while it’s still wrapped around the lighter?
No. Lighters should never be placed in an oven. Remove the lighter first, bake the clay shell on its own, then reassemble once it’s cooled.
What kind of polymer clay works best for this?
A firmer, oven-bake polymer clay generally holds detail and shape better for a wrapped project like this than a very soft, pliable brand.
How long does polymer clay take to cure?
It depends on your specific brand and the thickness of your piece. Always follow the temperature and time listed on your clay’s packaging rather than a general rule.
Can I use this same method for other small items?
Yes. The same wrap-and-cure approach works for pens, small flashlights, and other compact items, as long as you avoid covering any part that gets hot, sparks, or needs to move freely.
Final Thoughts
A polymer clay lighter case is a small project, but it’s a satisfying one. You start with something disposable and forgettable, and end up with something textured, colorful, and entirely your own.
Take your time on the wrap and trim steps, always cure the clay separately from the lighter, and keep the flame mechanism clear from start to finish. Once you’ve made one, you’ll probably find yourself making a few more, just to try out different colors and textures.
If you’re new to working with clay in general, my guide on How to Seal Air Dry Clay covers finishing techniques that carry over well to polymer projects too.