How to Make Air Dry Clay Gnomes (Easy Beginner Tutorial)

I made my first clay gnome almost by accident, I had leftover clay from a coaster project and about twenty minutes to kill, so I shaped a little cone hat, added a round nose, and set it on my windowsill to dry.
My daughter saw it the next morning and asked if we could make a whole family of them, and that’s genuinely how an entire shelf in my craft room ended up covered in tiny gnomes in every color I own paint for.
There’s something so satisfying about this particular project, the shape is forgiving, the personality comes almost entirely from the hat and a bit of paint, and no two gnomes ever turn out quite the same even when I’m trying to match a set.

If you’ve made my Air Dry Clay Mini Pots or my Air Dry Clay Fridge Magnets, you already know the basic building blocks, this tutorial just points that same skill set toward something a little more whimsical.
I’ll walk you through the classic bearded gnome first, the one with the tall pointed hat and the wispy white beard, and then a second, simpler variation with a rounded hat and a painted detail instead of a sculpted beard, so you can pick whichever style fits the space you’re making it for.
A Note About Choosing Your Clay Color
Most of this tutorial assumes you’re working with plain white air dry clay and adding all your color with paint afterward, but it’s worth knowing your other options before you start.
White clay is the most flexible choice by far, since it takes paint evenly and lets you match any color scheme you want, holiday, pastel, or otherwise. It’s also usually the easiest type to find and the one most beginner-friendly recipes and store-bought bags are built around.
Terracotta clay gives you a warm, reddish base color right out of the package, which can work nicely if you’re going for a more rustic, earthy-toned gnome and don’t mind skipping paint on the body entirely.
Keep in mind that lighter paint colors won’t show up as true or bright over a terracotta base the way they will over white.
Pre-tinted colored clays exist too, though I’d steer beginners away from them for this particular project, blending two different colored pieces, like a red hat and a white beard, is much easier to plan and control with paint added after the fact than trying to source and match several different clay colors upfront.
What You’ll Need
Here’s what to gather before you start:
- Air dry clay
- A small ball tool or the rounded end of a paintbrush
- A toothpick or fine clay tool
- A garlic press for the beard texture
- Acrylic paint set, red, green and skin tone.
- A fine detail paintbrush
- A sealant made for air dry clay
How to Make a Classic Bearded Gnome
Once everything’s ready, here’s how it comes together:
Step 1: Shape the Body

Roll a rounded, slightly tapered body about the size of a large egg, a little wider at the bottom than the top so it stands more easily once dry. Press the bottom lightly against your work surface to flatten it just slightly.
Step 2: Add the Nose

Roll a pea-sized ball of clay and press it onto the upper third of the body, angling it to point outward a little rather than sitting flush, this gives the nose some real dimension.
Step 3: Build the Hat

Roll a cone of clay, wide at the base and tapering to a point. Press the wide end over the nose, wrapping it slightly down onto the body so it looks like it’s resting on the head.
Bend the tip to one side while the clay is still soft, a drooping point reads far more like a classic gnome hat than a straight one.
Step 4: Add the Beard
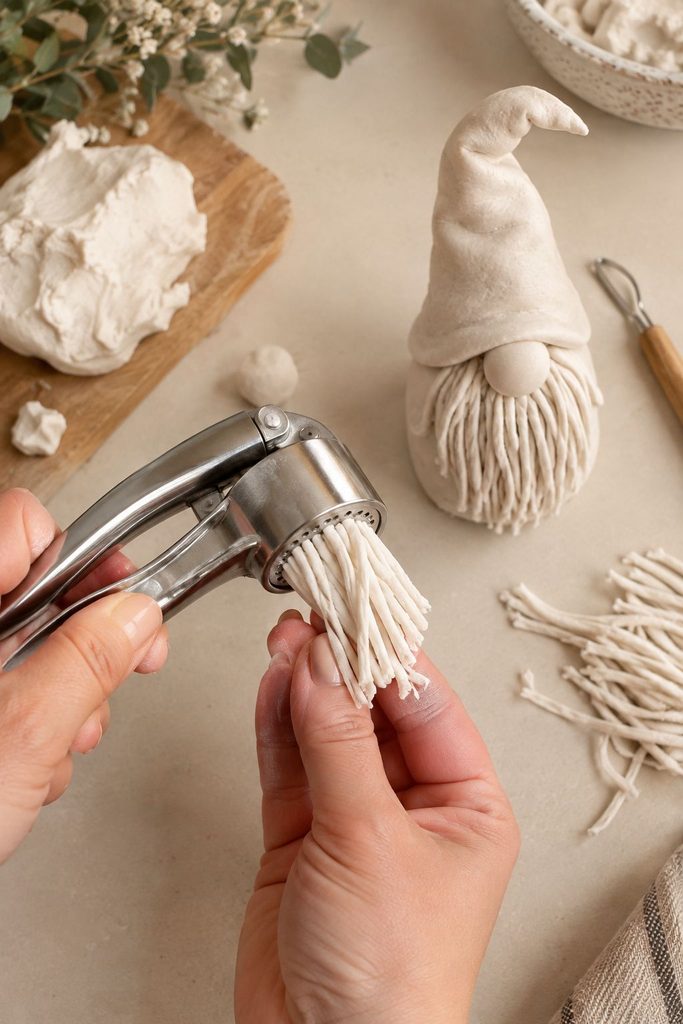
Press a small ball of white clay through a garlic press to create thin strands, then gather and press them beneath the nose, letting the ends fan out.
Repeat two or three more times, layering fresh strands over the first, until the beard has enough volume to look full.
Step 5: Smooth the Seams

Smooth where the hat meets the body with a damp fingertip in small circles, blurring the seam so both pieces read as one continuous shape.
This is usually the first spot your eye catches on a finished piece, so it’s worth the extra minute.
Step 6: Let It Dry
If the gnome stands upright, leave it standing. If not, lay it on its side and rotate it every few hours so it dries evenly. Depending on thickness, this takes one to two days, don’t rush it.
Step 7: Paint and Seal

Once the piece feels completely hard with no cool or damp spots, paint the hat, body, nose, and any exposed beard, two thin coats rather than one thick one.
Let each color dry before adding a neighboring one, then seal in thin, even coats once the paint is fully dry.
Tip: If your gnome won’t stand upright on its own once shaped, flatten the very bottom of the body slightly before it dries, a small flat base makes a surprising difference in stability.
How to Make a Simple Rounded Gnome
Once everything’s ready, here’s how this version comes together:

Step 1: Shape the Body
Shape a rounded, dome-topped body, slightly shorter and stouter than the classic version above. Work it smooth between your palms, then flatten the bottom just slightly so it stands securely once dry.
Step 2: Add the Nose
Roll a pea-sized ball of clay and press it onto the upper portion of the body, angling it outward slightly the same way as the first gnome.
Step 3: Shape the Rounded Hat
Instead of a tall point, shape a rounded dome of clay large enough to cover the head and drape down over the sides, more like a soft beanie than a pointed cap.
Press it into place, then use your thumbs to gently push the edges downward so they curve naturally rather than sitting stiff.
Step 4: Smooth the Body
Skip the beard entirely here, and smooth the lower body clean with a damp finger instead.
This bare area is where your painted detail goes later, so a smooth surface matters more on this version than the bearded one.
Step 5: Let It Dry
Let the gnome dry fully using the same guidance as the classic version, standing upright if it balances, or rotated periodically on its side if it doesn’t.
Step 6: Paint the Detail

Paint the hat a solid base color in two thin coats, letting it dry fully.
Then use a fine detail brush to add a small heart, a cluster of dots, or a thin stripe on the front. Let it dry, then seal the whole piece in thin, even coats.
Tip: This simplified version is the one I hand off to kids, since there’s no beard texturing step and the shapes are forgiving enough that a slightly lopsided hat still reads as charming rather than wrong.
Getting the Proportions Right
The difference between a gnome that looks intentionally whimsical and one that looks a little off usually comes down to just a couple of proportion choices.

Keep the hat roughly the same height as the body, or even slightly taller, a hat that’s too short makes the whole gnome look squat and a little awkward, while a generously tall hat is what gives gnomes their signature charm.
I usually aim for the hat to take up close to half the total height of the finished piece.
The nose matters more than people expect too. A nose that’s too small gets lost against the beard or hat, while one that’s too large can look cartoonish in an unintentional way. A small, round ball about the size of a pea for a palm-sized gnome tends to hit the right balance.
How Long This Actually Takes
Plan for about thirty minutes of hands-on shaping time for either gnome, the bearded version runs a little longer than the rounded one because of the beard-texturing step.
The body, nose, and hat come together quickly, maybe ten minutes total once you’re working. The beard is the slowest part of the classic version, figure another ten to fifteen minutes if you’re layering it in a few passes for good volume.
Drying is where the real time goes, one to two days depending on thickness, so this isn’t a same-day project if you want to paint and display it right away. Painting and sealing adds another twenty to thirty minutes spread across a day or two, since you’re letting coats dry between colors.
Making This With Kids
This is a genuinely good project to make alongside kids, especially the simplified rounded version.
The rounded gnome has no fussy technique to get wrong, a lopsided hat or an off-center nose still reads as charming rather than like a mistake, which makes it low-pressure for a child who wants to shape something on their own. I’d keep the garlic-press beard step in adult hands if you’re attempting the classic version together, it takes a bit of hand strength and patience that younger kids don’t usually have yet.
Painting is the part kids tend to enjoy most, and it’s also the most forgiving step to hand off entirely, a slightly messy paint job still looks intentional on a whimsical little gnome.
Displaying and Gifting Your Finished Gnomes
Once you’ve got a few finished, there are a handful of ways to actually use them beyond a single gnome sitting alone on a shelf.

A small cluster of two or three, in slightly different sizes or colors, tends to look more intentional than one piece displayed by itself, the same principle that applies to styling most small decor objects. Grouped near a plant, on a windowsill, or along a mantel, they add a bit of whimsy without taking up much space.
These also make an easy, low-cost handmade gift, especially in a small set of two or three tied together with a bit of twine or tucked into a small gift box. A single gnome works nicely as a gift topper too, pressed gently onto a wrapped present in place of a bow.
Common Mistakes to Avoid
Attaching the hat after the base has started to firm up. Both pieces need to be soft enough to fuse seamlessly at the seam, if you wait too long, that seam becomes a visible crack risk once the piece dries.
Making the beard too thick all at once. A dense clump of clay pressed through a garlic press can be hard to attach evenly. Work in thin layers, adding a bit at a time, rather than trying to build the whole beard in one pass.
Skipping the smoothing step at the hat’s base. This seam is one of the most visible parts of the whole piece, and a rough, unsmoothed transition there is usually the first thing your eye catches on an otherwise nice gnome.
Painting before the clay is completely dry. Even a piece that feels dry on the outside can still be damp inside, especially with a thicker gnome body. Give it the full drying time before you paint, painting too early can trap moisture and lead to cracking later.
Variations Worth Trying
A gnome family in graduated sizes. Make three or four gnomes at increasing heights and display them together, this is one of the most popular ways to style a finished set, and it uses up small amounts of leftover clay efficiently.
Seasonal color palettes. The same basic shape works year-round if you swap the paint, red and green for the holidays, pastel and floral details for spring, orange and cream for fall.
A gnome with a tiny attached object. A small clay mushroom, a heart, or a little bundle of berries pressed against the base gives an individual gnome more personality and works well as a gift topper.
Magnet or ornament versions. Press a small magnet or a wire loop into the back or top of the gnome before it dries fully, and you’ve got a functional piece rather than just a display one, my Air Dry Clay Fridge Magnets tutorial covers the magnet attachment step in more detail.
Frequently Asked Questions
How long do these take to dry before I can paint them? Most gnomes take one to two days depending on thickness, a thicker body can take a bit longer, always let a piece feel completely hard before you start painting.
Can I make these with kids? Yes, especially the simplified rounded version, the classic bearded style is doable too, just expect the beard texturing step to need a bit more adult guidance.
Do I need a garlic press for the beard? No, though it’s the easiest way to get fine, even strands. Without one, you can hand-roll very thin strings of clay and layer them instead, it just takes a bit more patience.
How do I keep my gnome from tipping over once it’s finished? Flatten the base slightly before the clay dries, and make sure the hat isn’t so heavy or off-center that it throws off the whole piece’s balance.
Related Posts
If this was helpful, here are a few more from the site worth reading next:
- How to Make Air Dry Clay at Home (Easy Recipe) — the base recipe this project starts from.
- DIY Air Dry Clay Mini Pots Tutorial — a similarly quick, beginner-friendly project.
- DIY Air Dry Clay Fridge Magnets — covers how to add a magnet backing if you want a functional gnome.
- How to Paint Air Dry Clay: A Step-by-Step Guide — more detail on the painting techniques used here.
- How to Seal Air Dry Clay — the finishing step for any gnome you plan to display or gift.
- Air Dry Clay Beginner Tips — a good starting point if any of this felt new to you.
Final Thoughts
What I love about this project is how forgiving it is, a slightly crooked hat or an off-center nose only adds to the charm, gnomes are supposed to look a little whimsical and imperfect, not machine-made.
If you’re making one for the first time, I’d start with the simplified rounded version to get comfortable with the basic proportions before attempting the bearded style.
Once you’ve made one, you’ll probably understand exactly why I ended up with an entire shelf of them, it’s a genuinely quick project, and it’s hard to stop at just one once you see how different a small change in hat shape or paint color can look.